In looking back at our initial approach to logging FileMaker PSoS (Perform Script on Server) activity, I reflect back on a number of times where this has been extremely helpful. If you have come to rely on the benefits of PSoS then you also know some of its challenges — one of the biggest is debugging and monitoring how long sessions take.
Since FileMaker 16 introduced JSON, in new systems we’ve switched over to using JSON as the main way of exchanging data for parameters. Because we also use PSoS in new systems, we updated our method for PSoS Logging and this blog entry talks about the changes we made there and also restates the usefulness of this log.
So as mentioned, we update it to no longer require our custom functions for parameter passing. Those date back all the way to the six fried rice methods. After more than a decade of fine use, we finally retired them. Now in any new systems we build, we pass parameters using JSON.
It never ceases to amaze me how we can always improve our code with new ways of thinking.
There is one custom function that is at the heart of the way this works, I think it is very forward-thinking in its architecture.
Credit Steve Senft-Herrera (aka “Steve”) of Beezwax for redefining things using this approach. And Arnold Kegebein for technical review and corrections.
LogPsosParameter ( StartOrEnd )
Let([
   $_psos_logging_token =
   Case(
      StartOrEnd = "start"; Get( UUID );
      StartOrEnd = "end"; $_psos_logging_token
   )
];
JSONSetElement( "{}" ;
   [ "ACTION"; StartOrEnd; JSONString  ];
   [ "SCRIPT"; Get( ScriptName ); JSONString  ];
   [ "PARAMETER"; Get( ScriptParameter ); JSONString  ];
   [ "TOKEN"; $_psos_logging_token; JSONString  ]
)
)
NOTE: We store our token in a local variable scoped to the current script. This means we can set it at the start of the script, and still retrieve it at the end of the same script. The custom function builds the JSON object at the time it is called.
The first time called with Start, it builds the ID for the script. When it is called at the end it can then use that variable to locate and update the PSoS log record. The nice enhancement that Steve made in the custom function is that it doesn’t have to return the PSoS ID it is working with — the ID is in a variable that both the script and custom function have access to that save variable. One would think that defines the laws of variable scope, but no, it works and it is great. And Steve is a genius!
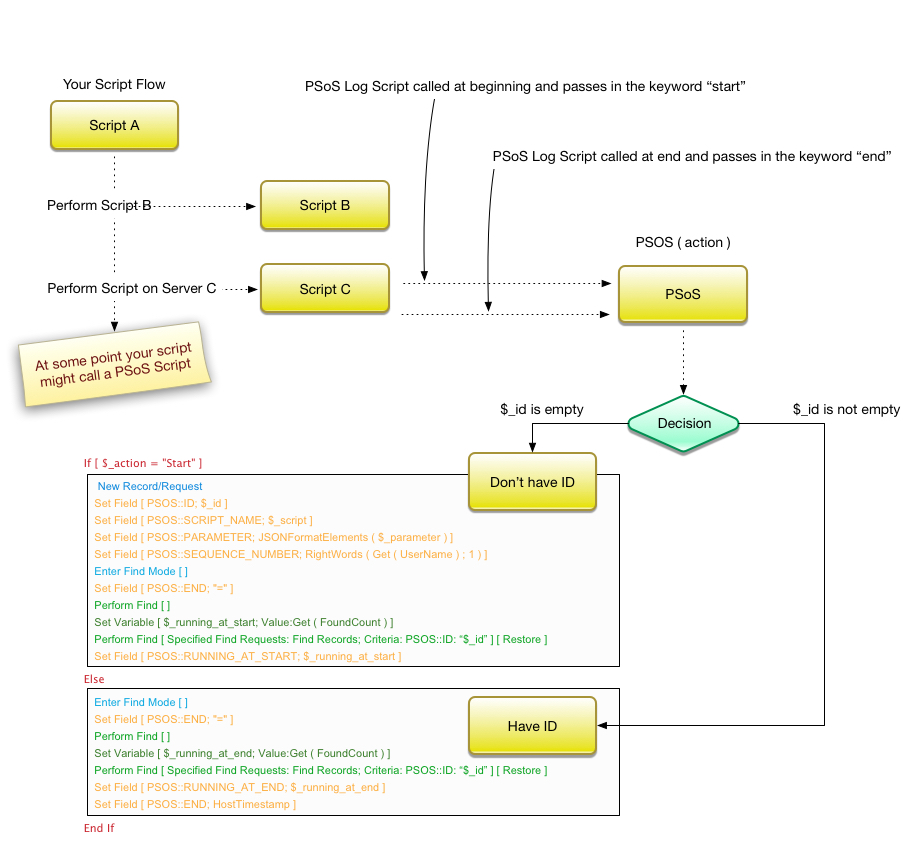
Here is what the PSoS script looks like in action:
Paired scripts
There is another design choice that we make when relying on PSoS and that is to have scripts work in pairs. So, we have a local script that might make sure that everything is OK to run the script on server. For example, often times we’ll do validation on the date before it gets set to the server. If everything is good then we’ll call the script via PSoS. Sometimes we’ll want to wait for the result sometimes we don’t. In either case, I find it helpful to separate them out into 2 parts.
Some developers like to have the patter of a single script being self-calling. I find that too confusing when you are trying to debug it. Just my preference!
NOTE: There are limits to how many concurrent PSoS sessions you can have. That setting can be found on the Sever Admin –> Database Server –> FileMaker Clients.
Maximum Simultaneous Script Sessions: ###
It allows you to set this number to a very high number, but good rule of thumb is to not set it more than double the number of cores that you have.
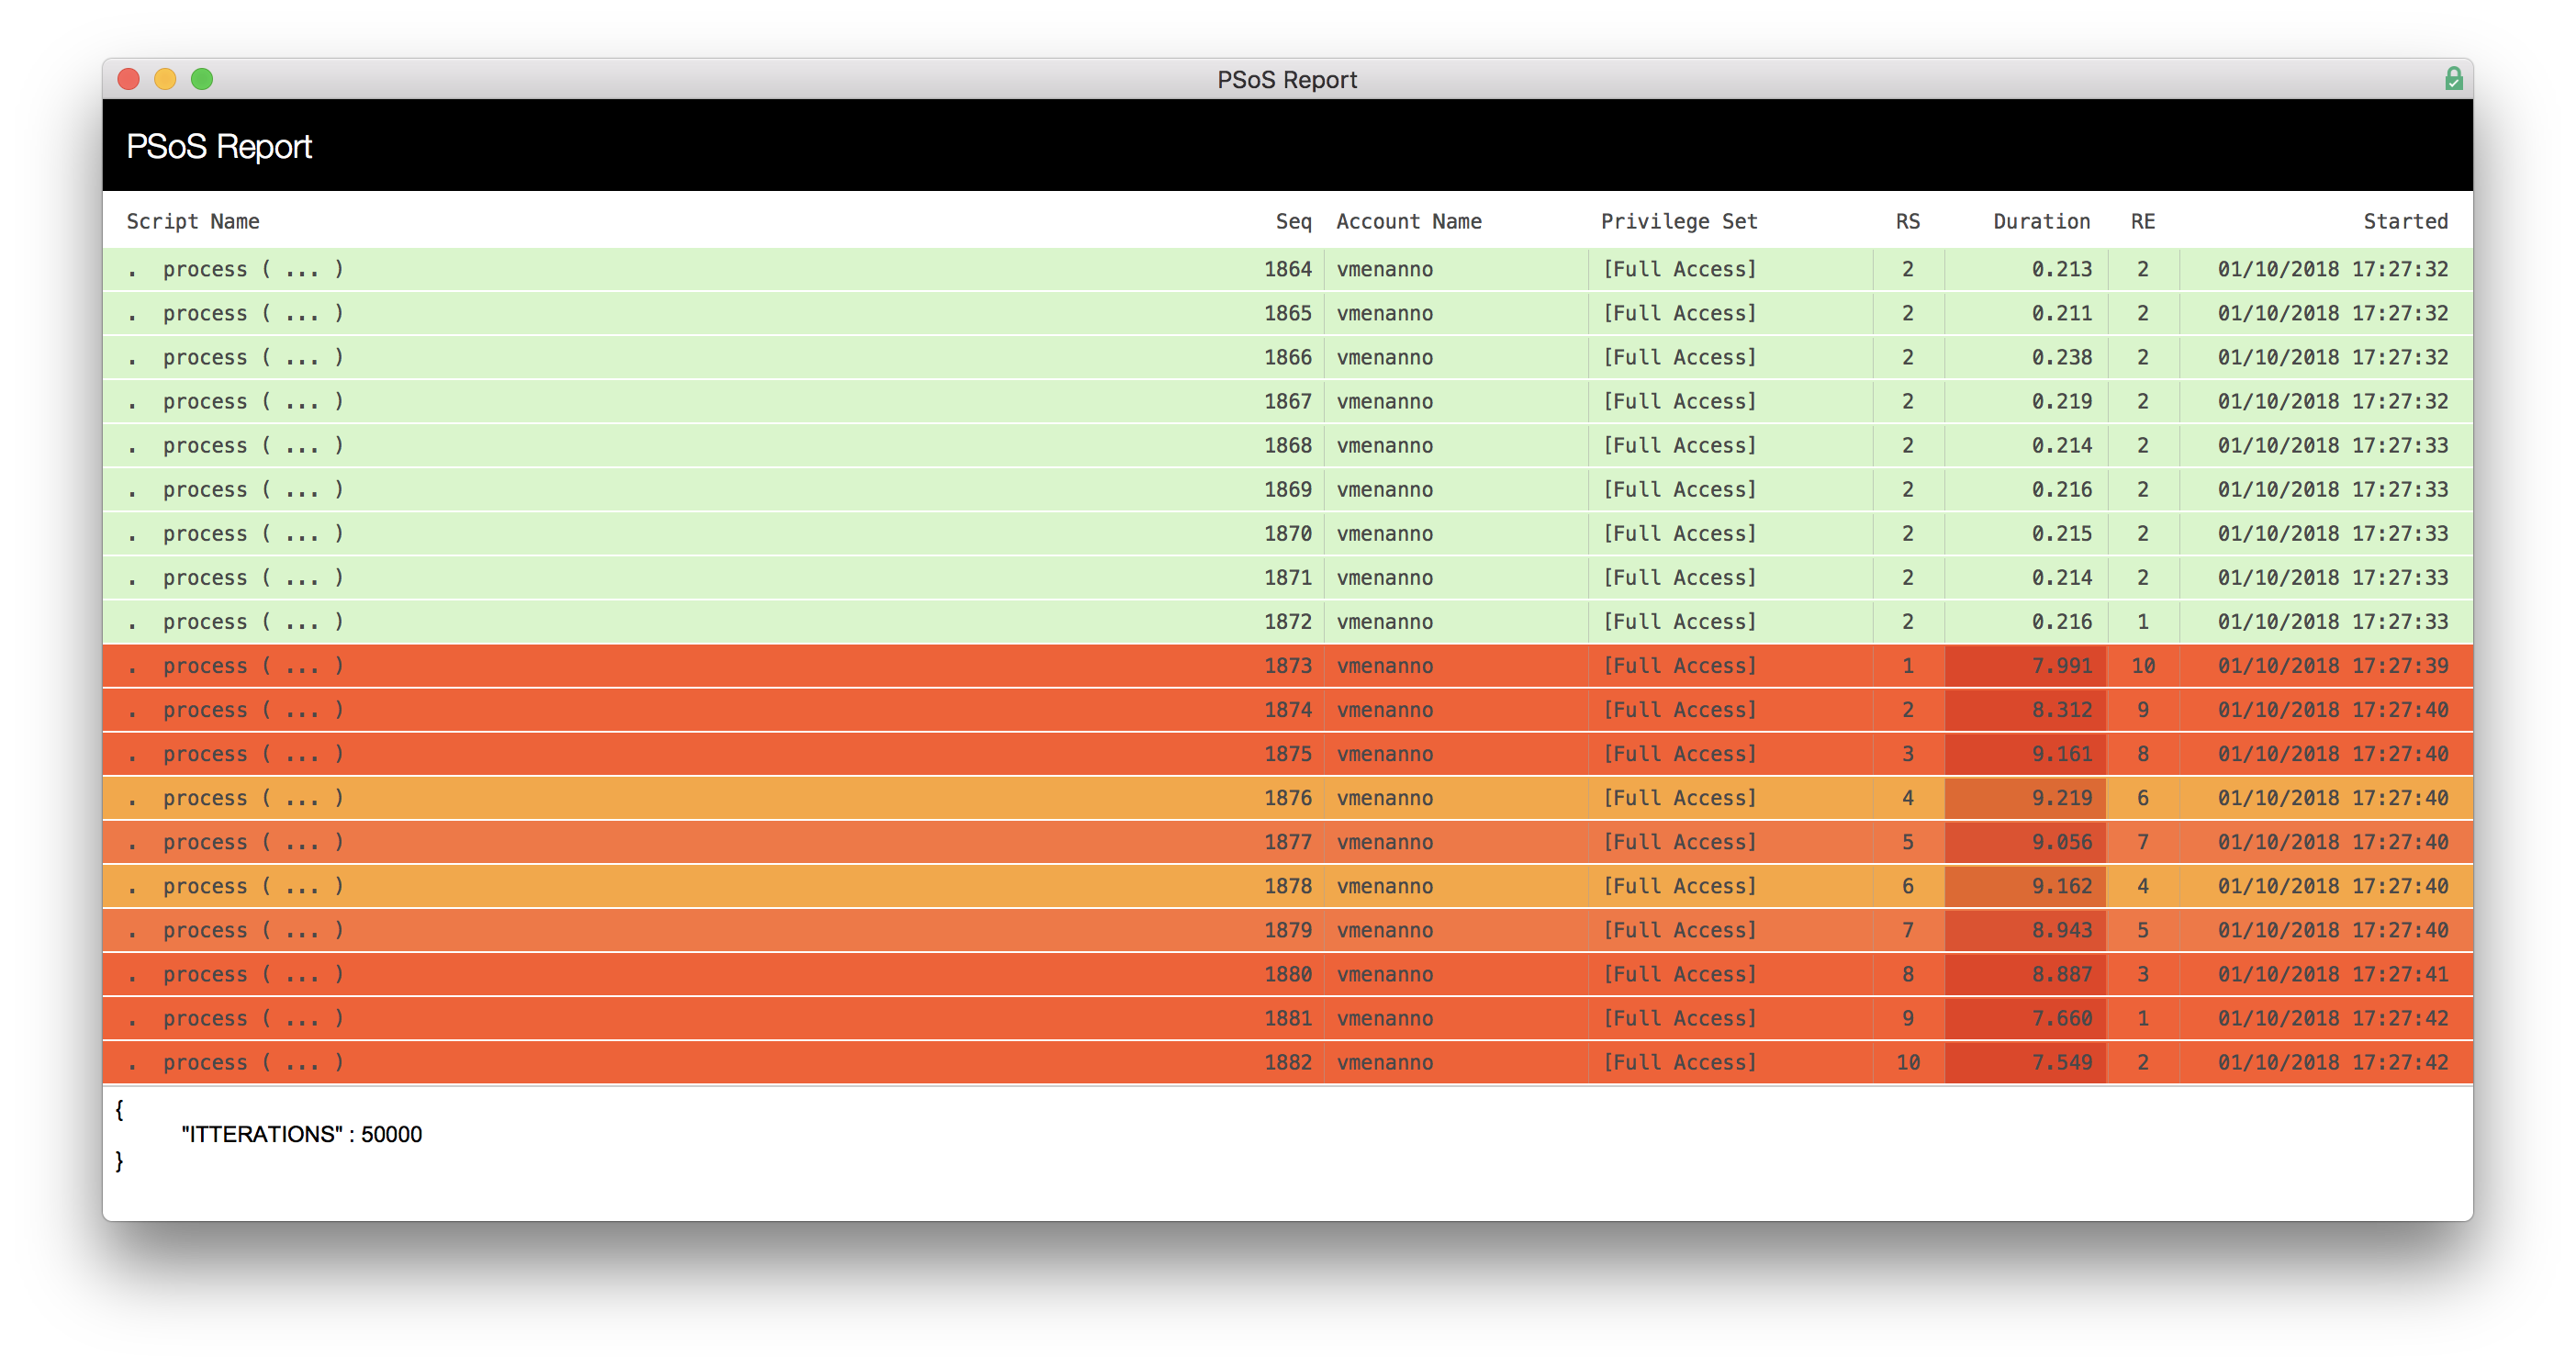
Exploring the log
Once wired up and you want to explore the log, here is an example of what it looks like. There are 2 important columns of information: RS and RE. RS means the total number of scripts running at the start of this script, and RE means the total number of scripts running PSoS at the time this current script terminated. So, in the example below you’ll see a section primary in green. What this tells you is that you maybe have a runaway script.
What it can be helpful at telling us is how long these scripts have been running concurrently.
For this log to work it needs to have 3 custom functions, 1 table, 2 layouts ( one for the PSoS Log and one for the PSoS report ), and 1 script. Let’s look at how this works. The other thing that we recommend for PSoS logging to work reliably, would be to follow a pattern called Single Pass Loop. What this pattern allows you to do is guarantee that your script has one entry point and one exit point. This is important for PSoS logging: if you can guarantee that you only have one exit, then you can always call the terminating part for doing PSoS reliably. Including the calls for PSoS Logging, here is what the basic structure of the script would look like.
Perform Script [ “PSOS ( action )”; Parameter: LogPsosParameter ( “Start” ) ]

# \\\\\\\\\\\\\\\\\\\\\\\\\\\\\\\\\\\\\\\\\\\\\\\\\\

Loop

THIS IS WHERE YOUR SCRIPT DOES WORK
Exit Loop If [ True // End single-pass loop ]
End Loop
# //////////////////////////////////////////////////

Perform Script [ “PSOS ( action )”; Parameter: LogPsosParameter ( “End” ) ]
Implementing this into your solution is done with a few easy steps:
- Copy the 3 custom functions
- Copy the PSOoS table ( the default layout will be referenced by the script )
- Create a new layout named “Report PSoS”
- Copy the PSoS script folder ( it should copy over the folder and the scripts )
- You are ready to start integrating PSoS Logging into your solution!
Enjoy! And please let us know if you have any questions or need any help.
Demo File
Account: Admin
Password: PSoS
Header Image Credit: NASA/JPL/Space Science Institute
One thought on “Logging PSoS Activity: Episode III – Return of the JSON”