“Hey Siri…Ask FileMaker…”
This story started when we explored iOS Shortcuts to the FileMaker Data API. As we continue to automate tasks by mixing together iOS apps, content on mobile devices and web APIs plus FileMaker, let’s add to our workflow using one of the most powerful functions available to iPhone and iPad users: Siri.
Siri to FileMaker, an example
In this example, we will pretend to be the Sales Manager who wants to use voice commands to ask our virtual assistant (Siri) about the status of customer orders managed in a FileMaker solution. And we’d love to ask Siri to send reports that show customer order trends over certain time periods.
Some questions we might ask our virtual assistant include:
- Get status order 1120
- Get the status of the order number 1115
- Give me the status of the order reference 1323
- How many orders did I get today?
- How many orders did I get yesterday?
- How many orders did I receive yesterday?
- How many orders did I receive today?
- How many orders did I receive last week?
- How many orders this month?
- How many orders this year?
- How many orders last month?
- Orders today
- Etc.
What we want from our virtual assistant is a quick answer to the question asked, and the ability to request and receive a specified report via email, as PDF or Excel document.
Here’s a video showing how it all works:
Hey Siri…Ask FileMaker…
Important note: At the moment, this whole technique works with FileMaker 17 Server on Windows. It’s not working with FileMaker Cloud nor with FileMaker 17 Server on macOS. Stay tuned for updates, once we identify a reliable solution for these issues!
Shortcuts, revisited
To review, a shortcut is a set of tasks, built in multiple steps, managed through the Shortcuts app on iOS. The building block of a shortcut is called an “action”. Each action is a single step in a task, and each shortcut consists of one or more actions.
Documentation for the Shortcuts app (What’s a shortcut?) gives an example of building a “Surf Time” shortcut: grabbing the surf report, giving an ETA to the beach and then launching your surf music playlist.
Our example task in iOS Shortcuts to the FileMaker Data API involved automatically uploading an image, from the Photos app on your iPhone, into a FileMaker container field.
This time our example will retrieve customer order data & reports, with the shortcut triggered using Siri. This is a simple example—really just one task at a time. You could certainly mix in other tasks and related actions using shortcuts.
Here’s the example file and shortcut for you to download: Siri FileMaker Shortcuts
Step 1 – Authentication
Compared to the previous example, in this case, the credentials to authenticate to our FileMaker server via Data API will be entered directly in the shortcut in order to make the human-machine integration easier.
Unfortunately, a safer way to save the credentials (or to use Keychain on iOS) is not available at the moment, so the possible solutions to this issue are:
- save the credentials in a text file;
- save the credentials in a Dictionary (JSON);
- Or, save the credentials in a file on iCloud (Get File), which can be called up by the Shortcut.
Note: The best solution would to save the credentials in a structured file (JSON) on iCloud, by which it would be possible to take advantage of a better level of protection guaranteed by the service itself.
For this example, we opt for a Dictionary, where our JSON object will contain all the information needed to authenticate the user and to configure some options during the following procedures.
{

“host”:”my-host”,

“username”: “admin”,

“password”: “admin”,

“file”: “DAPI”,

“layout”:”Requests”

}
Let’s also add some default parameters that we want to send to our application during our requests:
{

“host”:”my-host”,

“username”: “admin”,

“password”:“admin”,

“file”:“DAPI”,

“layout”:”Requests”,

“mail”:”your-sales-mail@my-mail.com”,

“code”:”your-sales-code”

}

Once the data entry is completed in our dictionary, save its contents in a variable (settings).
Dictionary + Add to Variable
Step 2 – Dictate Text
In this step we want our virtual assistant to record our request and to translate it into text that we can send to our application. We, therefore, use the Dictate Text command and configure the language we intend to use and how we want to manage the end of the recording.
Select as language “English (United States)” and set the Stop Listening selection to “After Pause”. In this way, as soon as the request finishes, the action can continue without having to wait for our command.

Then, save the dictated value in a variable (sentence).
Dictate Text + Add to Variable
Step 3 – Variables
Set a variable from a text block with the URL value of our server where the FileMaker Data API is active (remember to use an SSL certificate on your FileMaker Server!)
Compared to the previous example, this time we want to make better use of the variables, extracting from our previous variable (called “settings”) only the host property.
To do this we need to concatenate text with the host property of the settings variable. When entering data (when the keyboard is visible):
– click on the Variables button;
– select the settings variable;
– indicate that you want to work with a Dictionary (as Dictionary and Get Dictionary);
– press Get Value for Key;
– enter the property value that we want to extract from the settings (JSON) variable, host;
– confirm.
Lastly, add the text created to a new URL variable.

Thanks to this selection feature, we can better organize our code and our variables.
Note: Remember these steps, because they will be used again later in other parts of this post.
Text + Add to variable
Step 4 – Encode
Concatenate username and password separating them with a “:” and then perform an encode in base64, to manage the Basic Authentication provided by the Data API.

As in the previous case, we will obtain the values for the username and password properties from our settings variable.
Text + Base64 Encode
Step 5
Set the URL to log in via Data API (URL/fileName/sessions).
Get the value for the fileName property from our settings variable.
Make an HTTP POST call to receive the token and authenticate the user.
URL + Get Contents of URL
Set as Method: POST and as Headers:
Content-Type: application/json
Authorization: Basic Base64 Econde (value from our previously created variable, called via the magic variable button)

Step 6
Get the response from our endpoint, parse the received object and save the token to a variable.
Get Dictionary Value (response) + Get Dictionary Value (token) + Add to Variable

Note: enter the If statement to check if the token variable exists.
Step 7
Set the URL to make the record creation request via the Data API (URL/fileName/layouts/layoutName/records)
Let’s get the value for the fileName property and the value of the layoutName property from our settings variable.
Make an HTTP POST call to receive the ID of the new record created.
URL + Get Contents of URL
Set as Method: POST and as Headers:
Content-Type: application/json
Authorization: Bearer token

In the Request Body, select JSON as a type of request.
Click on Add New Field to add a new property called fieldData of Dictionary type, click on “0 items” and add three new text type properties:
sentence, with the value of the sentence variablemail, with the mail value extracted from the settings variablecode, with the code value extracted from the settings variable


Finally, add a new field to our Request Body called script (text type) and insert the value “Dispatch” in the related field.
Step 8
Get the response from our endpoint, parse the received object and save the value in a variable called response (the data returned is a JSON = Dictionary).
Get Dictionary Value (response) + Add to Variable

Step 9
Select our newly created response variable using the Get Variable command and, as previously done (Dictionary), derive the value of the scriptResult property returned from the call.
Assign this value to a new variable called result (the data returned is a list).

Repeat the same procedure to obtain the value of recordId from the response variable and save it in a new variable ID (the data returned is a Number).
Step 10
Select our newly created variable result using the Get Variable command.
Use the Split command to separate our list by indicating “New Line” as a separator.
Then use the Get Item from List command to obtain the first value from our list and assign it to a variable called error.
This variable will contain a number that will indicate whether the request produced a foundset or not.

Repeat the same procedure to obtain the last element from our list, which we will save in a variable called a phrase.
This variable will contain a sentence generated by FileMaker based on the result of our request.

Step 11
Save our sentence in a text block.

Step 12
With the variables defined above, save in our iCloud (or Dropbox) a text file containing the text of the phrase received as an answer to our question (Append to File).
Generate the name of the file in a unique way, in order to maintain the history of requests by using the ID variable previously created.

Step 13
Select the Speak Text command to let our virtual assistant read the statement returned from our FileMaker solution.

Step 14
Recall the variable error to evaluate its content and manage a new iteration with our virtual assistant.
If the variable error contains a value equal to 0, it means that our request was successful and generated a foundset that can be processed later to generate a report in PDF or Excel format.

Create an If block and evaluate if the error value is equal to 0.
If so, compose the question our assistant can ask us later.
Step 15
Ask our assistant to read the question just generated.

Step 16
In this step, we ask our routine to listen to the user’s response.
If the word Yes is found in the text of the answer, a new If block will be opened to manage a new sequence of actions.

Step 17
Create a new request by sending the affirmative answer to the server.
To do this you will need to set up the call to allow modification of the record previously generated to handle the request.
Set the URL to request the upload container via the Data API (URL/fileName/layouts/layoutName/records/id)
Make an HTTP PATCH call to receive the ID of the new record created.
URL + Get Contents of URL
Set as Method: PATCH and as Headers:
Content-Type: application/json
Authorization: Bearer token
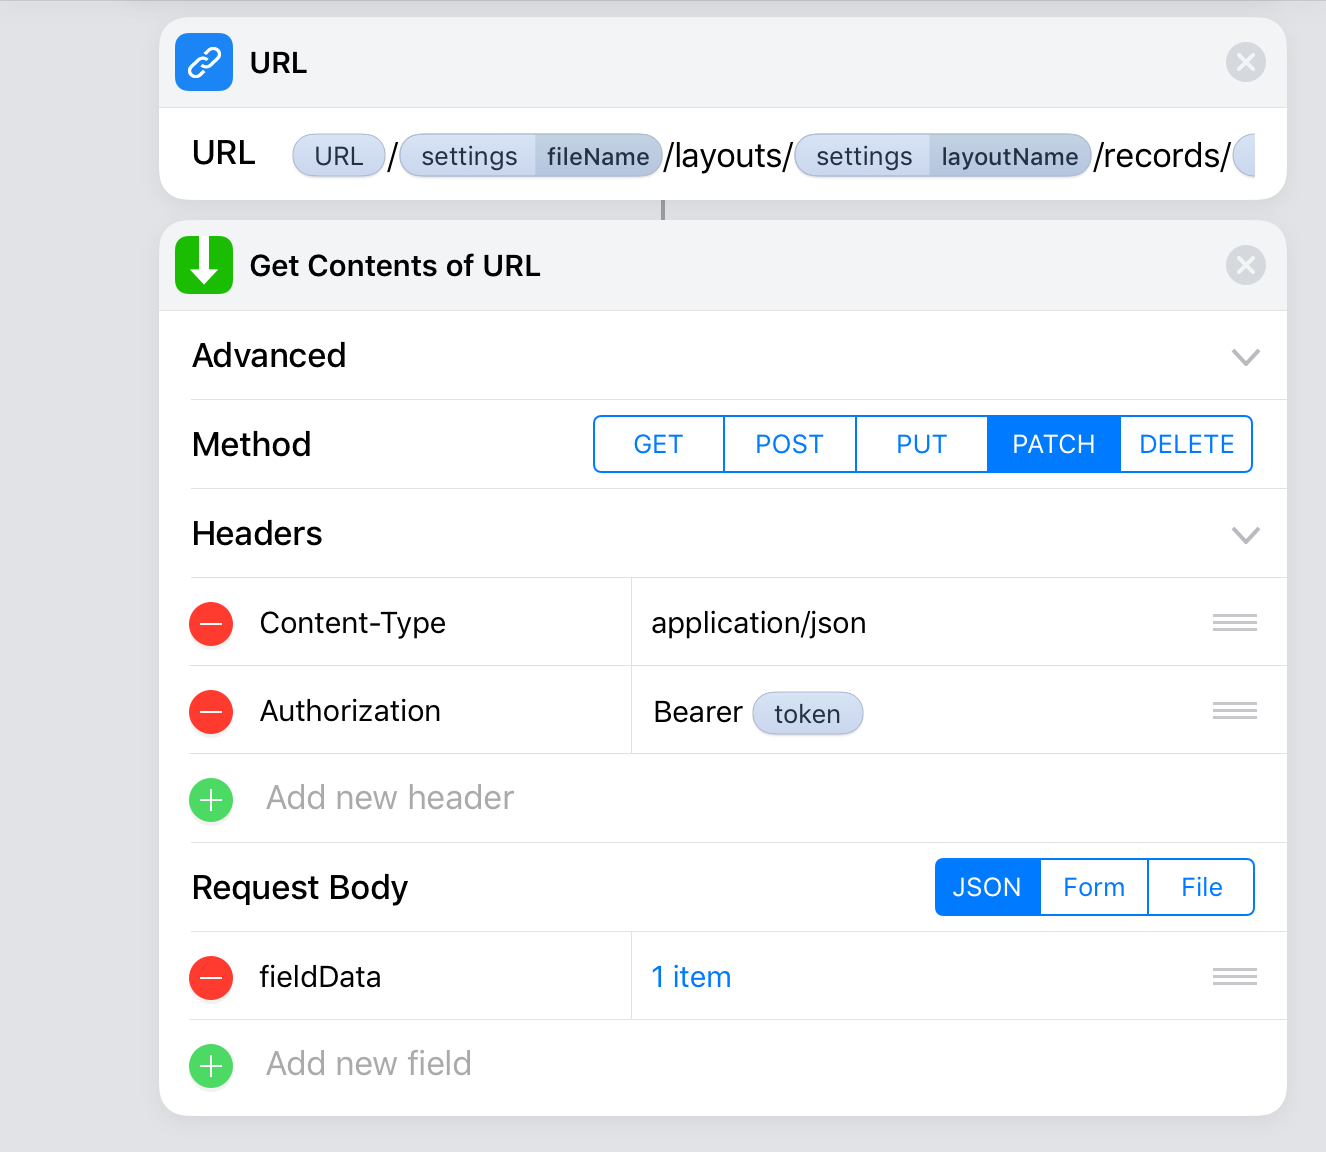
In the Request Body, select JSON as the request type.
Click on Add New Field to add a new property called fieldData of Dictionary type, click on “0 items” and add a new number type property:
- hasReport, with the value of 1

Step 18 – Response
Create a response sentence that will inform the user of the acceptance of the new request. This will then be processed by FileMaker, as well as let our virtual assistant read it.

Step 19
Set the URL to log out via the Data API (URL/fileName/sessions/token)
Make an HTTP DELETE call to delete the session on the FileMaker server for the logged in user.
URL + Get Contents of URL
Set as Method: DELETE and as Headers:
Content-Type: application/json

How to make Siri recognize our vocal command
In order for us to freely use our newly created routine without opening the Shortcuts app and using the “Hey, Siri” function, we will need to add the shortcuts to Siri.
Click the Setting button located at the top right of our work area and click on “Add to Siri”.

Record the trigger phrase that will launch our routine.

On the FileMaker side of things
So far we have only talked about Shortcuts. But what about our beloved FileMaker app?
What’s really going on behind the scenes with FileMaker? There is nothing crazy. We are the architects of the intelligence that will have to handle verbal requests and turn them into answers and data.
At the voice prompt, a record is created in a temporary FileMaker table (Requests) and at the same time, a script that analyzes the newly inserted sentence is executed.
The script consists of a series of steps that evaluates keywords in the sentence thanks to the PatternCount function, and save conditions in variables that will then be grouped together thanks to the JSONSetElement function, in order to create a structured statement that allows you to more efficiently manage activities in FileMaker, such as searching and creating reports.

Conclusion
Shortcuts, on iOS, are very interesting and open up new opportunities for FileMaker to integrate with third-party applications, content, and web APIs. Additionally, the ability for Siri to understand our requests to trigger shortcuts allows us to manage tasks by voice. We might even say this introduces a small bit of “artificial intelligence” into our FileMaker-based solutions — and perhaps even more than that in the future, as Shortcuts, Siri, iOS and FileMaker keep moving forward.
“Hey, Siri…Is this the kind of future a Workplace Innovation Platform like FileMaker can offer?” Hope it’s so!