Script transactions in Claris FileMaker are finally here, but wait! Haven’t we done “transactions” in FileMaker for a long time? Yes and Yes. But script transactions are different and the main advantages, that I see, are the possibilities of simplifying code and improving solution performance. I’ll elaborate on these in this post. And, of course, there is also the inherent benefit of doing things transactionally … all or nothing is the law of the data.

Even as script transactions arrive, there are two main challenges that as a community we’ll need to solve for. First, there is the fact that these are scripted transactions, NOT user transactions. This is a distinction I will cover below. Second, the other main challenge is that FileMaker aggregate functions can’t work on uncommitted changes.
In most cases the latter isn’t a problem. Real-world workflows and data flow mostly tolerate the eventual integrity model. For example, paying for a cup of coffee ☕️, you give them your money💰, then they pour your coffee, sooner or later. Depending on how busy they are, this might only be a three-minute difference. Or you get off a flight ✈️ to go collect your luggage 🧳, and you wait at baggage claim but just for a bit. The biggest exception here is in some financial or inventory solutions, when you need that transactional integrity where both sides are resolved at the same moment.
Claris Delivers Script Transactions in FileMaker 19.6
During FileMaker 19.6 beta testing there was a great deal of discussion about the new script transactions, with plenty of innovative ideas, feedback and lots of open questions. This was especially true about solutions where there is significant complexity. I think we’ve only scratched the surface and as a community we’ll find our path (😁…like we always do). I encourage you to experiment and learn what is possible beforehand — and, more on this below.
I am super thrilled we finally have script transactions and can’t wait to see how our solutions can improve both for us as developers and for our customers providing more efficient and reliable solutions.
Ghosts of Transactions Past…
We have had the ability to manipulate data transactionally since FileMaker Pro 7 was introduced, almost 20 years ago. Back then, we discovered that manipulating a related record would also lock the parent record. This simple discovery led the way and we improved on it, by creating a “transaction record” and controlling all data entry from that point of view. Facilitating the commit or revert all the changes.
Controlling the ability to create, edit and delete related records meant that we needed to have the plumbing necessary to reach those related records. This meant that we needed relationships and table occurrences. And that meant more code to maintain over time. And more more table occurrences also meant that it takes a little more time to open your solution. We got used to this and accepted it for many years.
Meanwhile, we also figured out audit logging, synchronization, replication, conflict resolution and many other database tactics that were needed to build robust solutions, with enough integrity to feel safe in what we were doing…while also learning there could be better ways in the future.
…and Script Transactions Present
The good news is that if you built your solution to support FileMaker pre-19.6 parent-record locking “transactions”, then those transaction should still continue to do their job. However, with the release of FileMaker 19.6 we now have native script transactions. Three new script steps and it’s only through a script that this type of transaction can work. This is an important distinction to be made. They are not user transactions. One does not simply walk into FileMaker Pro and turn on a setting that says “Now you are in a transaction mode, so do anything you want, and if something fails you can revert it.” The new transactions have to be controlled by a script. This is going to be a tricky bit for most to fully utilize them out of the brand-new box (but we’ll try!).
The 3 new script steps are…
Open TransactionRevert TransactionCommit Transaction
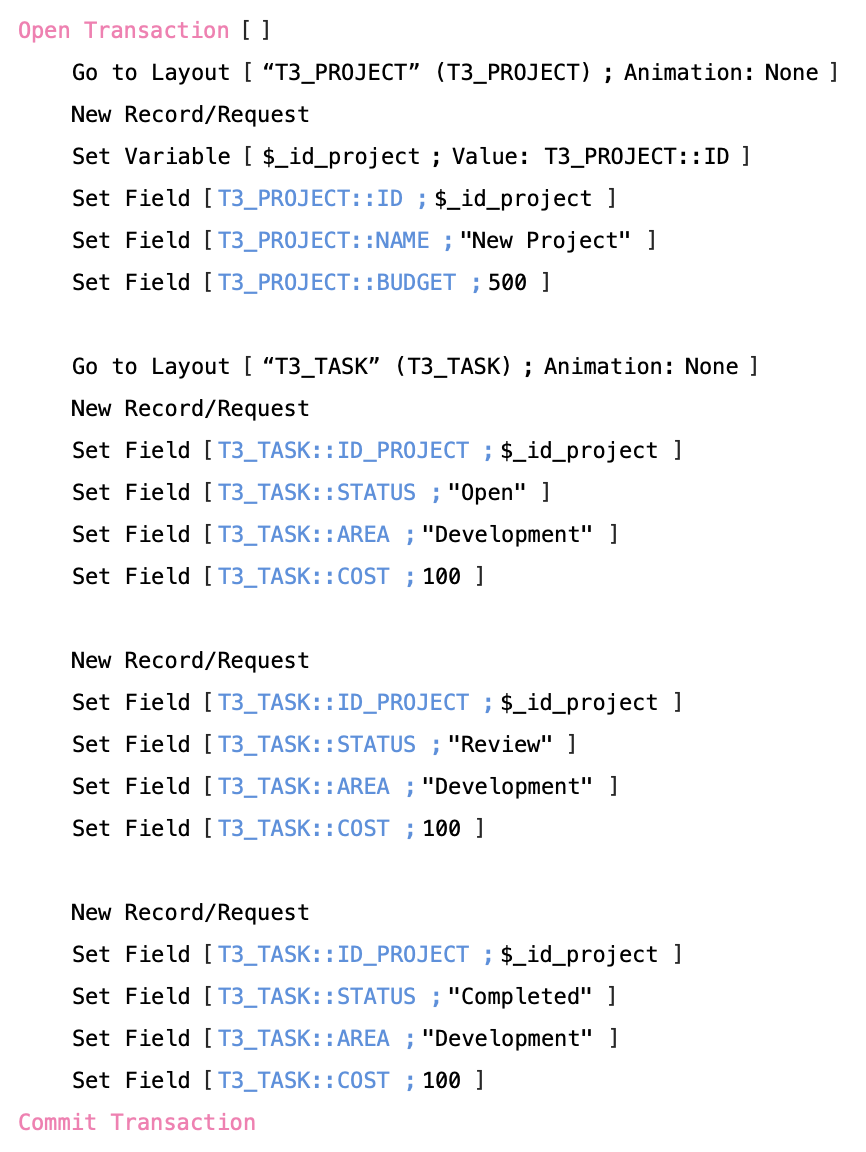
You’ll notice as in the image that Open Transaction and Commit Transaction will nest ➡️ the content just like If/End If and Loop/End Loop. The section that starts with Open Transaction [ ] and ends with Commit Transaction [ ] I’ll refer to this as the transaction block.
Inside the transaction block is the only place you can have the Revert Transaction step (at this time).
Now before you run off and just add Open Transaction and Commit Transaction to your scripts, there are some rules you need to understand. I’d like go back to the days when FileMaker 7 was released, to help understand why it’s important to explore script transactions in depth.
Convert or Rebuild?
I remember when FileMaker 7 came out, many people wanted to start using it right away. They converted their files and just kept using what they had originally programmed for years and years without learning what is different about FileMaker 7. People were wondering whether they should convert and just keep using everything they had built except now under the FileMaker 7 roof. Or, should they rebuild their solutions from scratch?
In some solutions, developers had invested many, many years of work. Rebuilding these from scratch was a daunting task. So what to do? Convert and be left with a legacy of code to support? That’s not to mention that back in pre-FileMaker v7 days each file was its own table. So, you would end up with multiple database tables converting into multiple files (not ideal).
As FileMaker 7 and 8 and beyond came out, the best advice in those years was when Danny Mack suggested, don’t convert nor rebuild to start:
“Converting a complex solution may be confusing…It is highly advisable to build some mastery of the new [FileMaker Pro] application by first building a new solution. Once you have a reasonably good understanding of the new environment, then it becomes appropriate to consider the approach to take to migrating an existing solution.”
– Upgrading to FileMaker 8:
Migration Foundations and Methodologies
Once you understand what is possible, then you can choose your path.
I found my path after some humbling discussions with customers where I was trivializing the rebuild efforts. Only after experience building several solutions did I find a common middle ground for refactoring the past into a newly-minted solution.
Now that we have Open Transaction and Commit Transaction, and we can script as a transaction block, I think the same advice would be prudent. One should not simply add these 2-3 new steps into your scripts without understanding their capabilities and limitations. So, let’s learn more about the new power of script transactions that we now have available to us. Let’s start with some of the basics.
The Basics
First Rule of Script Transactions: Only a single transaction can be running at any one time.
Within your transaction block you can call other scripts and anything in data manipulations that happen within the transaction block. Be it in the first script or any sub-script, it is all part of the transaction. If any of the scripts called while you are already within a transaction block try to open another transaction (while the first transaction has not yet completed), then you’ll get the following error:
[3] command is unavailable (for example wrong operating system or mode)
You can also use Get ( TransactionOpenState ). This new function returns 1 (true) if currently in an open transaction and 0 (false) if not currently in a transaction.
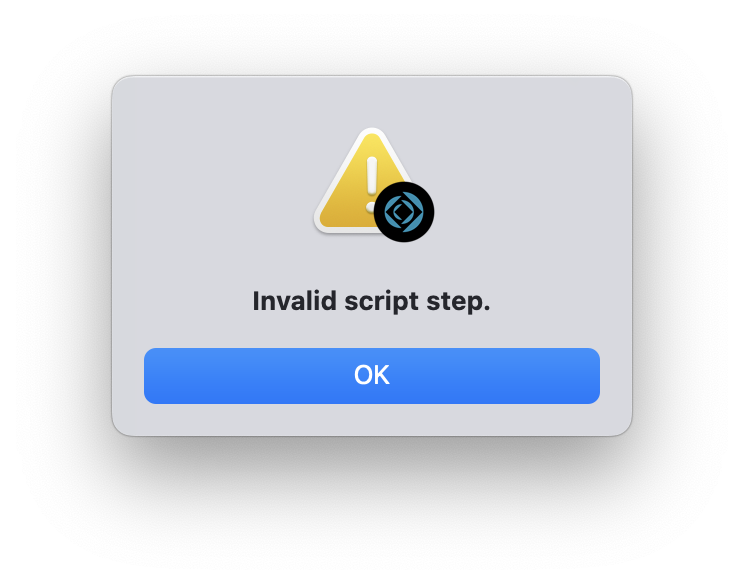
Note: FileMaker won’t let you save a script where you have nested transactions. This is something you can do with If and loops but not something you can do with transactions steps.
You can’t paint yourself into a hole this way as it will prevent you from saving your script.
If you try to save your script you’ll be presented with a warning dialog, with the message of “Invalid script step.”
The Revert Transaction step also has to be within a transaction block. This is unfortunate, I know, because you could have a controlling script that opens the transaction, then use any number of sub-scripts that manipulate data. If at some point during those sub-scripts some problem is detected and you want to call Revert Transaction, you won’t be able to include this step independently. You will get the same error as mentioned above, “Invalid script step.”
In the future, it would be great to be able to add Revert Transaction anywhere we need it. If there is no active transaction running and it comes across Revert Transaction, then it could just skip over it. Much like when it encounters Commit Records/Requests or Revert Record/Request script step inside a transaction block. “Did I read that correctly?”, you say. Yes, that is right… if you have those steps within a transaction, they basically don’t have any affect/effect. That Jedi mind trick won’t work over here! 🛸
In the meantime, if your script encounters a data error or a security error that will abort the transaction, and return you to the transaction block put you on the Commit Transaction step, which will be the next step that gets executed. I’ll share more about what types of things cause it to abort the transaction below.
Any steps except Open Transaction and Commit Transaction can be places inside the transaction block, but there are subtleties to pay attention to. For example, as I mentioned Commit Records/Requests or Revert Record/Request will not work inside the transaction block. They are just disregarded and don’t even return an error.
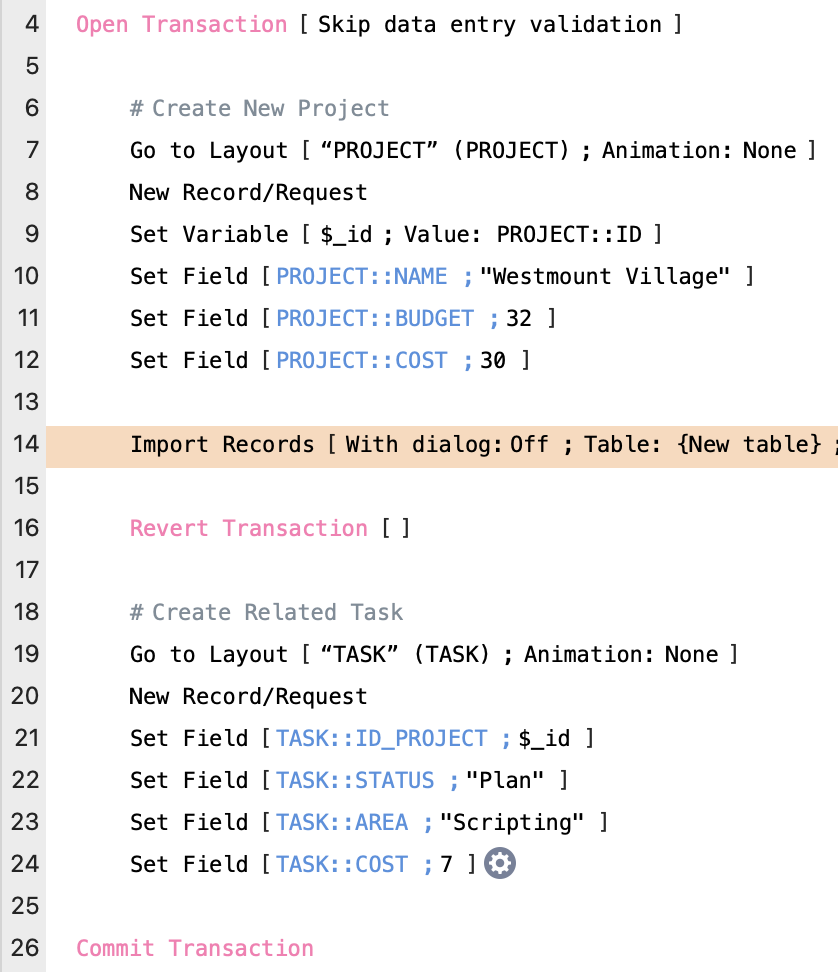
If you use an Import script step inside a transaction block and your Import script step creates a new table…the new table and layout that would normally get added are also removed if you end up reverting your transaction.
If, on the other hand, you are not importing into a new table and just adding data to an existing table, then aborting the transaction will end up removing the imported records.
However, it is worth pointing out the normal behavior when importing is that you automatically switch to the import set. If you abort the transaction right after, then you’ll end up with zero found records and lose the found set you originally started off with. So, even though reverting your transaction means that your data state returns back to the way it started, this is not the case with your found set. It is good to be aware of these nuances, as this behavior could lead to unexpected data changes. More testing and exploring is necessary.
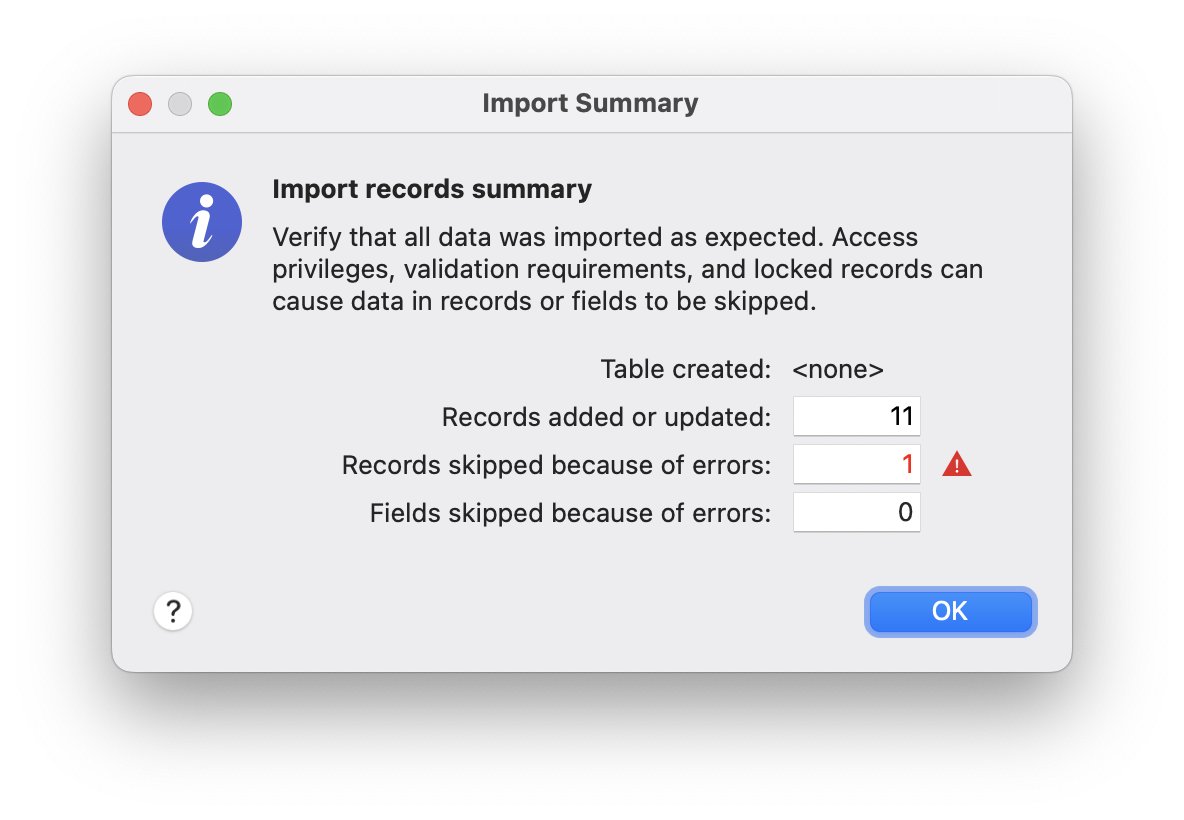
One more thing: When you use the Import script step within a transaction block it won’t show the Import Summary dialog, which normally shows up at the end of an import.
Only One Window
Another very important point is that the transaction happens in the window that exists when the Open Transaction step is executed. Any data operations in a different window, either by switching to a different window, or by creating a new window, do not become part of the transaction.
Let’s say your script calls a New Window step within the transaction block. Any data added, deleted or altered after you called the new window script step is not part of the original transaction. This means that if you then decided to revert the transaction, anything that happened within that new window script step would NOT get reverted. This is a very important point to understand.
With only one transaction running at a time, all the steps run from the context of the window that exists when the Open Transaction step is executed. This also applies to any script that runs, whether the script is a scheduled script or a script that is invoked via PSoS or even a script that is run by the Data API. All the same rules that apply.
You can still move to another layout, as well as create, edit or delete records on other layouts. It’s just that you have to avoid using a new or different window. It all has to happen within the window where the Open Transaction step started.
Revert Transaction
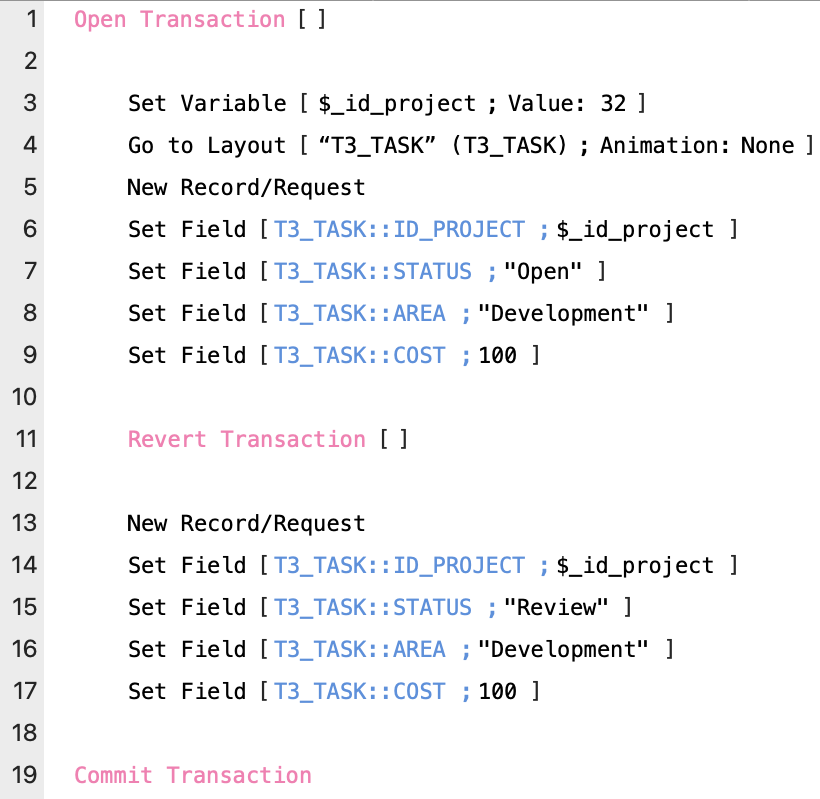
The Revert Transaction step allows you to define an optional calculation, with a boolean result. Empty or True will execute revert.
It will revert the data to the state before the transaction started. Another important point is that it will jump execution to the Commit script step and no error will be returned when the Commit script step is executed.
So just the Revert Transaction script step inside the transaction block without a calculation will revert the calculation and all changes will be reverted and things will be as if they never happened. (Take the blue pill, Neo!).
Note: False or zero will execute the step but no reverting will take place, and the script will continue with the next steps.
This allows us to place business logic in this calculation, maybe just before we execute the Commit Transaction step to determine if we need to Revert Transaction.
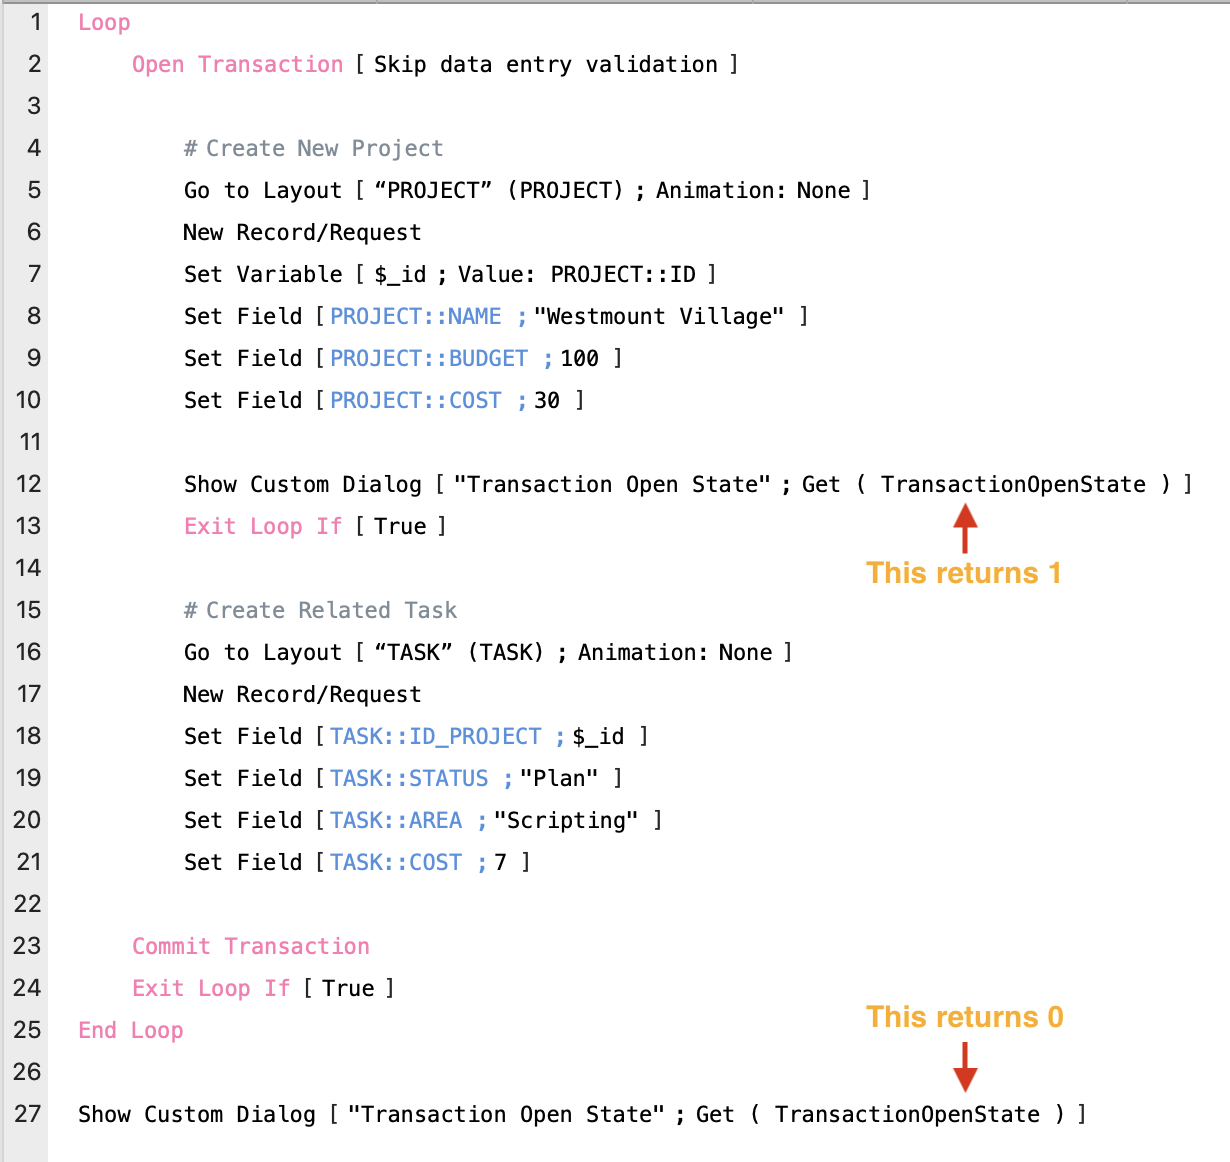
If the script is aborted before it reaches the Commit Transaction step, the transaction is implicitly aborted. For example, you could exit the script you are currently running within your transaction. Or you could have a sub-script also call Halt Script and that will also implicitly abort your transaction.
The image shown illustrates an interesting situation, and something my coworker, Alec, pointed out to me during testing. Here you have a single pass loop and within in it you have a transaction block. In this case getting the script execution to continue outside the transaction block will also cause an implicit abort.
Going into a transaction can also cause the transaction to abort even before it begins. If you are sitting on a record that hasn’t been committed it will first commit the record you are on before starting the transaction. If for some reason committing that record fails then it will throw an error, and will automatically jump to the Commit Transaction step. A validation error could cause the record to not be able to be committed and thus, even before the transaction gets started it is aborted.
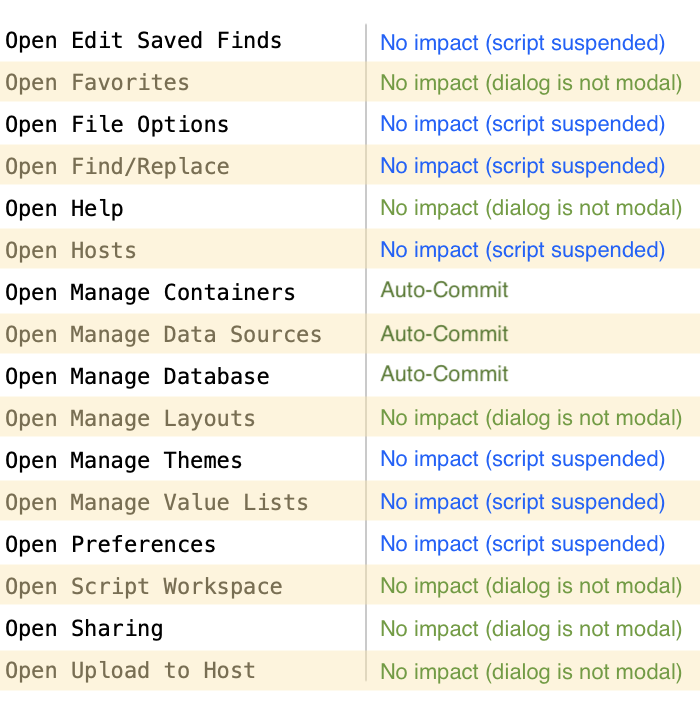
On the other hand there are some steps like the ones in the list shown here that will also cause the transaction to auto-commit, and others that will suspend the script temporarily.
For example calling Open Manage Layouts has no impact on the running of your script as the dialog is not a modal dialog. However executing an Open File Options script step will cause your script to be suspended while the dialog is in the foreground. This dialog is a modal dialog.
Of these steps that I looked at only three of them, Open Manage Containers, Open Manage Data Sources, and Open Manage Database, are ones that will auto-commit your transaction even before you get to your Commit Transaction step. This is very interesting behavior, and I am not quite sure yet about the ways that these differences can be used.
Other steps like Re-Login or Close File [external data source] are also steps that will auto-commit.
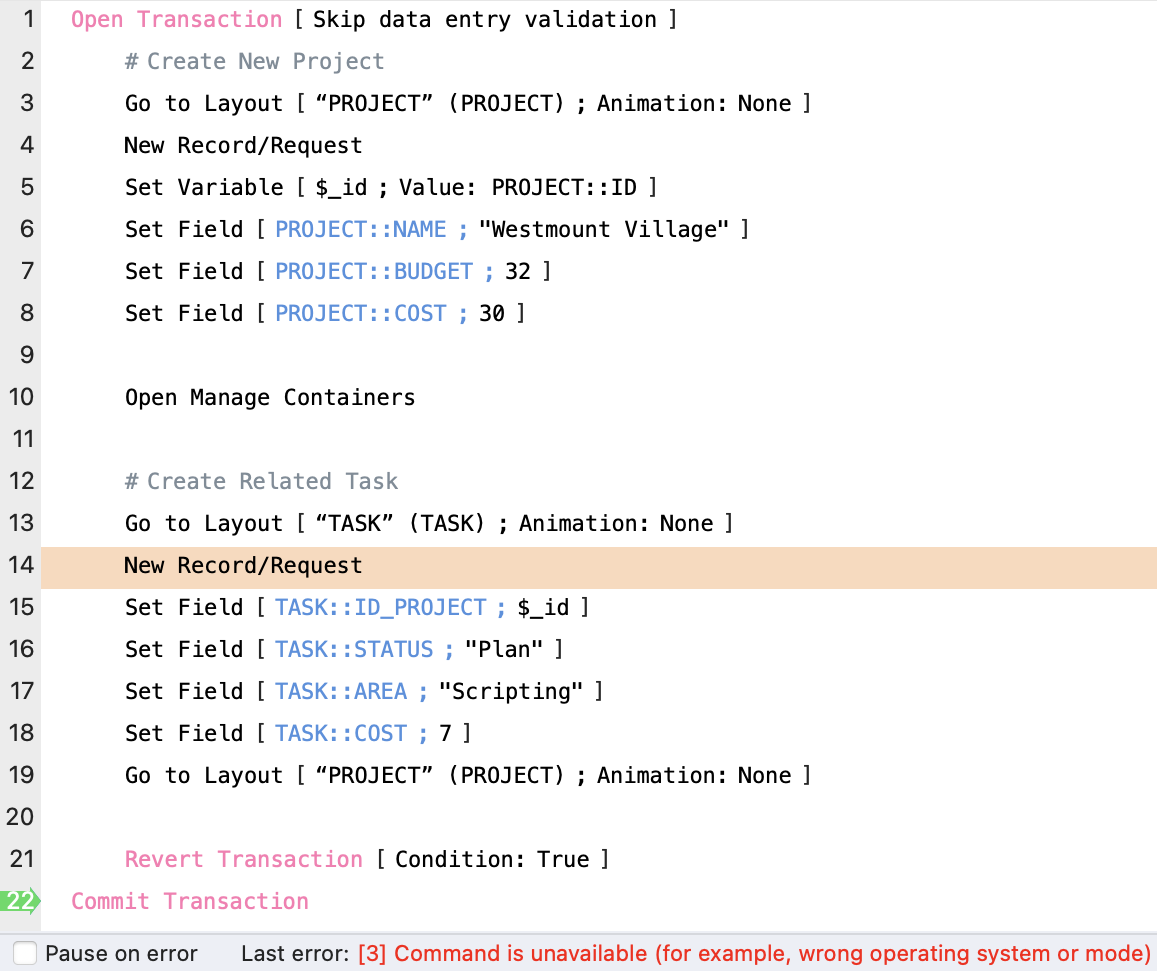
In the example shown here, when Open Manage Container is executed, it will auto-commit the transaction. In this case, the transaction no longer exists and the PROJECT record was also committed. The script will be temporarily suspended and when the dialog is dismissed and script execution is resumed, it will be as if no transaction block existed.
When it gets to step 21 and executes the Revert Transaction step it will return the error:
[3] Command is unavailable (for example, wrong operating system or mode)
Like I said… there are many nuances to be aware of, and subtle details to consider. 👀
Truncate vs Delete All
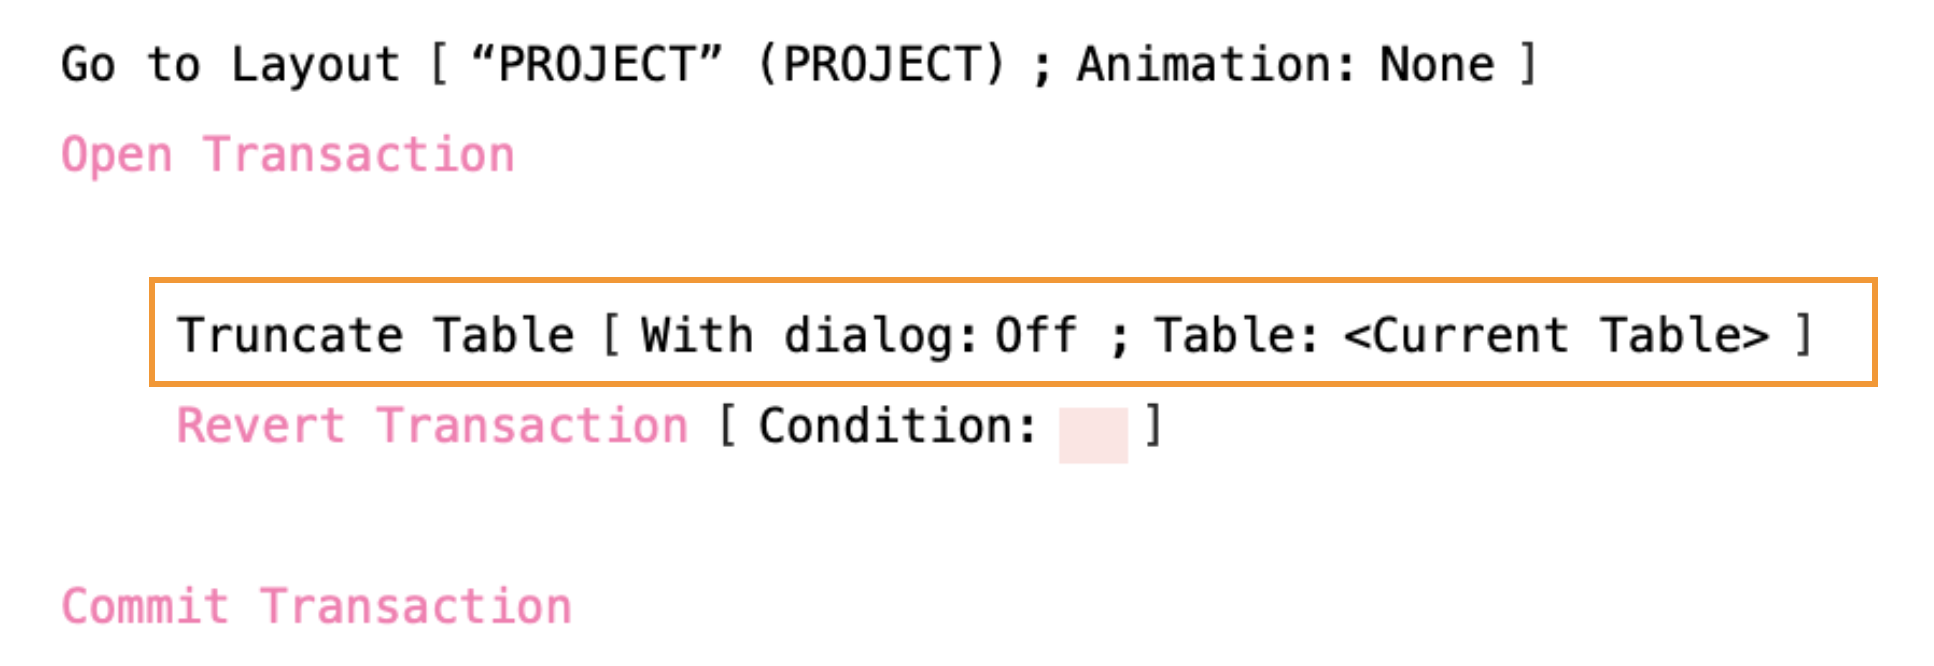
If you want to remove all the records in a table within a transaction, but you might need to revert, then don’t use Truncate Table, and instead use Delete All Records. In the example above even though the transaction gets reverted, all the records in the PROJECT table will not be coming back any time soon. However, in the example below, using Delete All Records, the records could be restored.
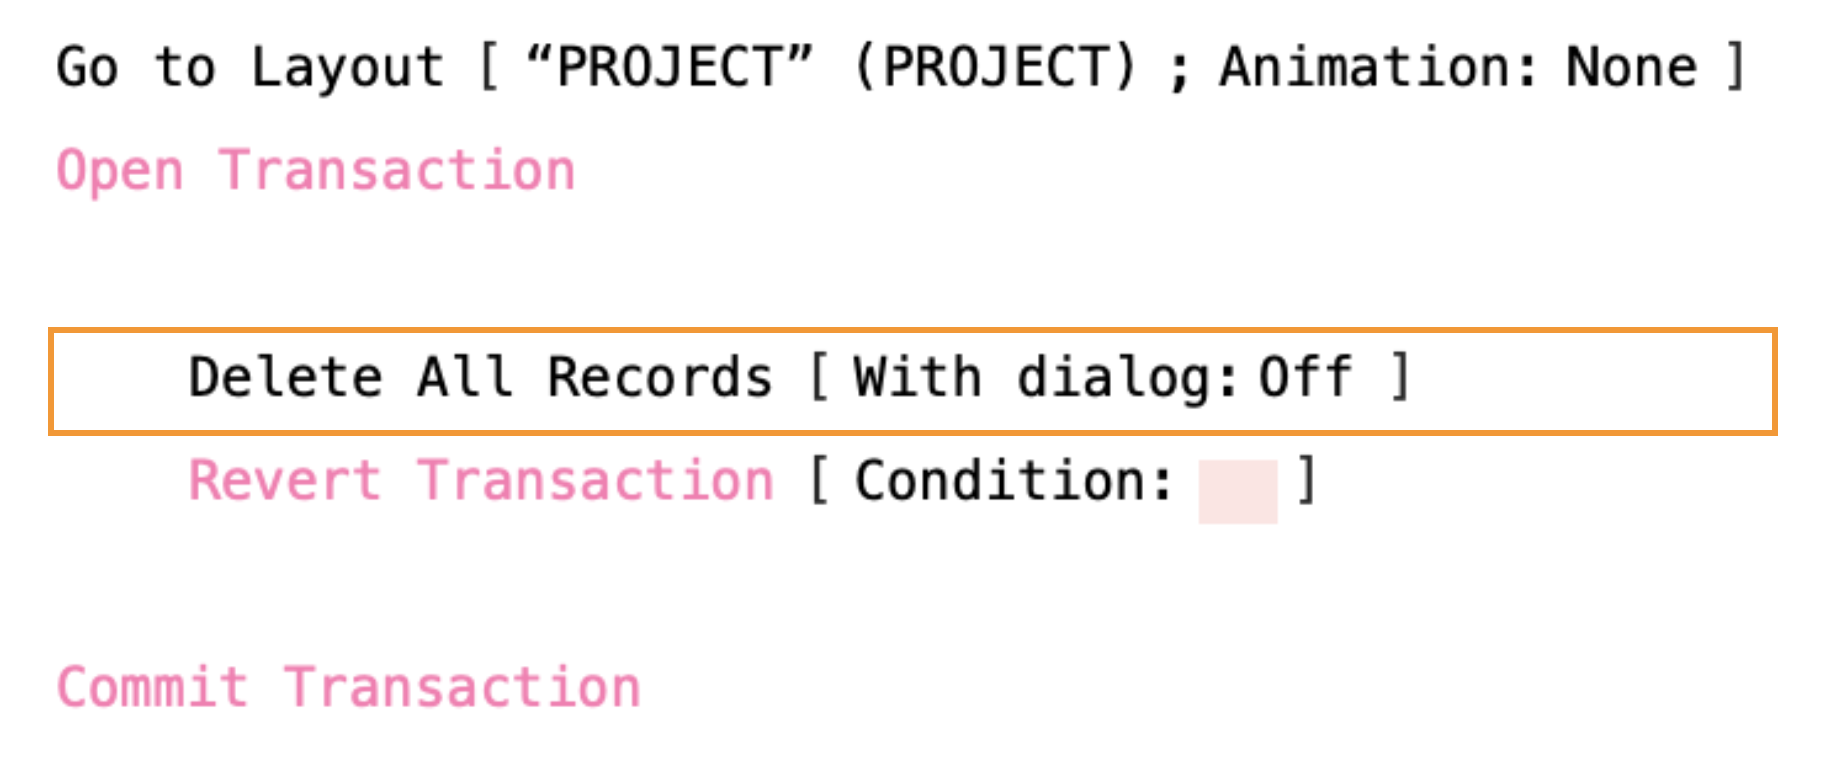
It’s worth noting that if there are a significant number of records, then this could be slower than using it outside a transaction block. That’s because Delete All Records will be deleting records in a loop, in the unlikely event that you decide to revert. It then has to brings those records back to life again!
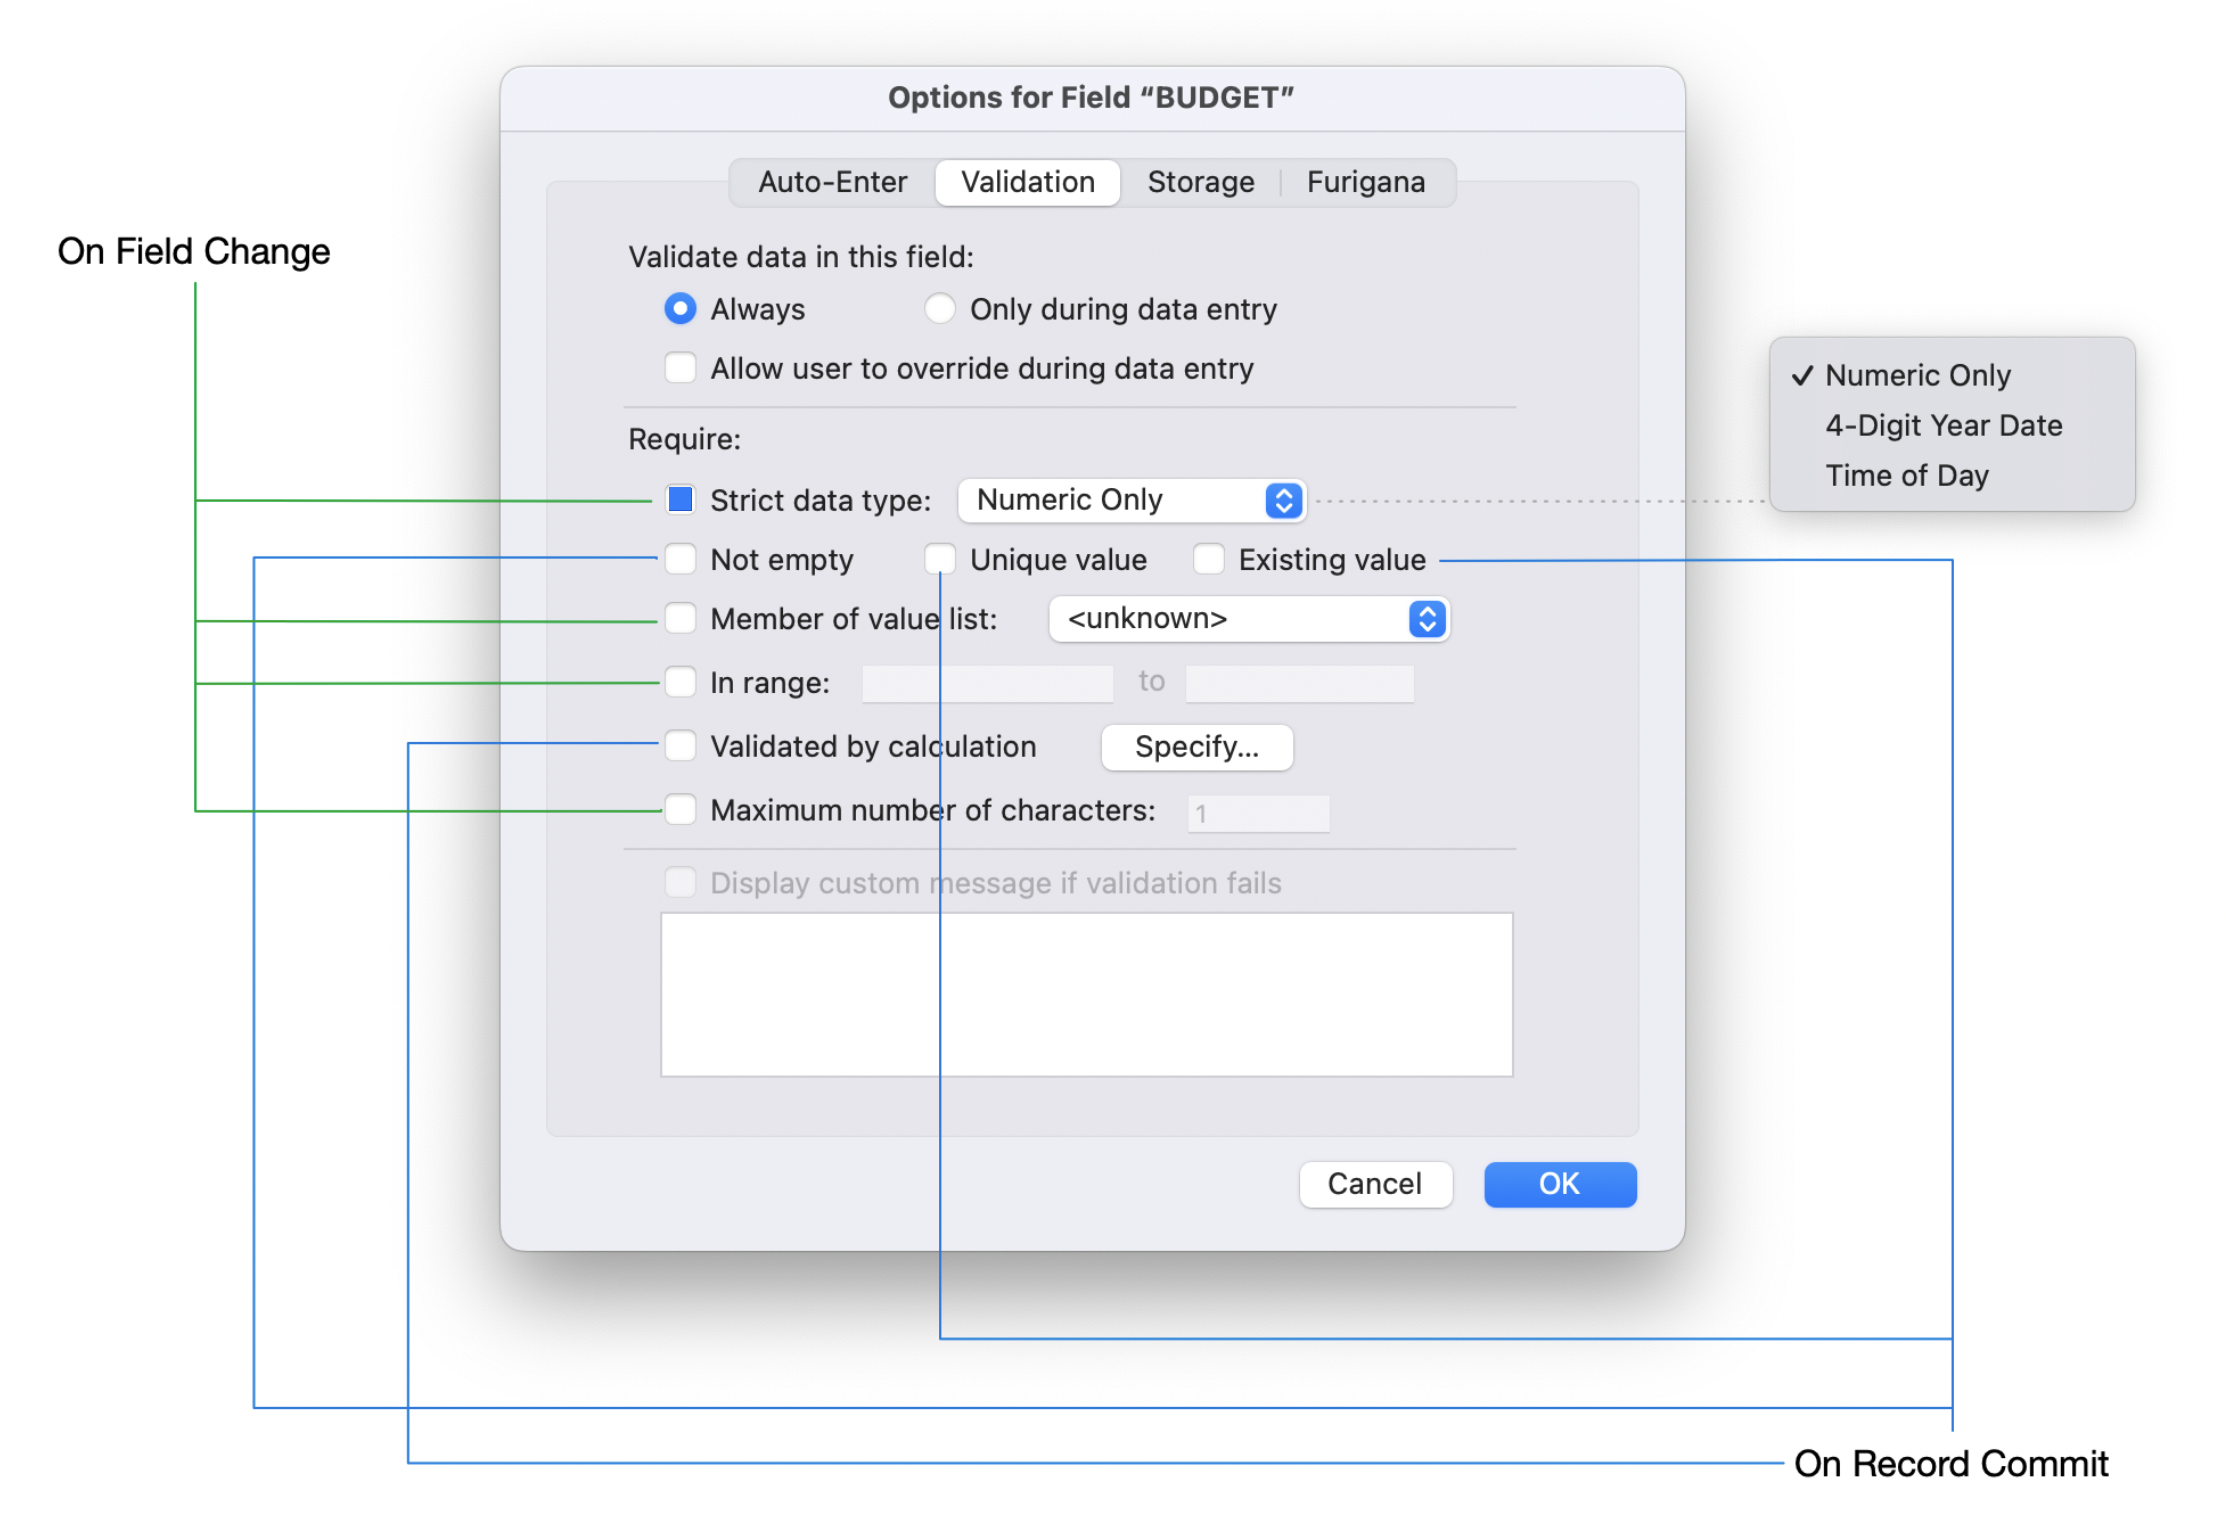
Validation
In preparing for presentations on the new script transactions I came up with this image to describe some differences when talking about validation:
- How validation affects execution of the script when it is in running a transaction
- How validation affects the auto-aborting of an active transaction.
For now let’s assume that the option for “Validate data in this field:” is set to Always.
There are some validation options that will automatically trigger the transaction to be aborted when the validation requirements aren’t met. Let’s say you only want to allow numeric data into the BUDGET field. Looking at the script below as an example, when it executes step 7, it will return the following error:
[502] Number value does not meet validation entry options
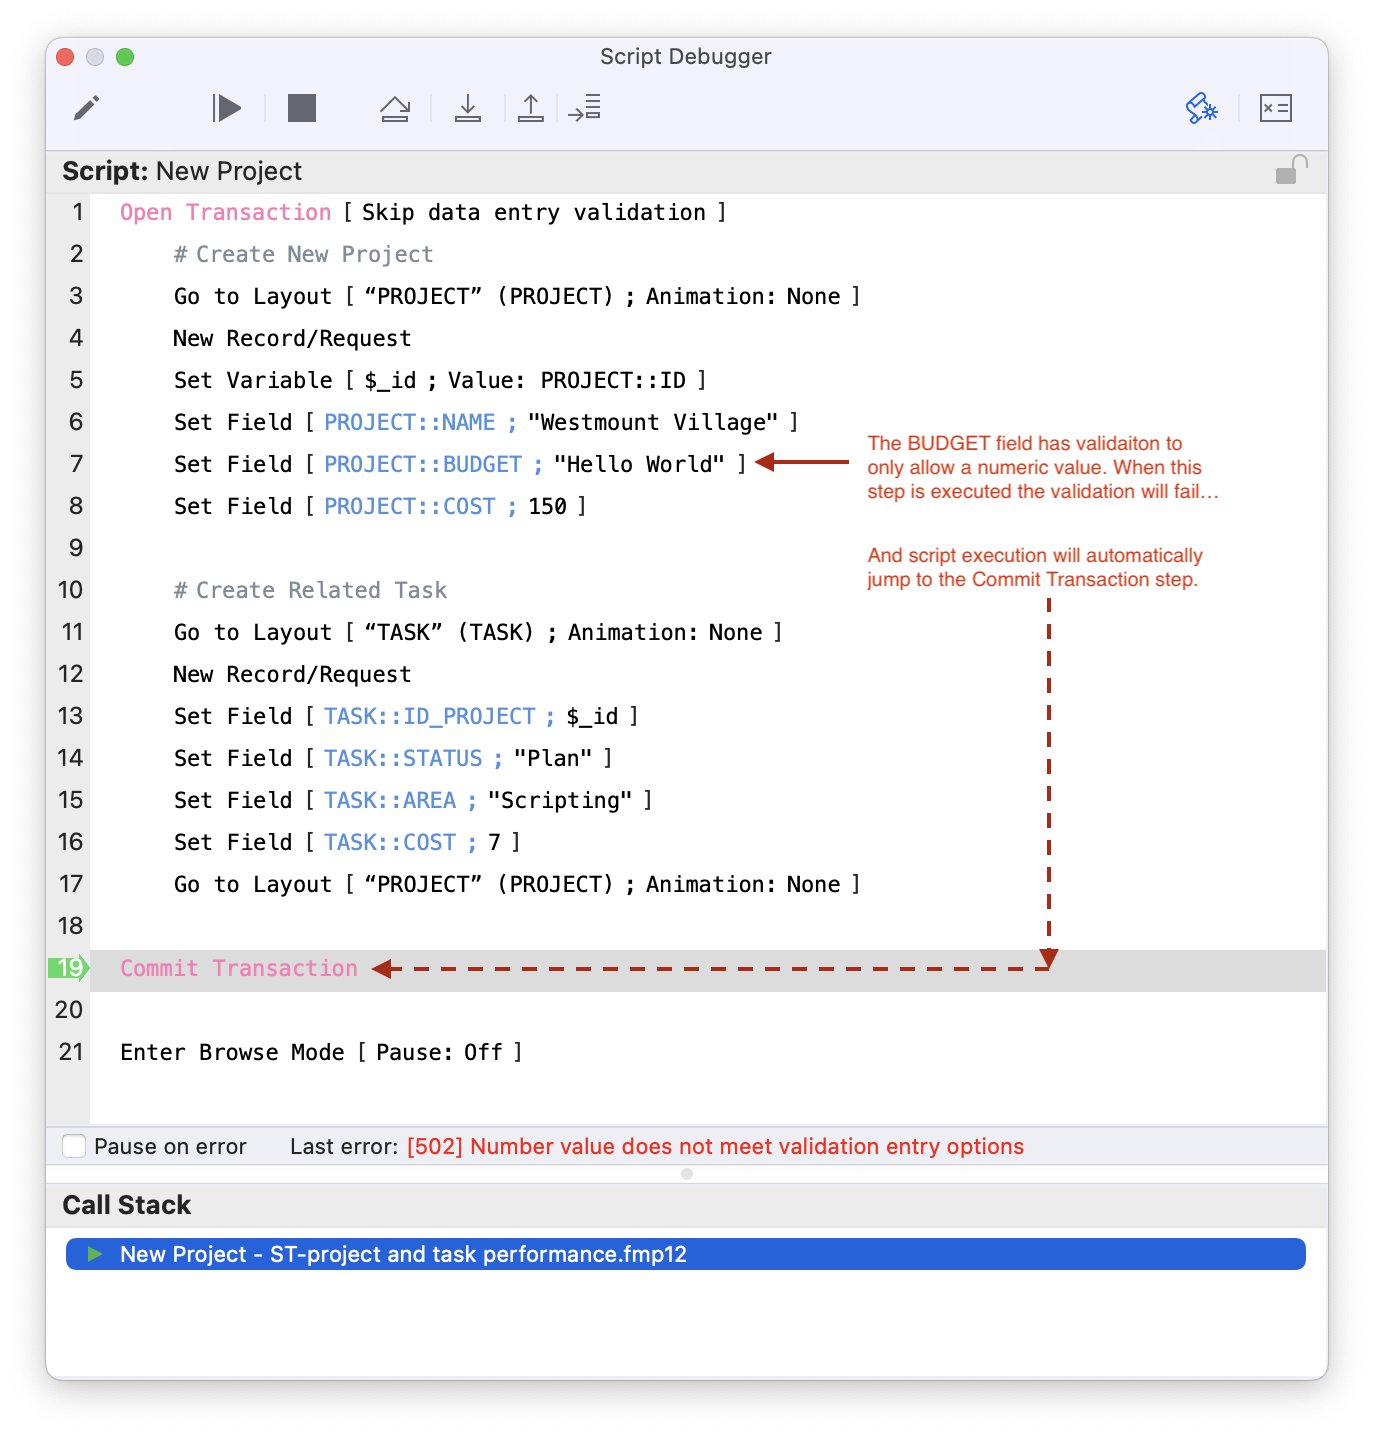
When the Commit Transaction step is executed it will return the same validation error, except it will also append to the end of the error: (<script name>:<step number>). So in this example if the script was called “New Project”, then error string returned in the debugger would be:
[502] Number value does not meet validation entry options (New Project:7)
On the other hand, it’s different if validation is based on the PROJECT::NAME field needing to be unique. It can only determine if this value is unique when it tries to commit the transaction. In the example below, even though “Westmount Village” exists on another record, the script will continue to execute until step 18: Commit Transaction.
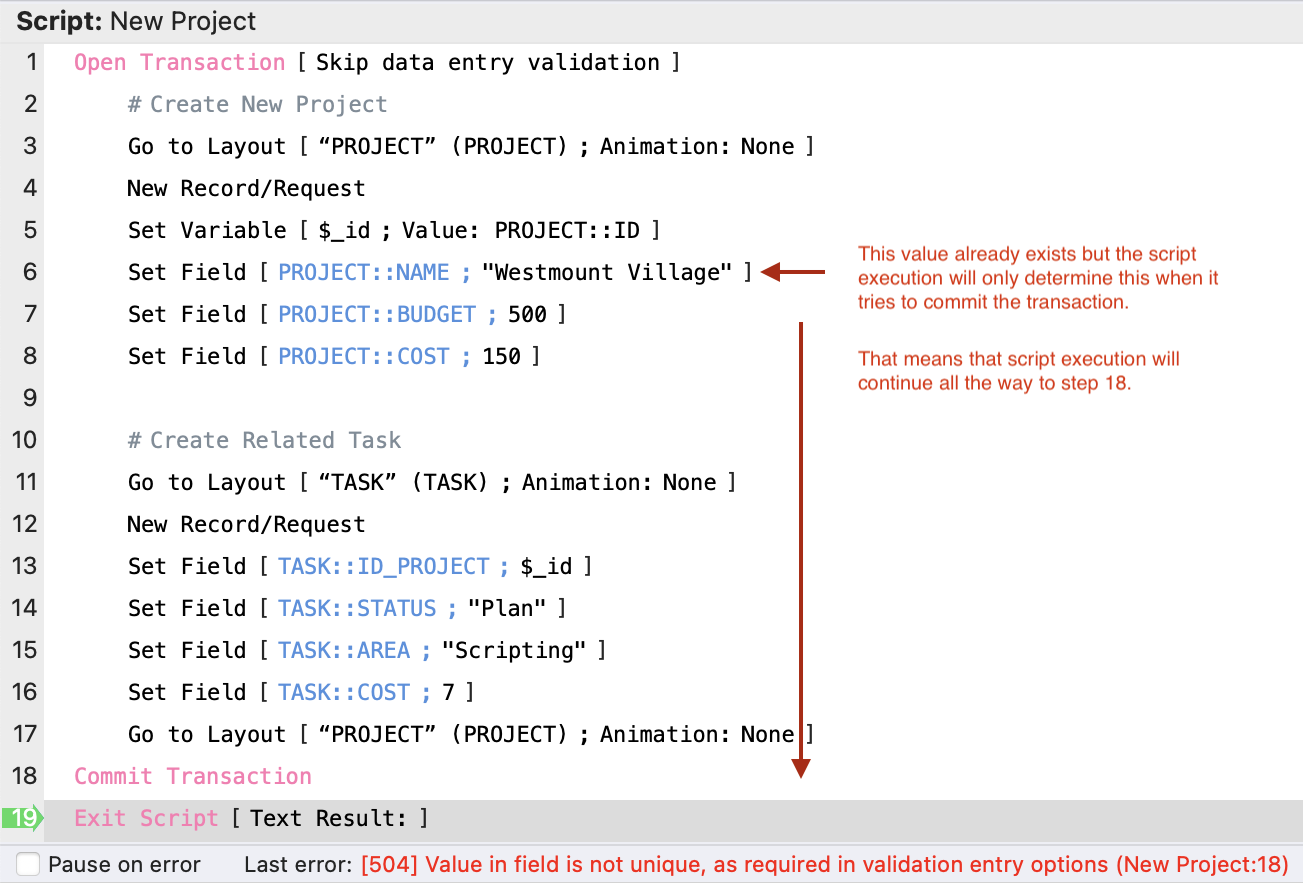
At this point when it tries to commit the transaction, the validation constraint on NAME needing to be unique can only be determined if the index is updated when it tries to commit it. Thus, in this case it will also return a validation error. But the interesting factor is that it can’t point you to where in the script the error actually was. Note that what was appended to the end of the debugger error message is the script name (“New Project”) and the step number (“18”). The difference here is that the step number is actually the Commit Transaction step number.
I think you get the hang of this. I am not going to spend more time on it, except for one last comment: Consider if, for “Validate data in this field:”, instead of Always you have it set to Only during data entry. Think of this as “Only when someone is actually entering data manually”. If you have this option selected, the validation will not be checked.
So, data validation is one area where auto-abort kicks in. The other main area where auto-abort kicks in is Security.
Security
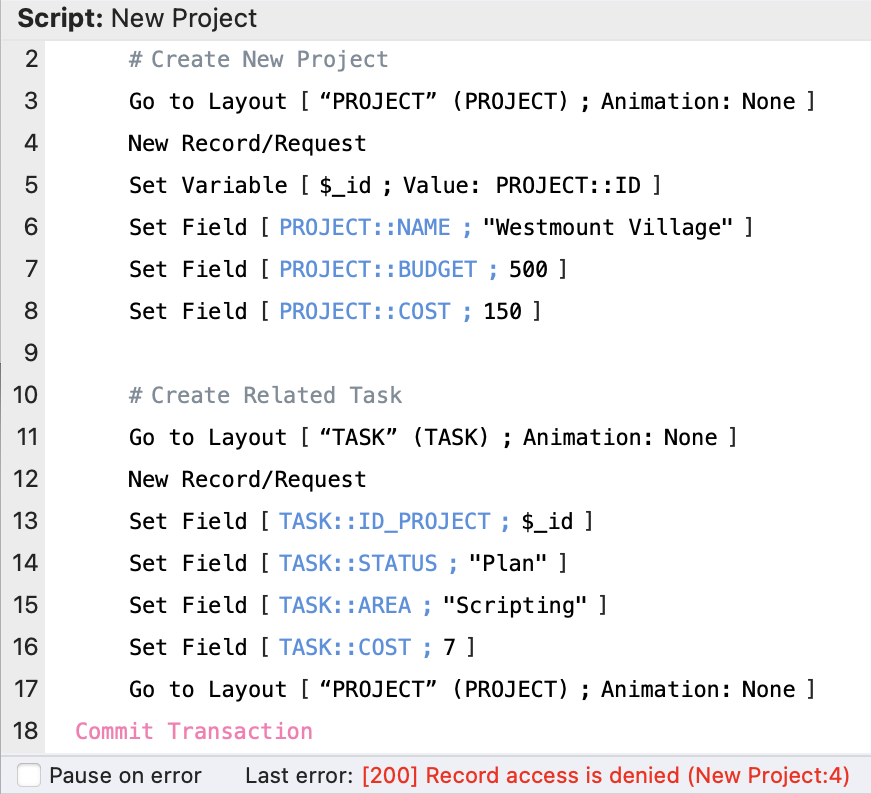
Let’s say we don’t allow a user to Create records in the PROJECT table.

In the context of this script, we’ll see that as soon as it tries to create a new PROJECT record it will then auto-abort and jump to the Commit Transaction step, then returns the error:
[200] Record access is denied

When you execute the Commit Transaction script step, you get the same error repeated, except you’ll also get additional information as to the <script name> and the <step number> where the error occurred.
Other examples of things like editing a record not being allowed or deleting a record not being allowed would also behave in the same way.
The important thing to understand about the auto-abort functionality, is basically:
Any data entry validation failures and any security failures (and a few of the examples listed above)… are the places where auto-abort functions.
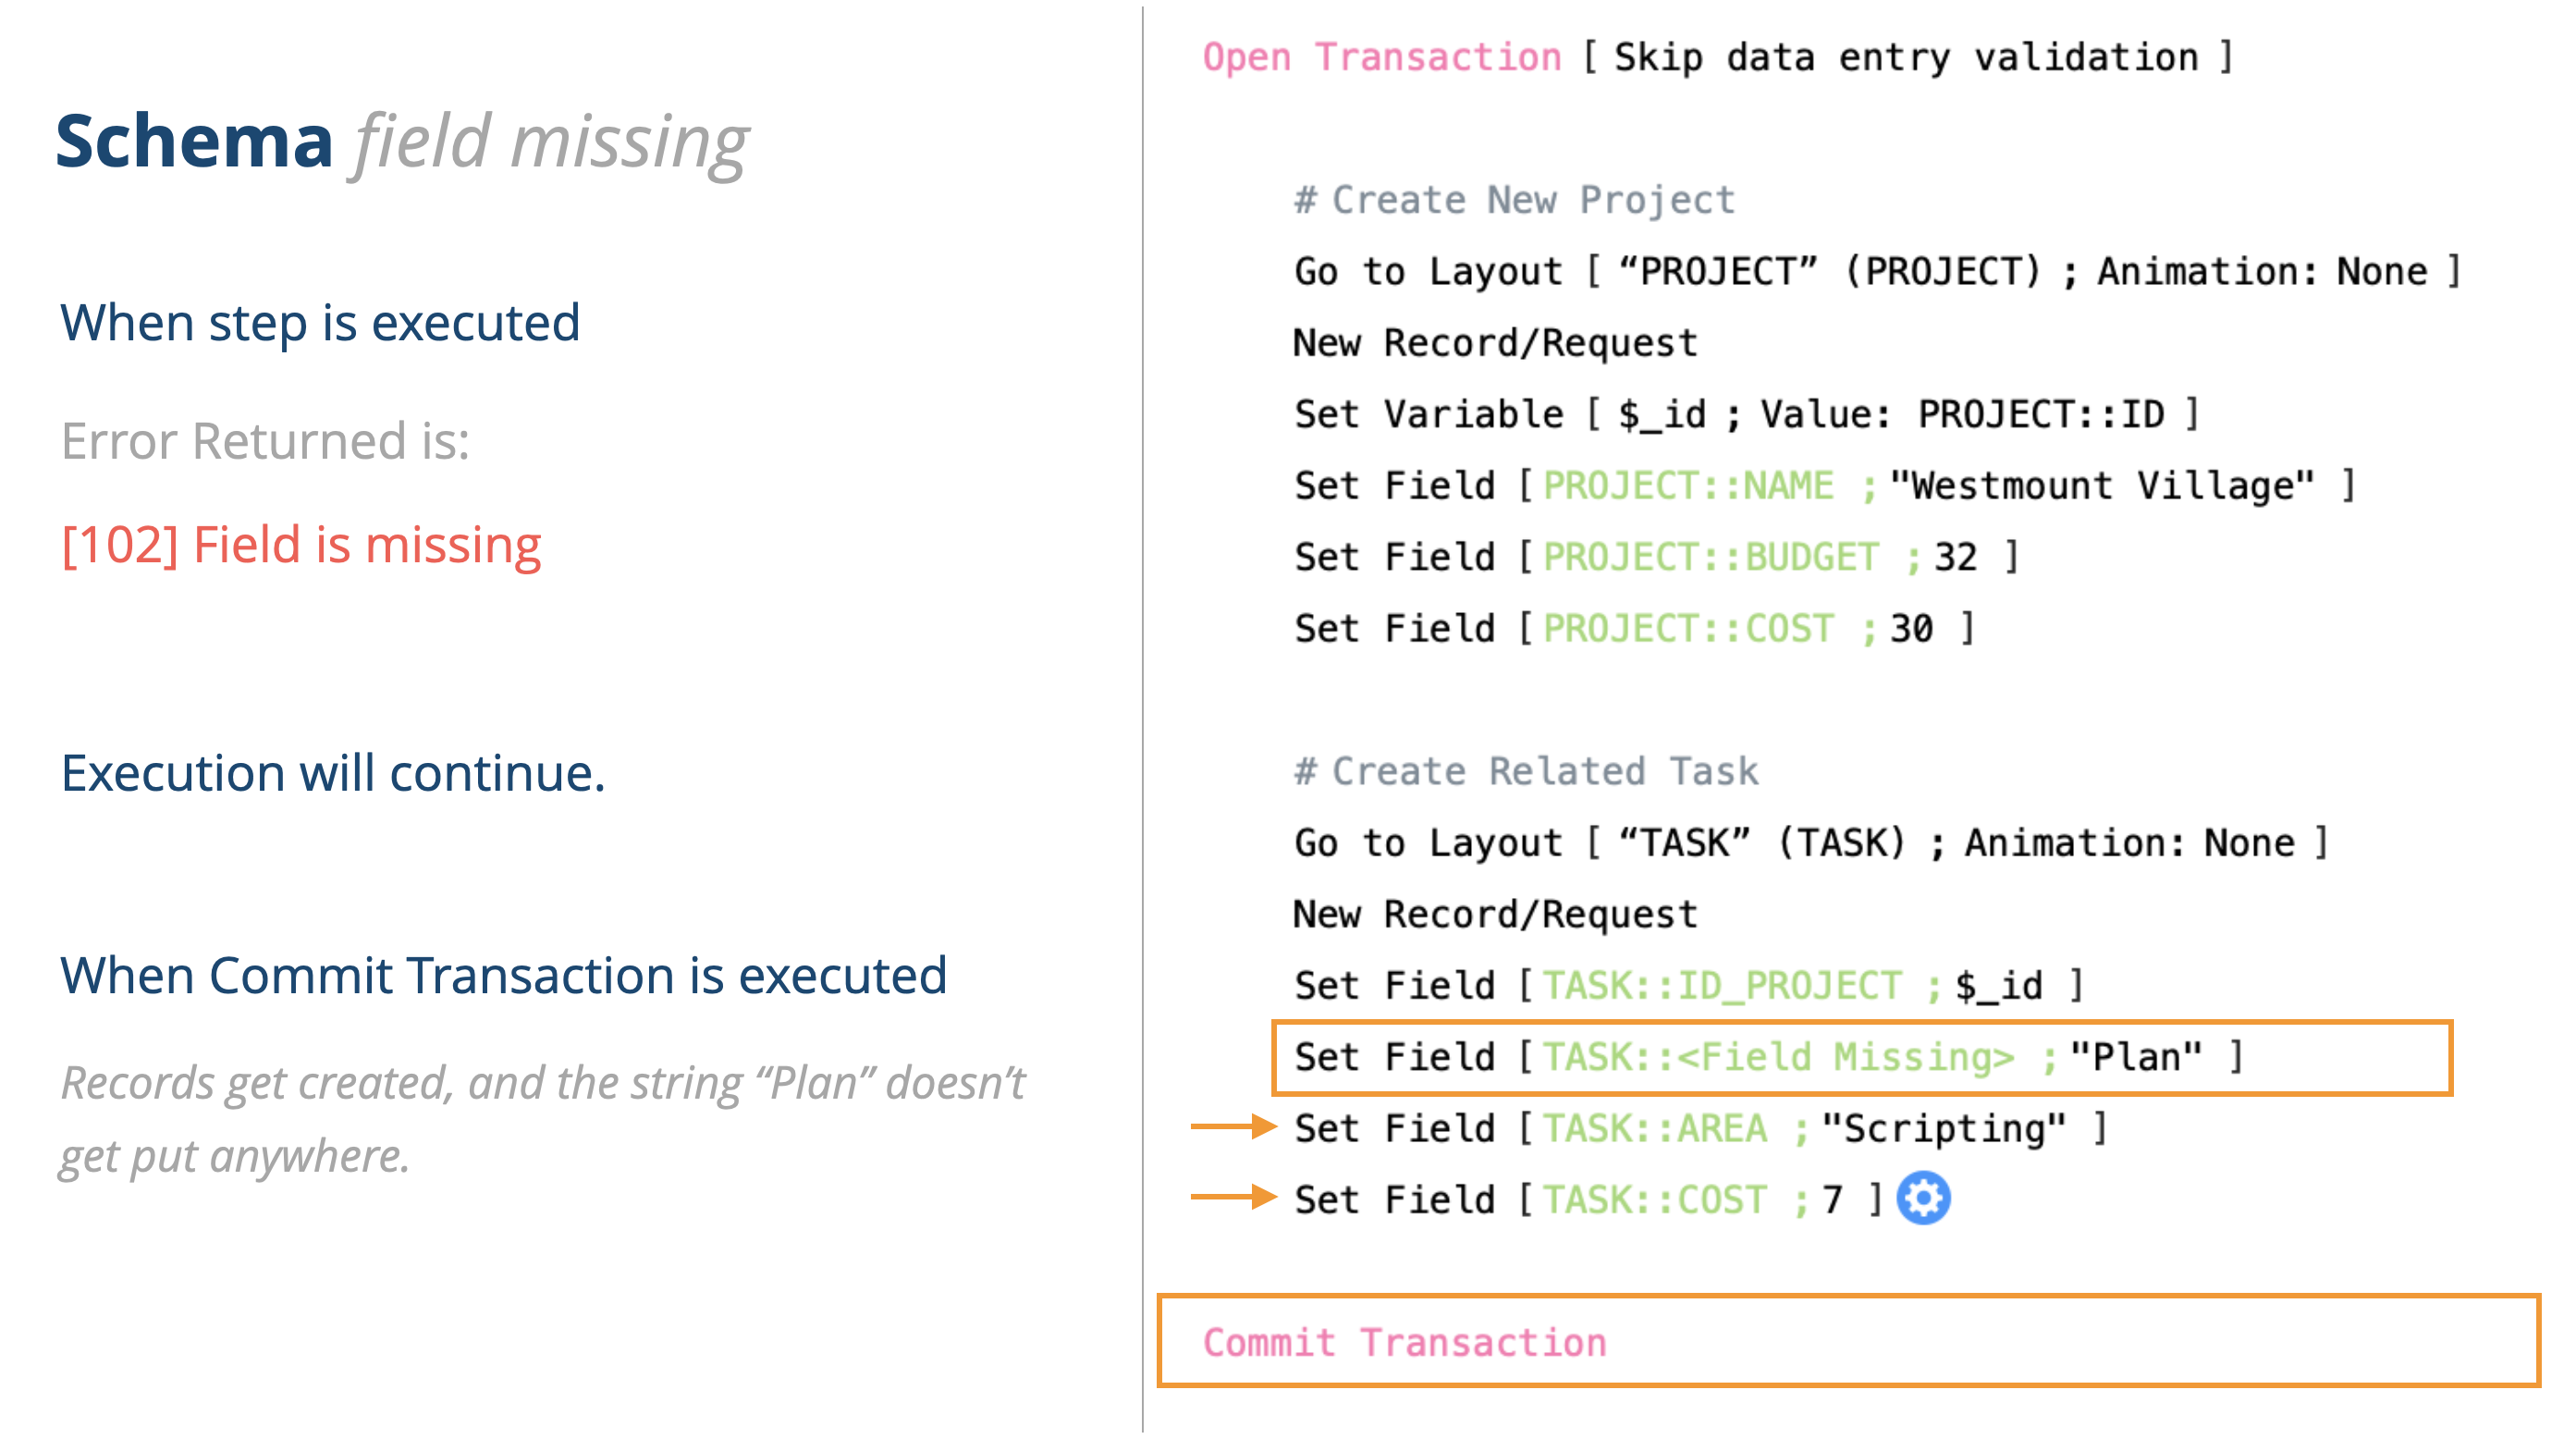
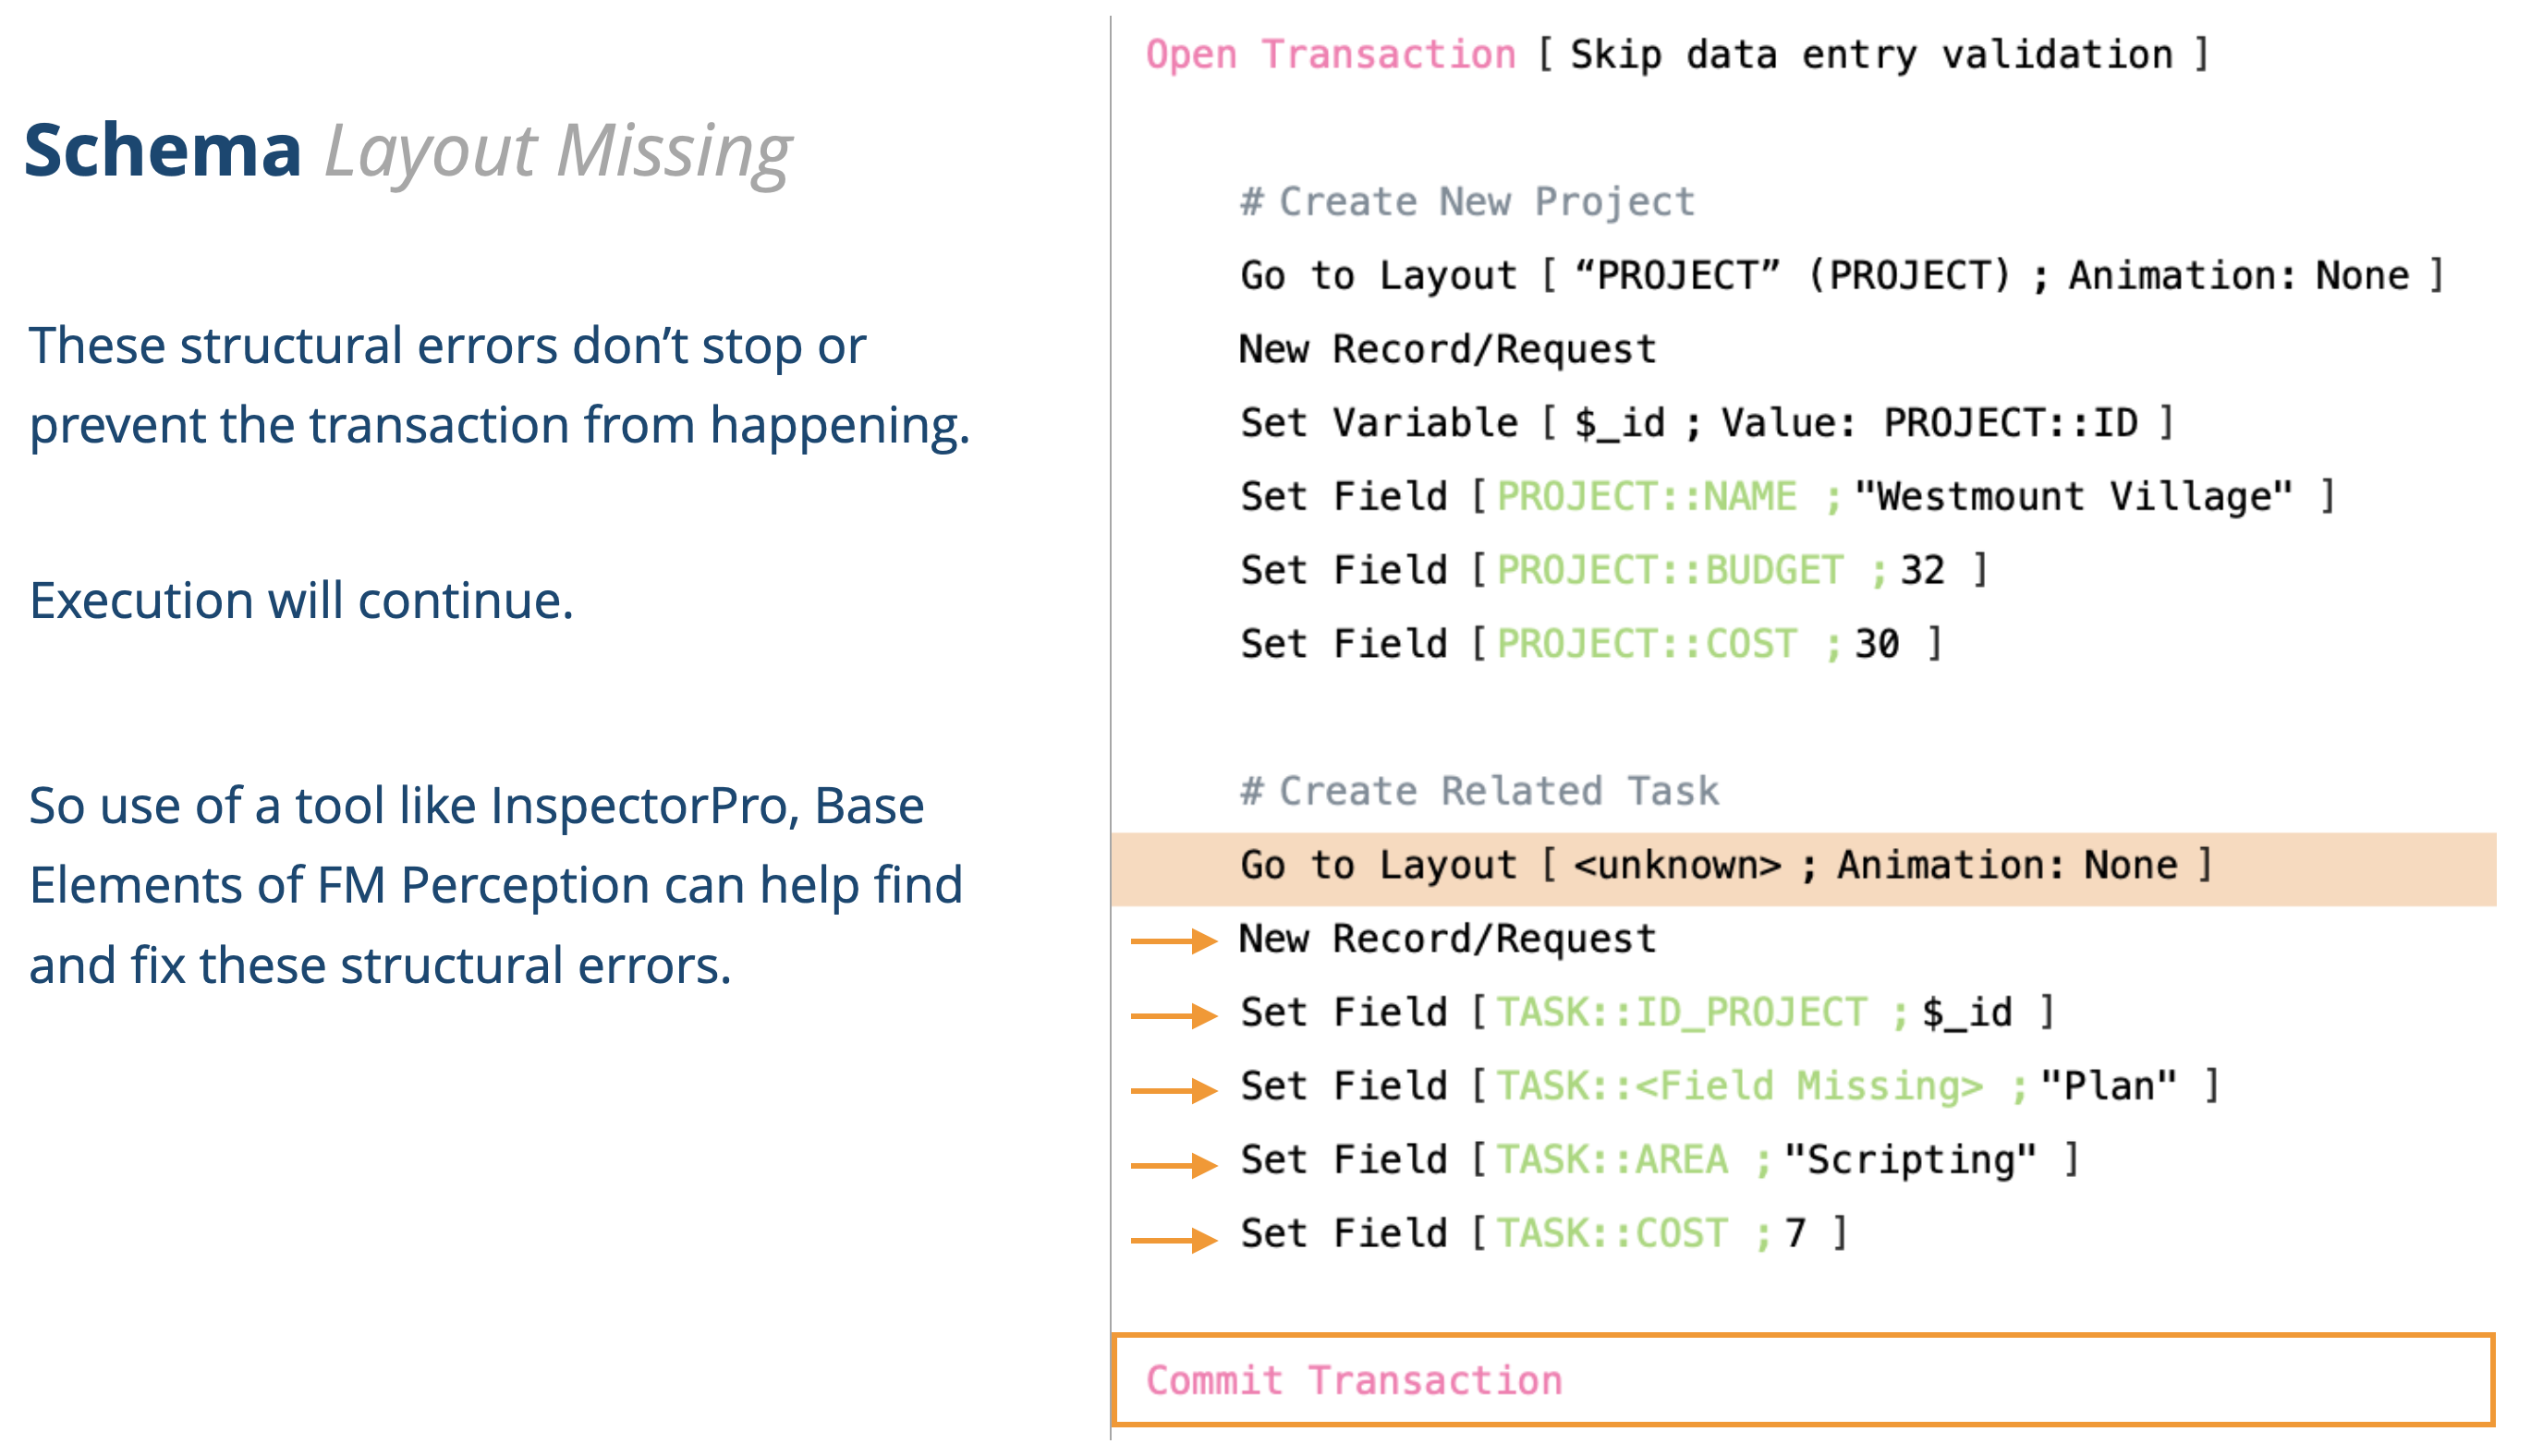
There are situations like this (taken from my slide deck about script transactions)… where you have schema problems with your solution. This broken reference to a field isn’t going to prevent your script from executing. It will actually execute and work … it just won’t auto-abort. But the word “Plan” doesn’t get placed anywhere.
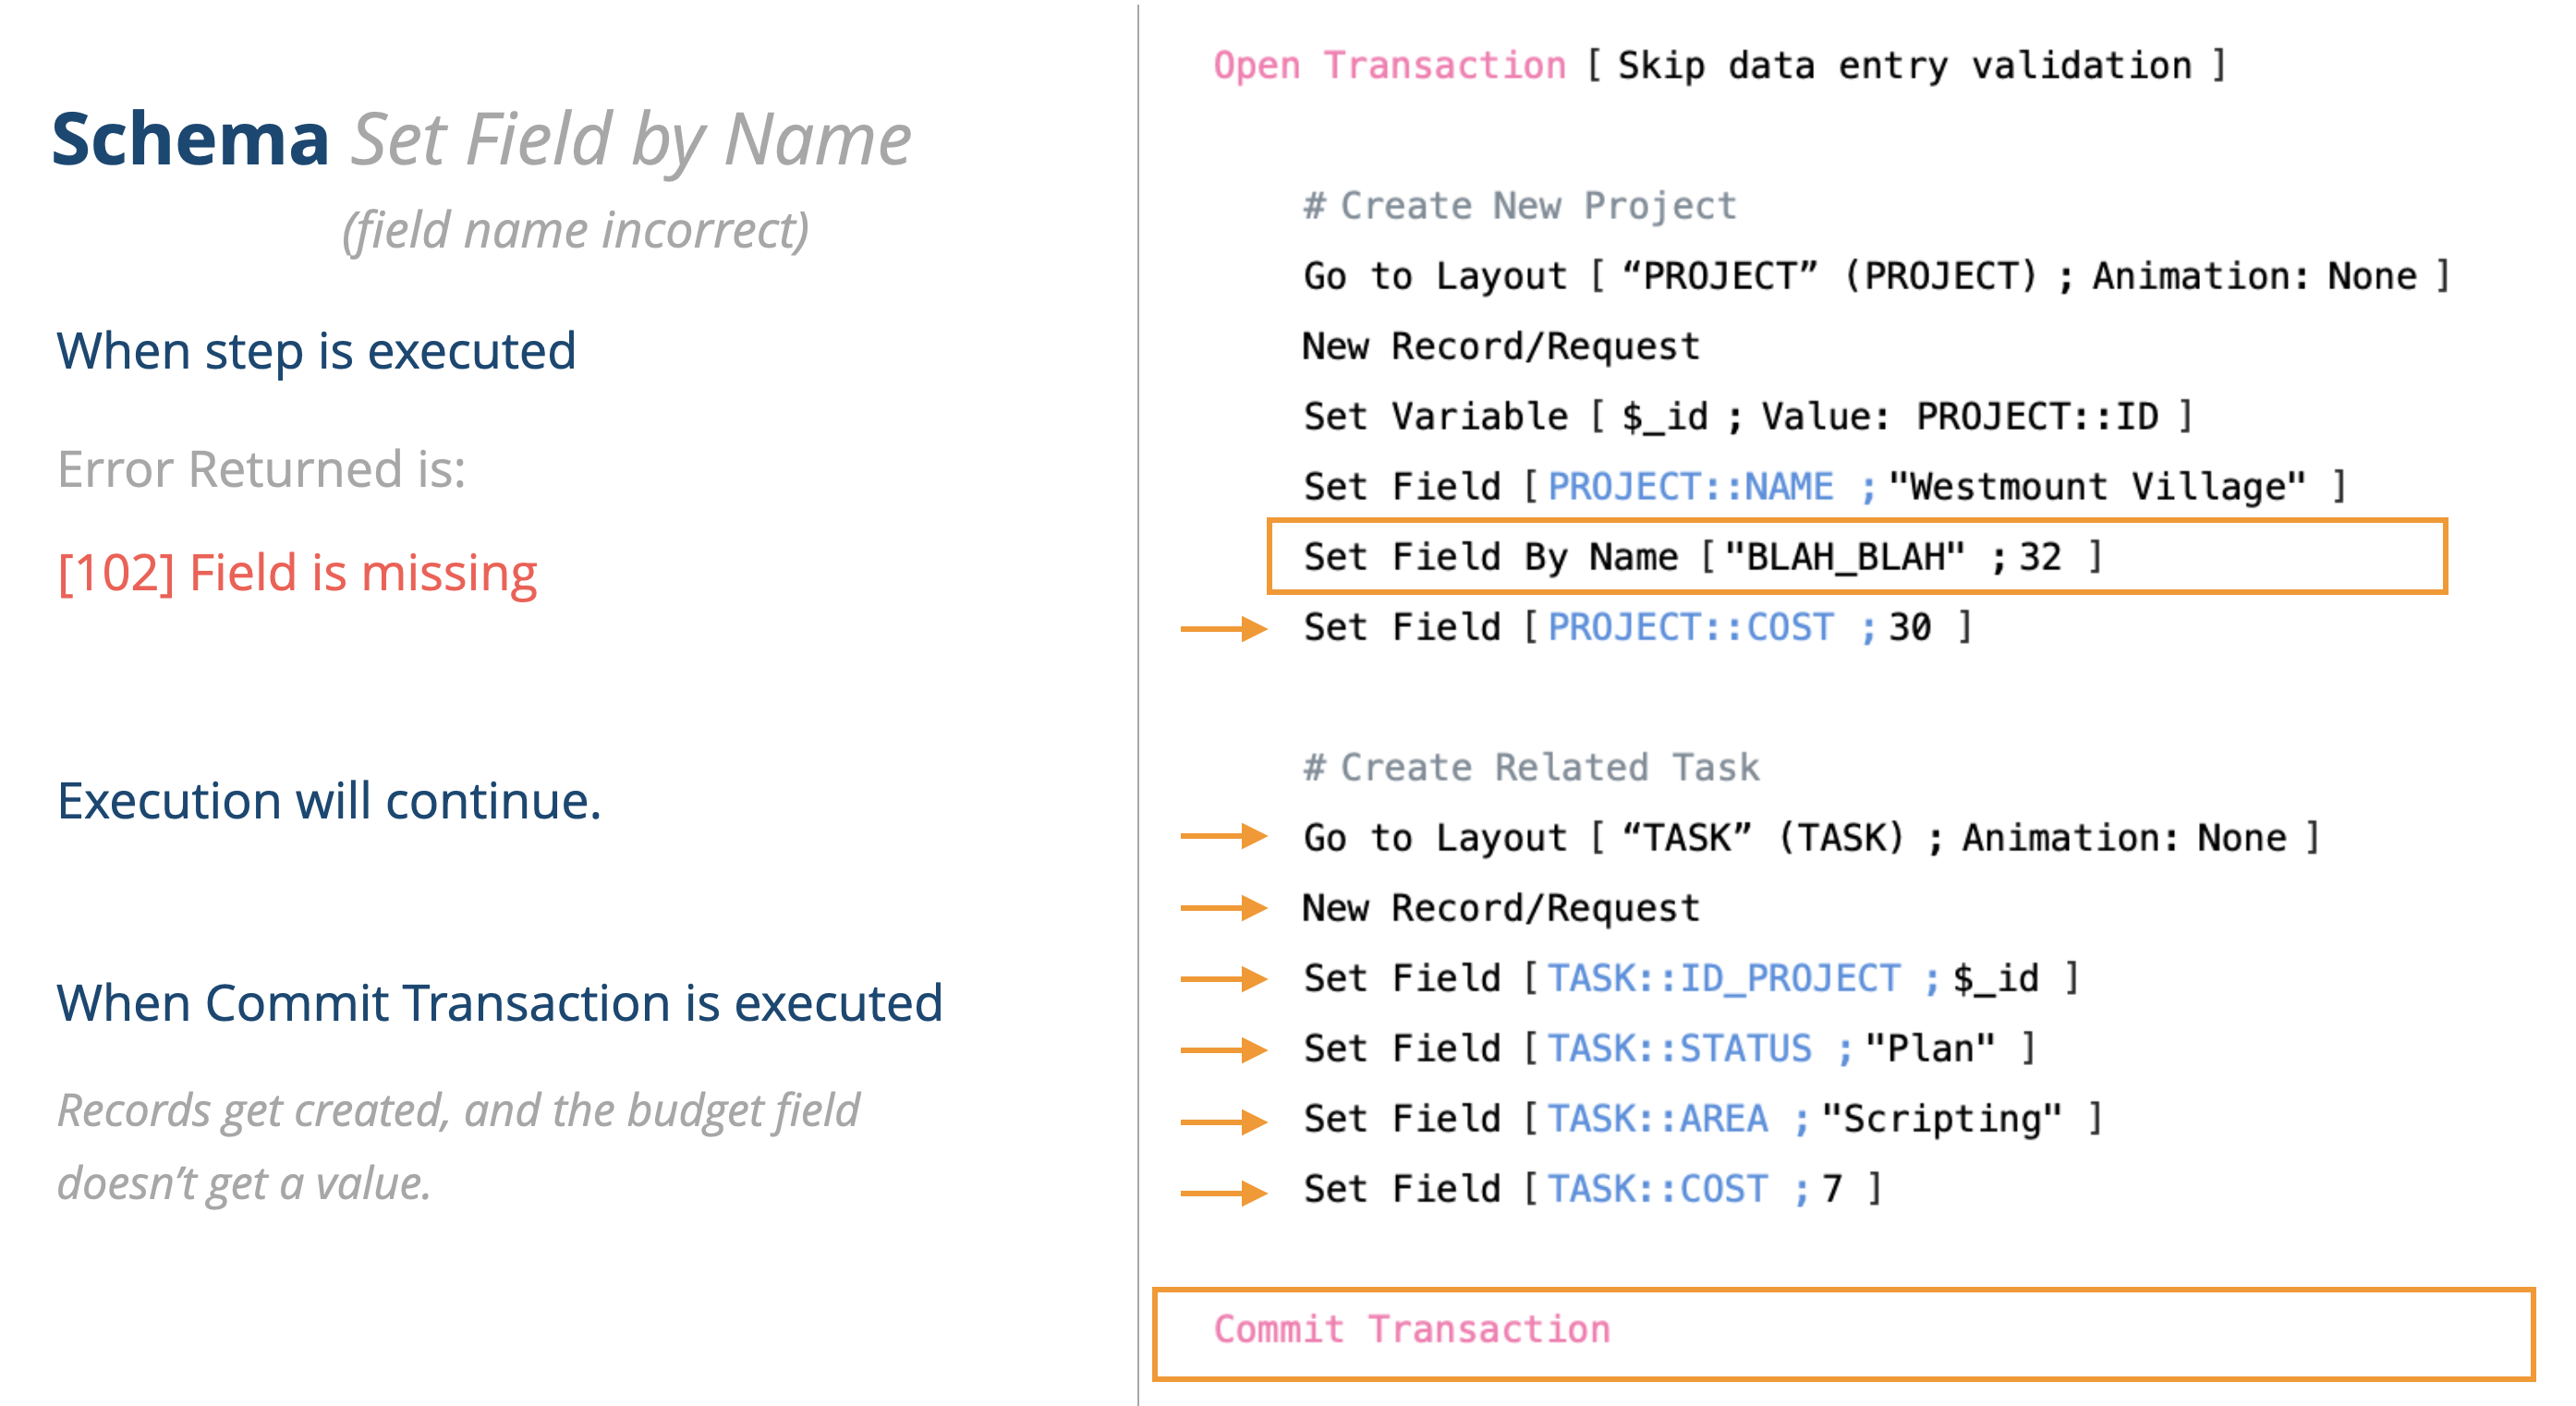
Here is another example. It’s kind of splitting hairs on this, but if you try to set the field by using indirection and the field name is incorrect, the transaction will succeed but the value of 32 won’t be entered into any field.
Here is another schema error. Yet again, the transaction will plow right through in this case. I believe you’ll end up with two Project records… just because by going to a layout that doesn’t exist, basically it won’t take you anywhere.
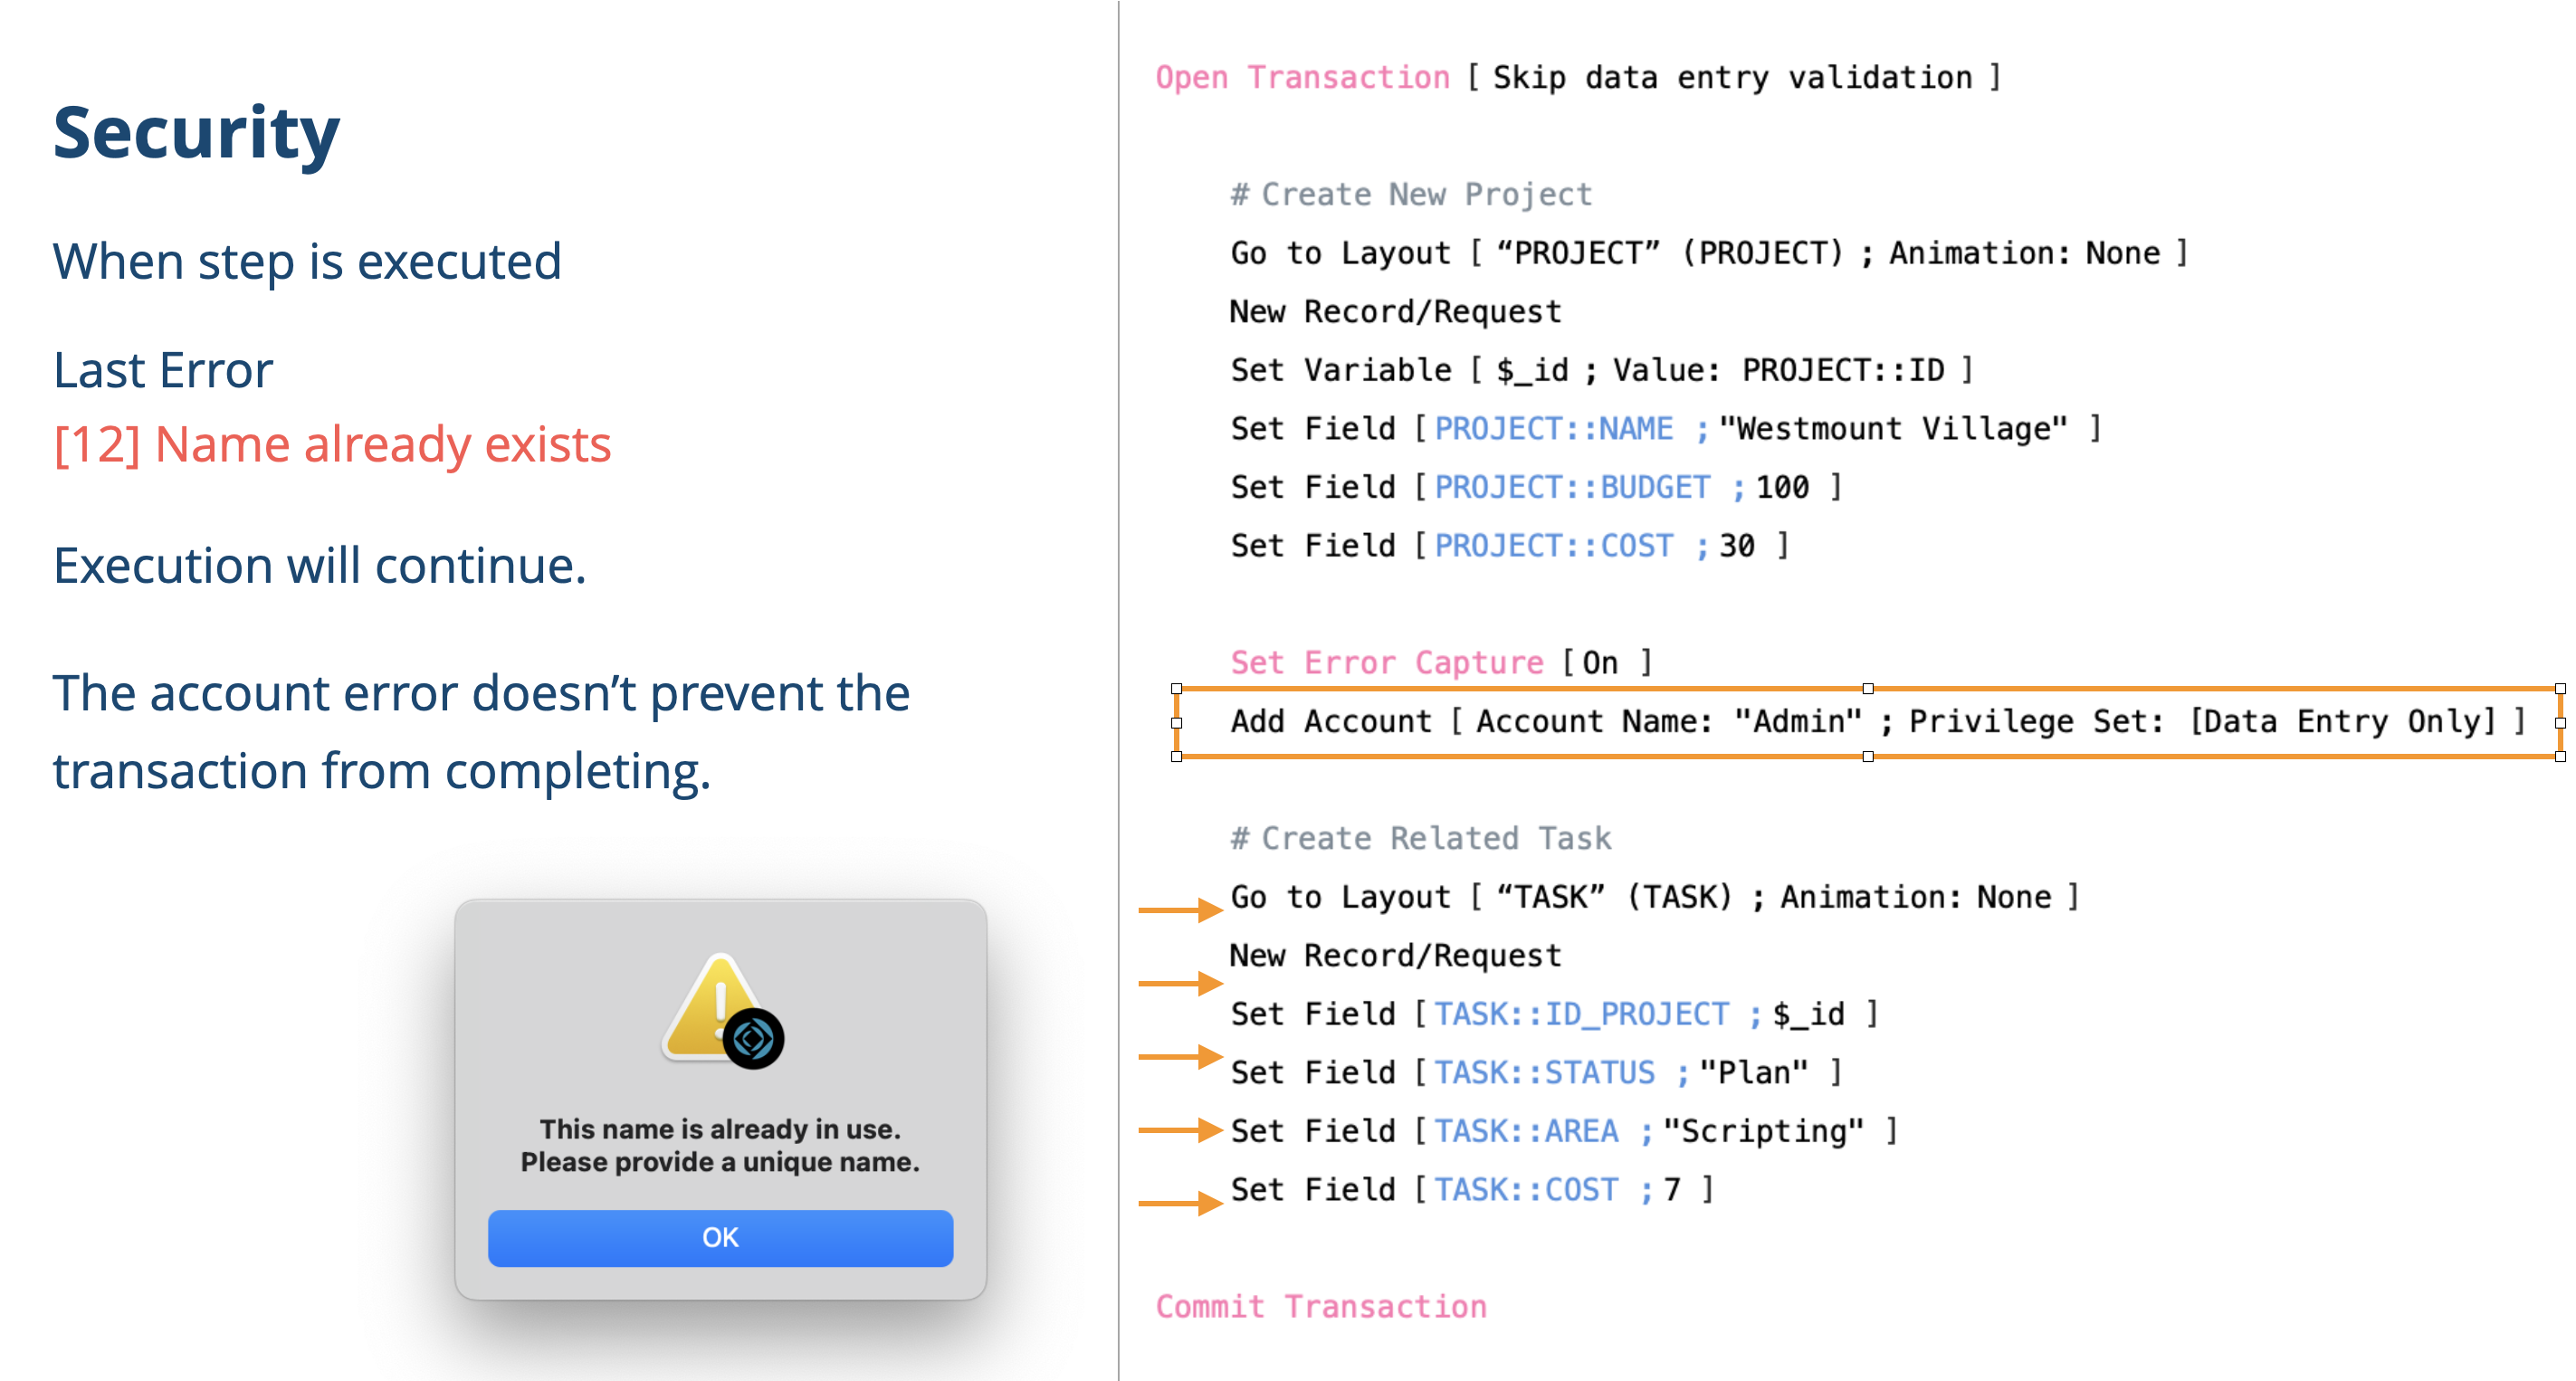
This last example shows where, as part of the transaction block, you want to also be creating an account. Again, the transaction isn’t affected by the fact that an account failed to be created.
Simplifying Code
One of the benefits that might be possible with native script transactions is that we’ll be able to simplify code. If we rely on the transaction being able to auto-abort based on any data validation or security errors, then we might be able to simplify code from how we handle errors.
This is what it might look like. On the left shows what some scripting might look like to check for every possible error. And on the right how much more condensed it could become.
I have omitted the Open Transaction and Commit Transaction steps for brevity.
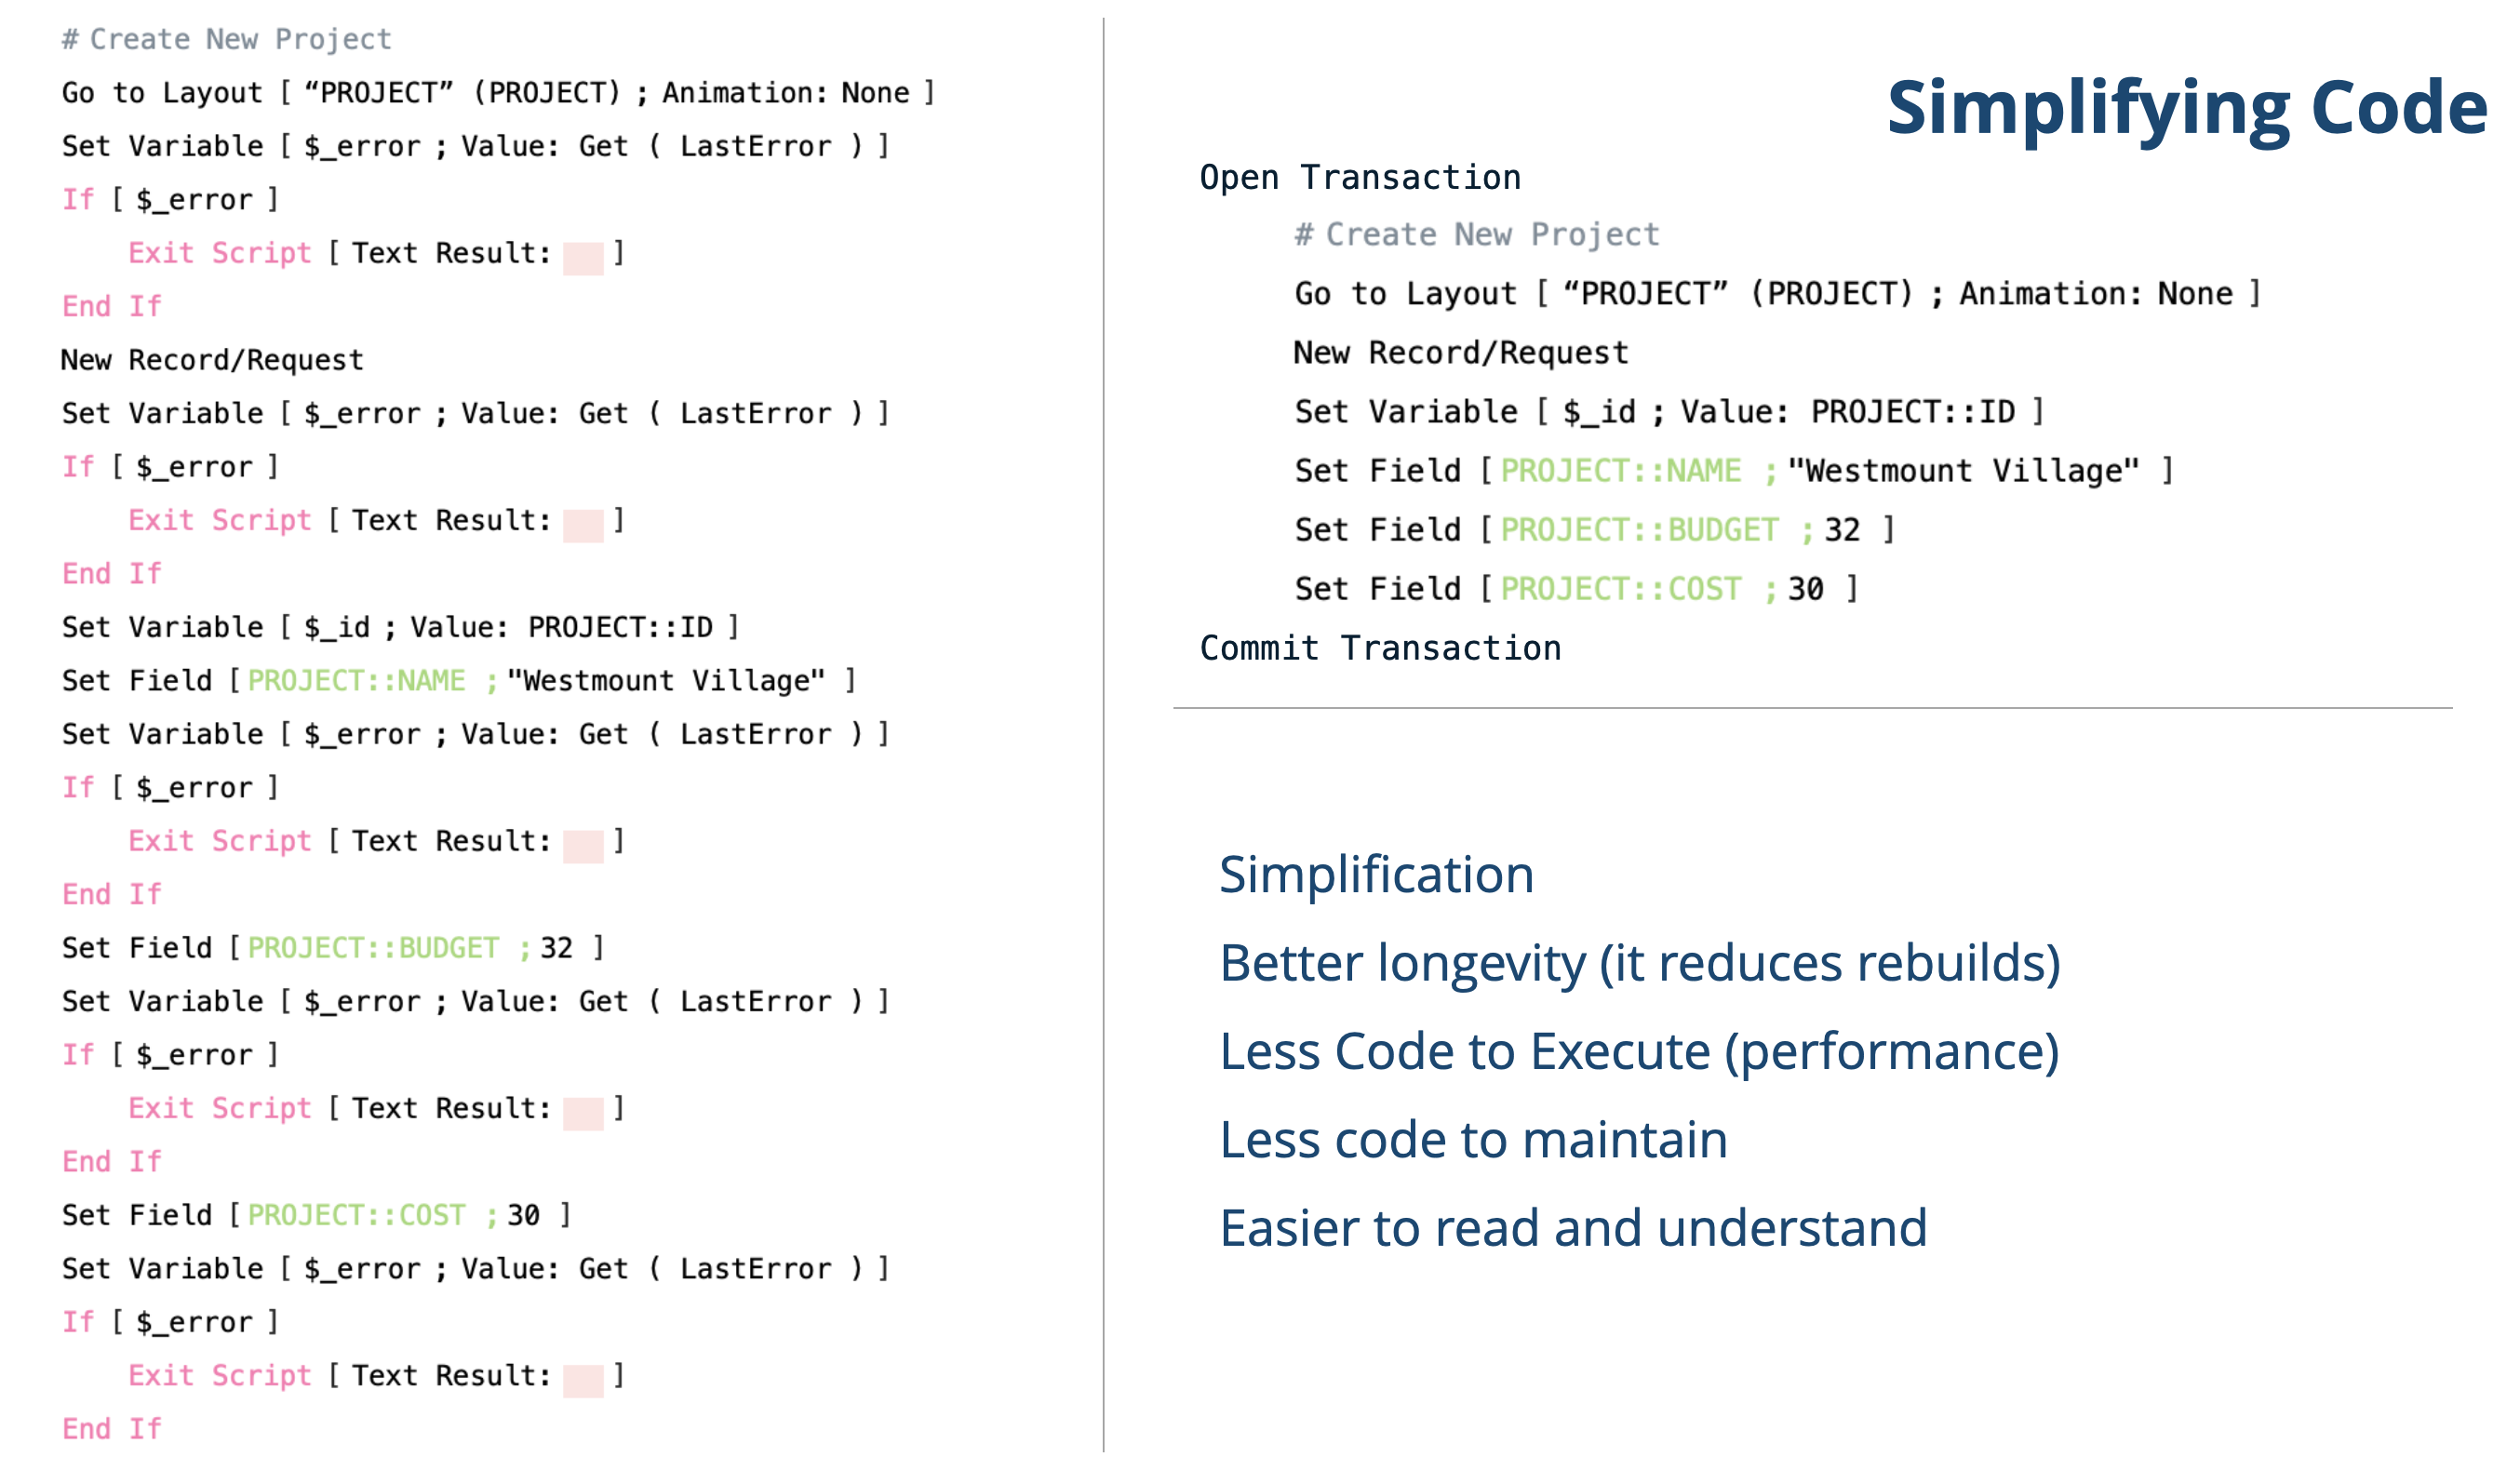
I see the core benefits in this area as follows:
Simplifying code is a really big deal. If a developer comes along and doesn’t understand the code, they might be inclined to re-write it. So this helps with code longevity. Also, there is less code, which makes looking at the code easier to understand what the code is doing. There’s less code to debug and less code to execute, which helps solutions run faster.
Overall, this can provide a much better DX (Developer Experience).
During ETS, one thing brought up was that when it auto-aborts and jumps right to the commit transaction step, that we don’t have a way to capture the error in place and do something else. For example, this could be some sort of retry. Because it jumps to the Commit Transaction step, any steps that you put right after the step that you want to trap for will get skipped.
However, there are two new Get functions that might be able to provide some assistance with error trapping and error reporting. There some much more to say about error trapping and custom error code that we’ll save that for a future blog post.
For now, the two Get functions are:
Get ( LastErrorDetail )
Get ( LastErrorLocation )
Performance
Getting performance gains when using script transactions… hmmm, that is a hard one to explain. As I mentioned before script transactions are not magic fairy 🦄 dust. You can’t just sprinkle these steps across your solution and expect them to make your solution faster.
Let’s step back a moment and talk about the cache. Claris has made great improvements to the FileMaker platform over the years by improving its cache. If you open up a file for the first time it will cache many different things about the file. So the next time you log in it is much faster.
An example might be a production system which has a start up script when the file is opened. After the first time a user logs in, they will start saving a great deal of time.
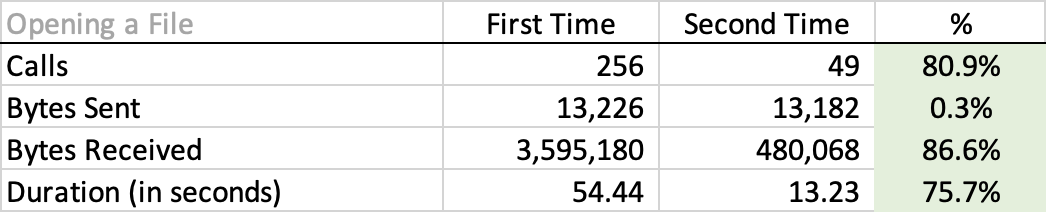
What follows next are some visualizations of the above numbers:

This is pretty impressive … and we got these improvements for free just by being on the latest version.
Next, let’s look at the performance difference of using native FileMaker operations vs the (pre-v19.6) FileMaker transactions that we have been using for so many years and compare that to the new script transactions.
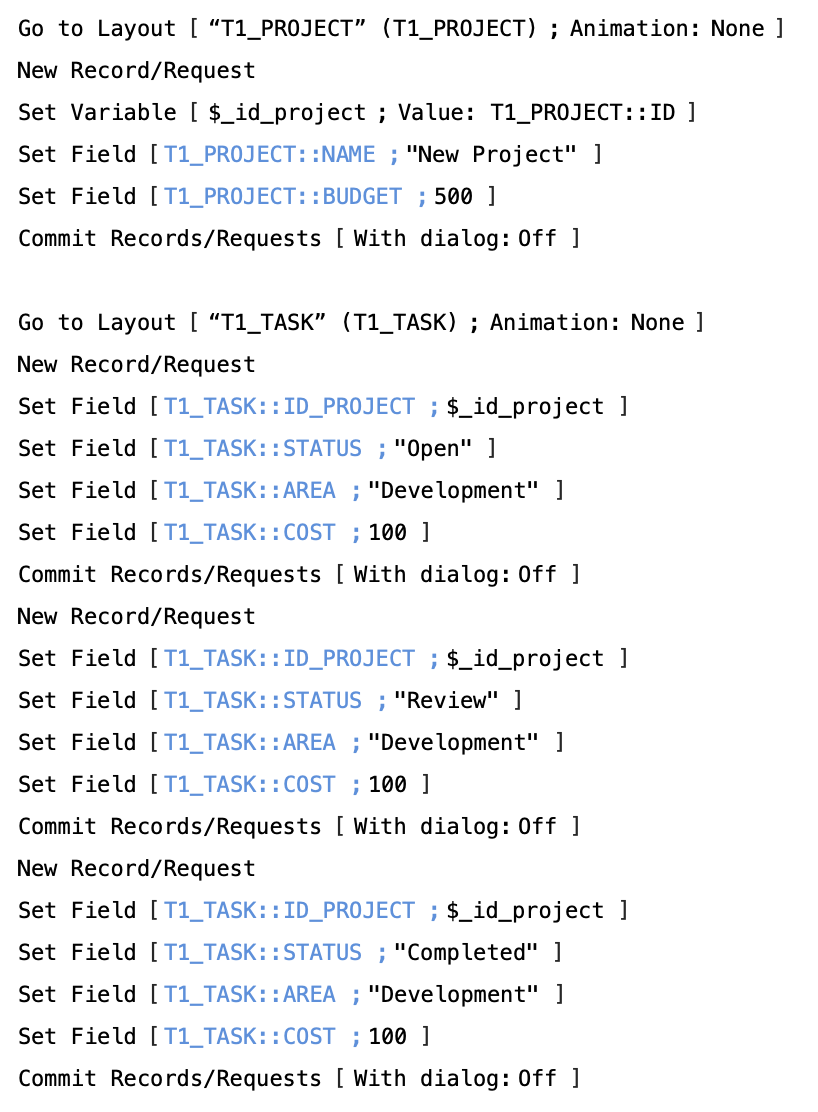
What I did to test these 3 different methods was to create a Project record and 3 related task records.
And I did it in 3 different ways.
The first way was as you see here on the left, just pure native FileMaker. Go to the Project layout and create the record and commit it. Then move to the Task Layout and create and commit each record there as well.
The next method was to use the FileMaker transactions that we have been using for years now by controlling and creating all the of the records from the perspective on a single uncommitted record.
And the third method was to use the new script transactions, with all the same steps within a transaction block.
And my network latency back to the server was 21 ms.
The point I am trying to make with these comparisons is that WAN performance is always going to be slower than sending your request to be done on the server.
Let’s look at the results. Orange is WAN and blue is PSoS:
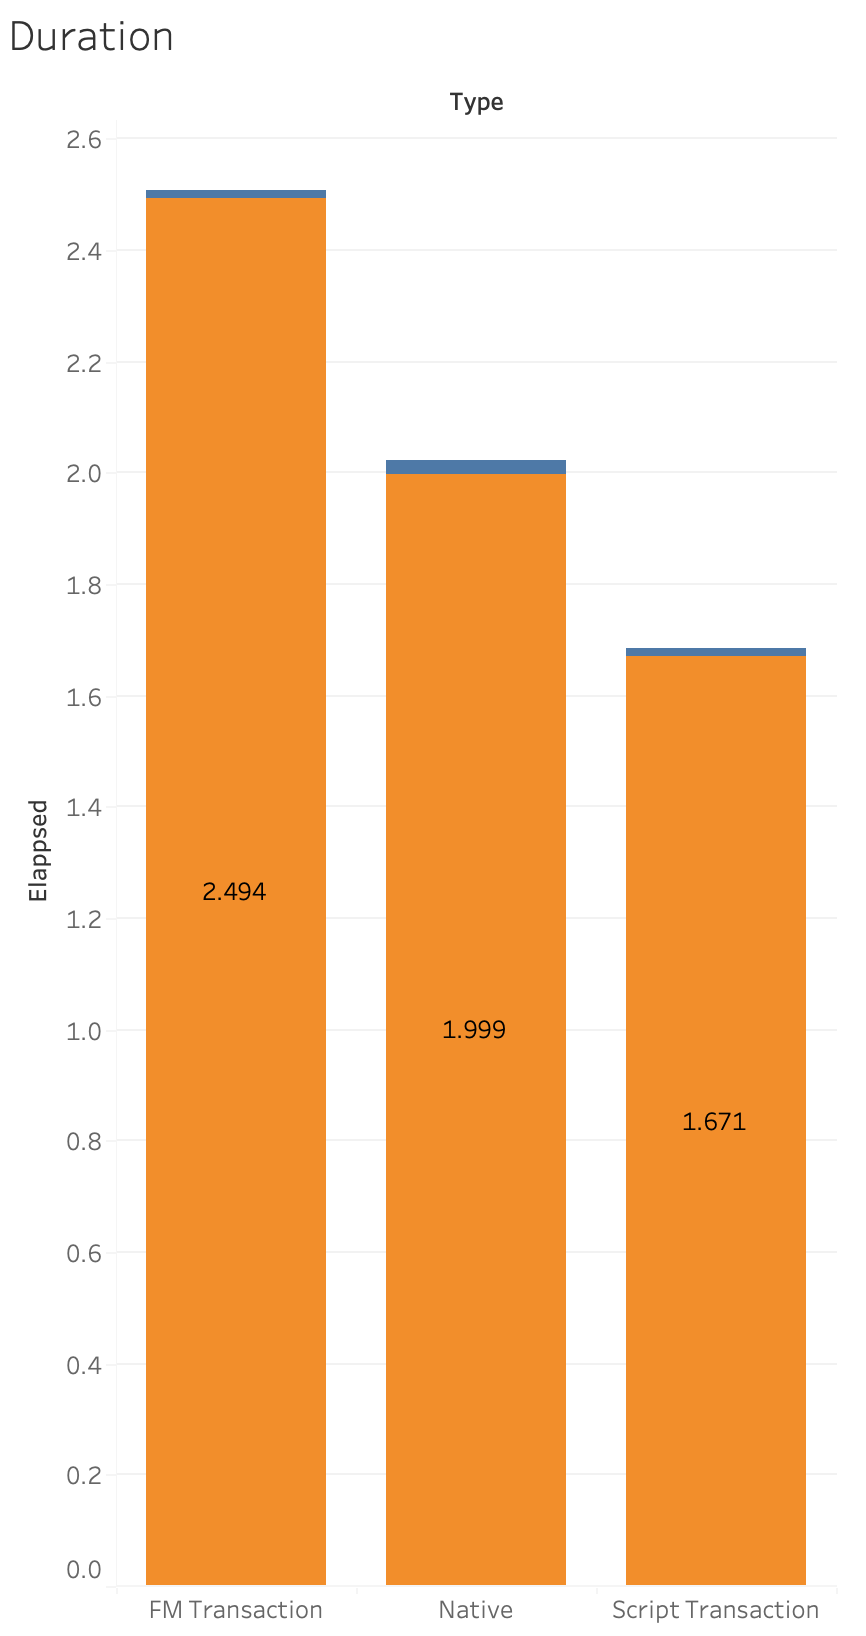
If we filter out the WAN results and just look at the PSoS numbers this is what we see:
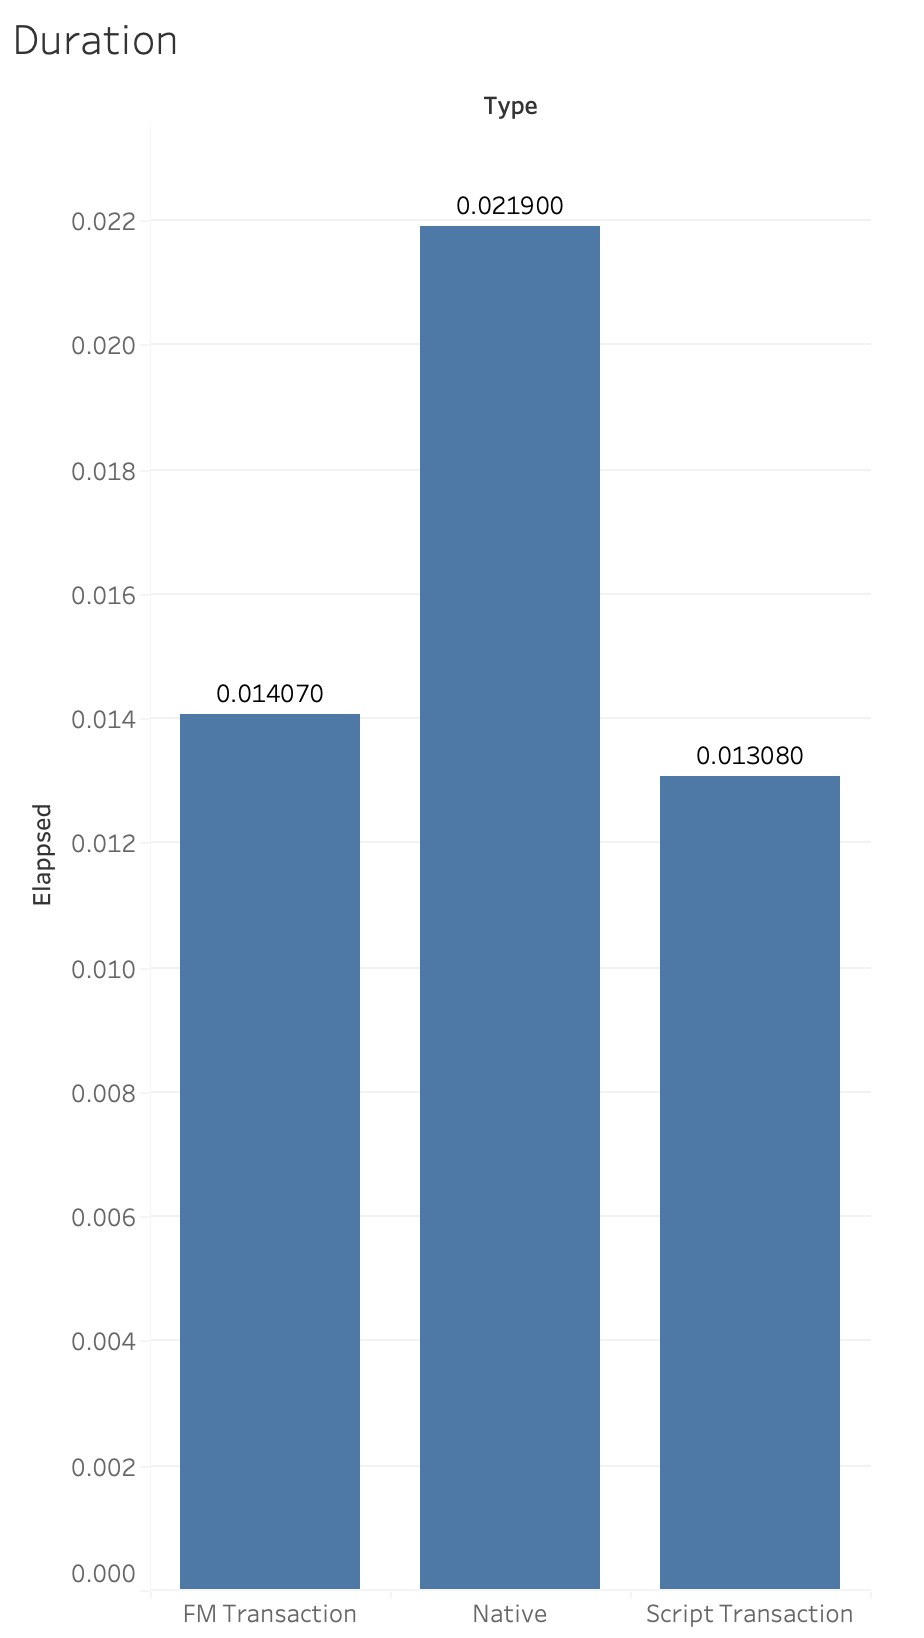

Nice to see that script transactions are the fastest but the bigger dramatic difference is to make sure you run your transaction on the server.
A real world solution
Let’s put this in the context of a real solution. This is a solution that presents 100 rows of data in a list view. It has 20 columns/fields and 2 of the fields are unstored calculations that present a count of 2 different related tables. If we use transactions to convert those unstored calculations to stored calculations, then when FileMaker views the list of records it doesn’t have to do extra work to pull down the related records to calculate the counts. There are fewer calls and less network traffic, etc.

All the fields had local styles and 7 different conditional formatting options on each field. What I did is made a duplicate layout and made sure that no field had local styles and none of them had any conditional formatting. And to differentiate them I called them “Complex” and “Simplified”.
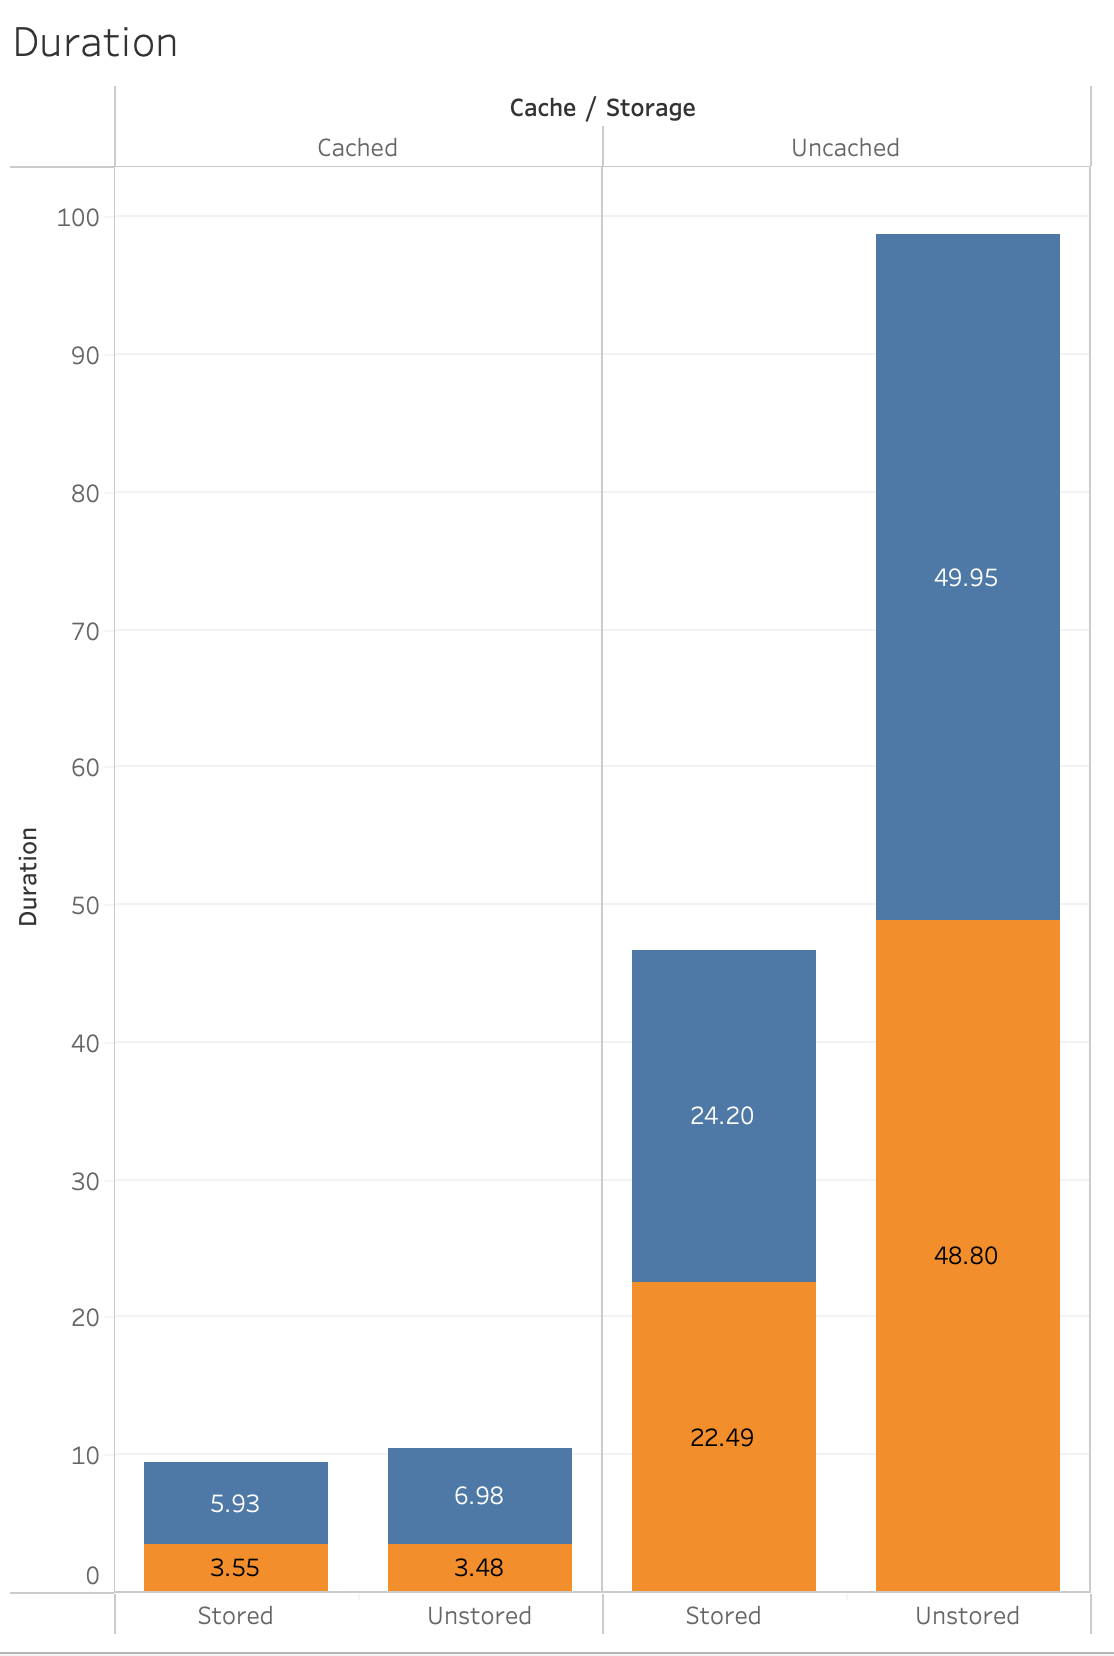
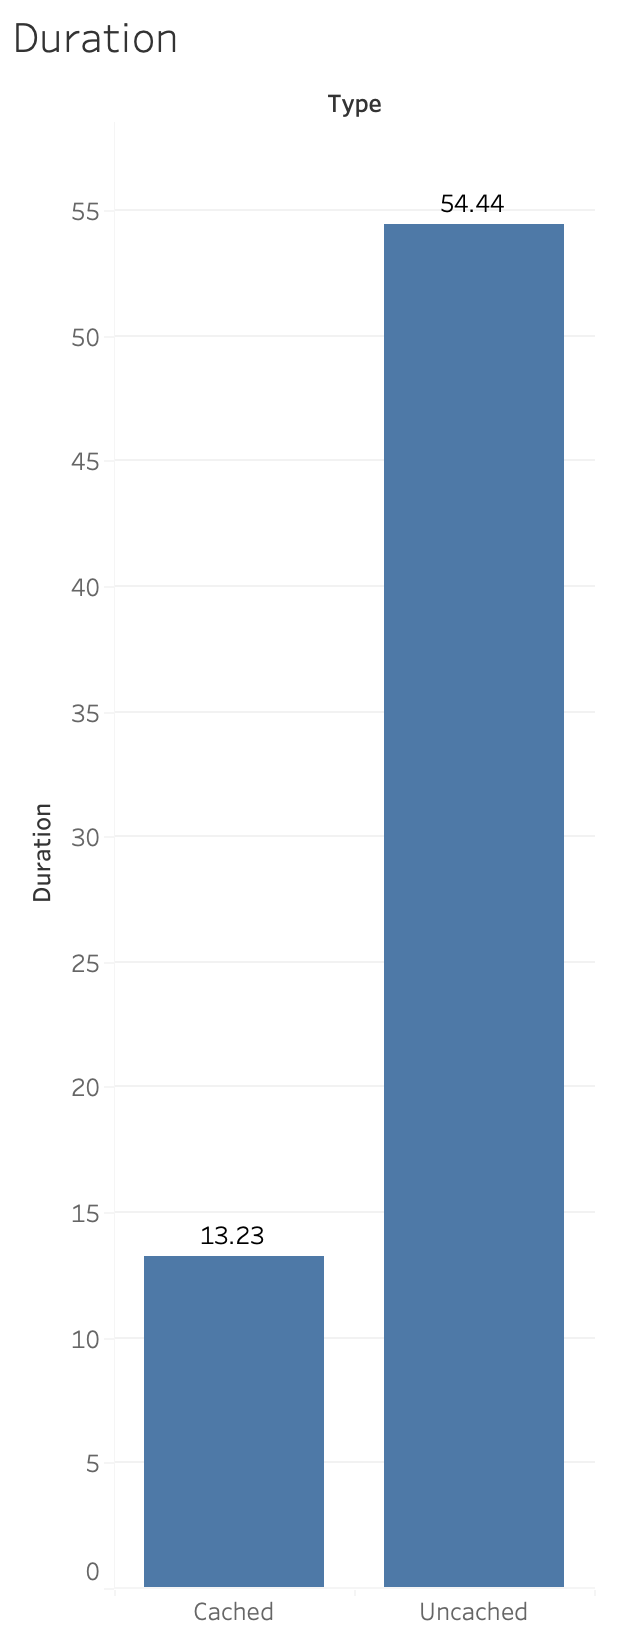
Not much of a difference in time to view the list of records when it is uncached. But there is a significant difference when using the cache.
So with the help of transactions we are able to have the values stored and it improved the performance so that it is about twice as fast.
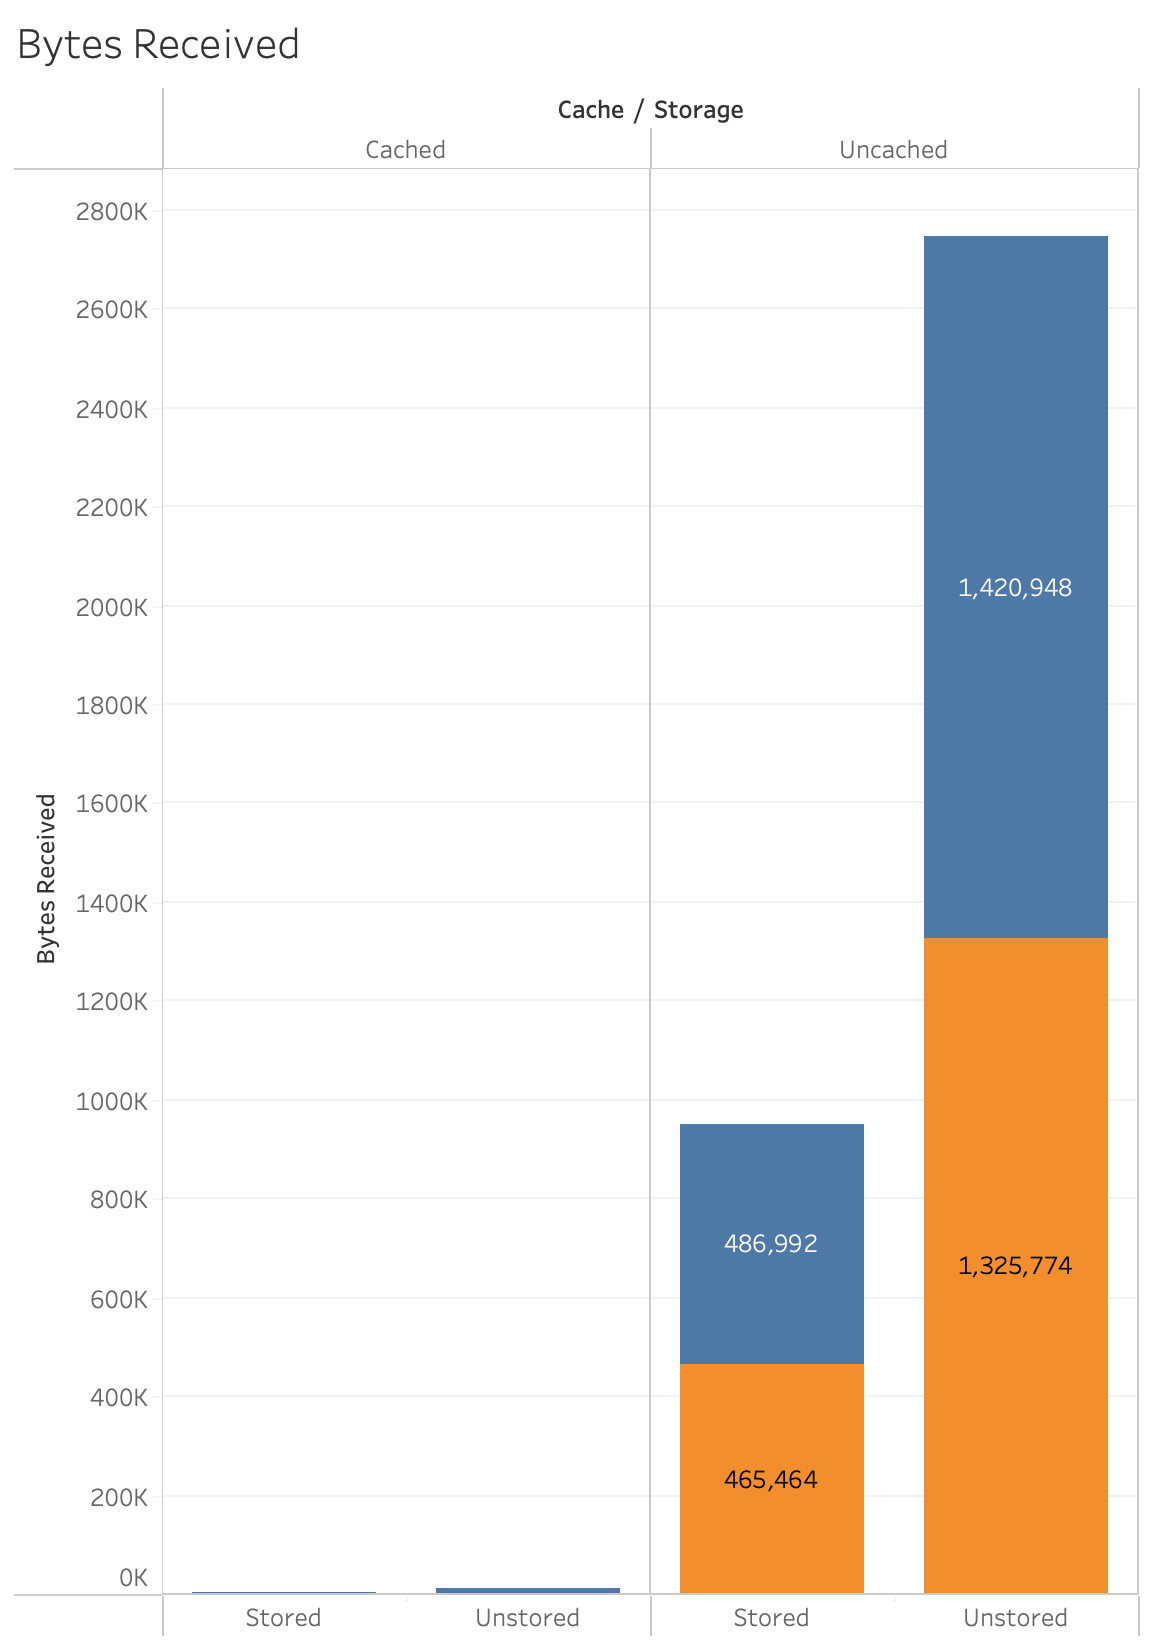
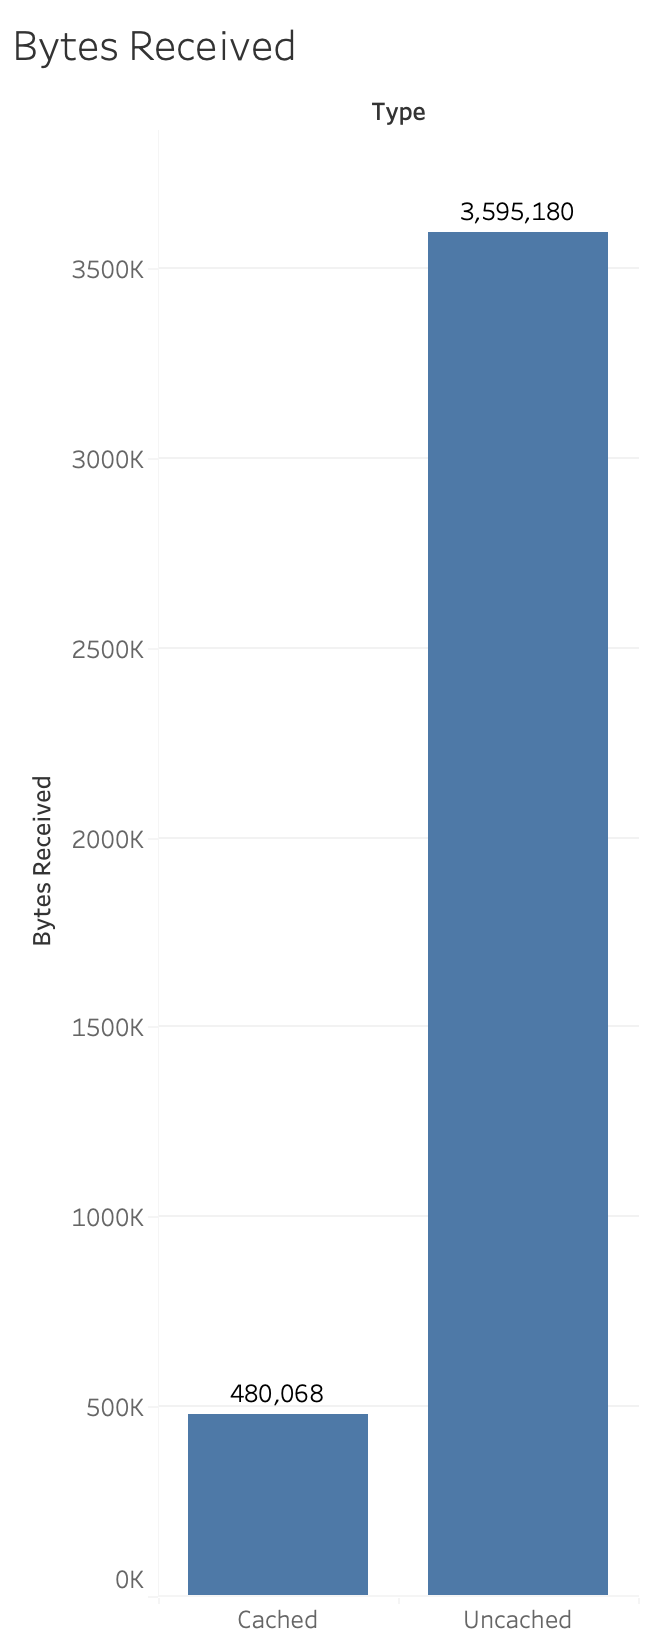
In this chart we see the impact that the stored values have on the amount of data sent to the client. Notice the dramatic difference in the amount of data when the cache kicks in. In the next chart we’ll filter out the uncached values so we can see more closely the bytes received.

Here we can see more dramatically the difference between the unstored complex version of the layout and the simplified layout in terms of the bytes received.
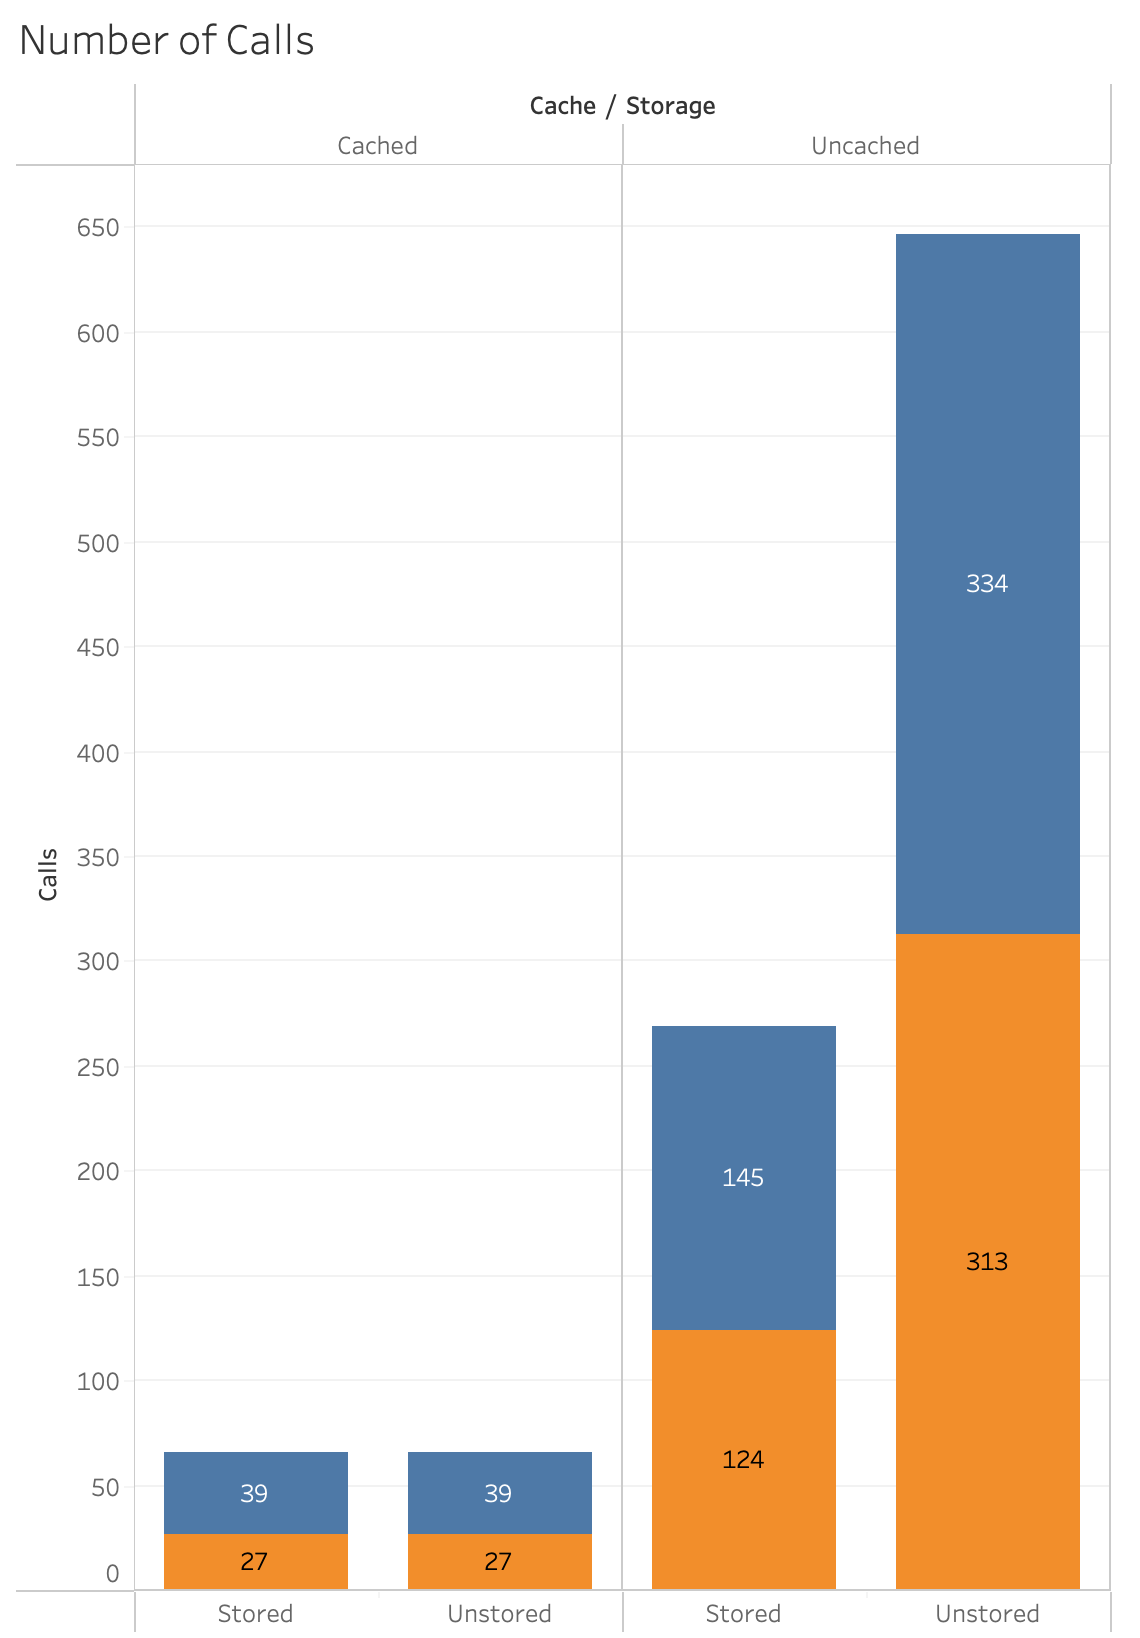
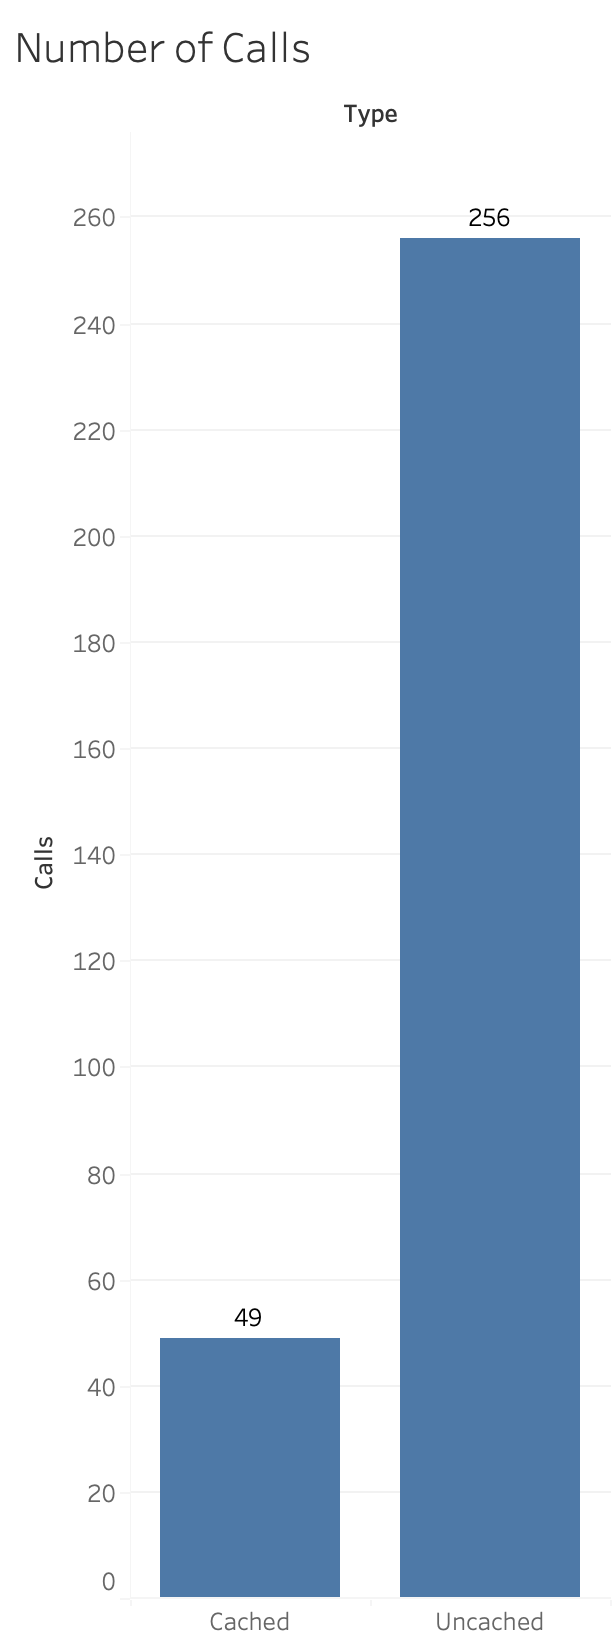
This last chart shows the number of calls. The point I am making is:
Transactions can help you get faster performance by working diligently, while changing unstored calculations to stored calculations.
Note: Of course, it is worth considering many factors, like styles and conditional formatting, etc. The simpler you can keep your layouts, the better.
Direct vs Indirect
During ETS this user interaction wasn’t discussed much, but I think it is going to be one of the most challenging things to consider. How do we allow the user to make the changes and then have the script do the actual transaction?
With the new script transactions, you can open a transaction while putting the script into a paused state. Then go about changing, adding or deleting records. When you resume your script, as long as no revert transaction was encountered or you did not cancel the running of your script, then it would have reached the commit transaction step and your changes would be recorded. This is a little awkward, although it is one way that you could allow for multiple record changes. But it’s still not ideal and especially gets even more messy with script triggers.
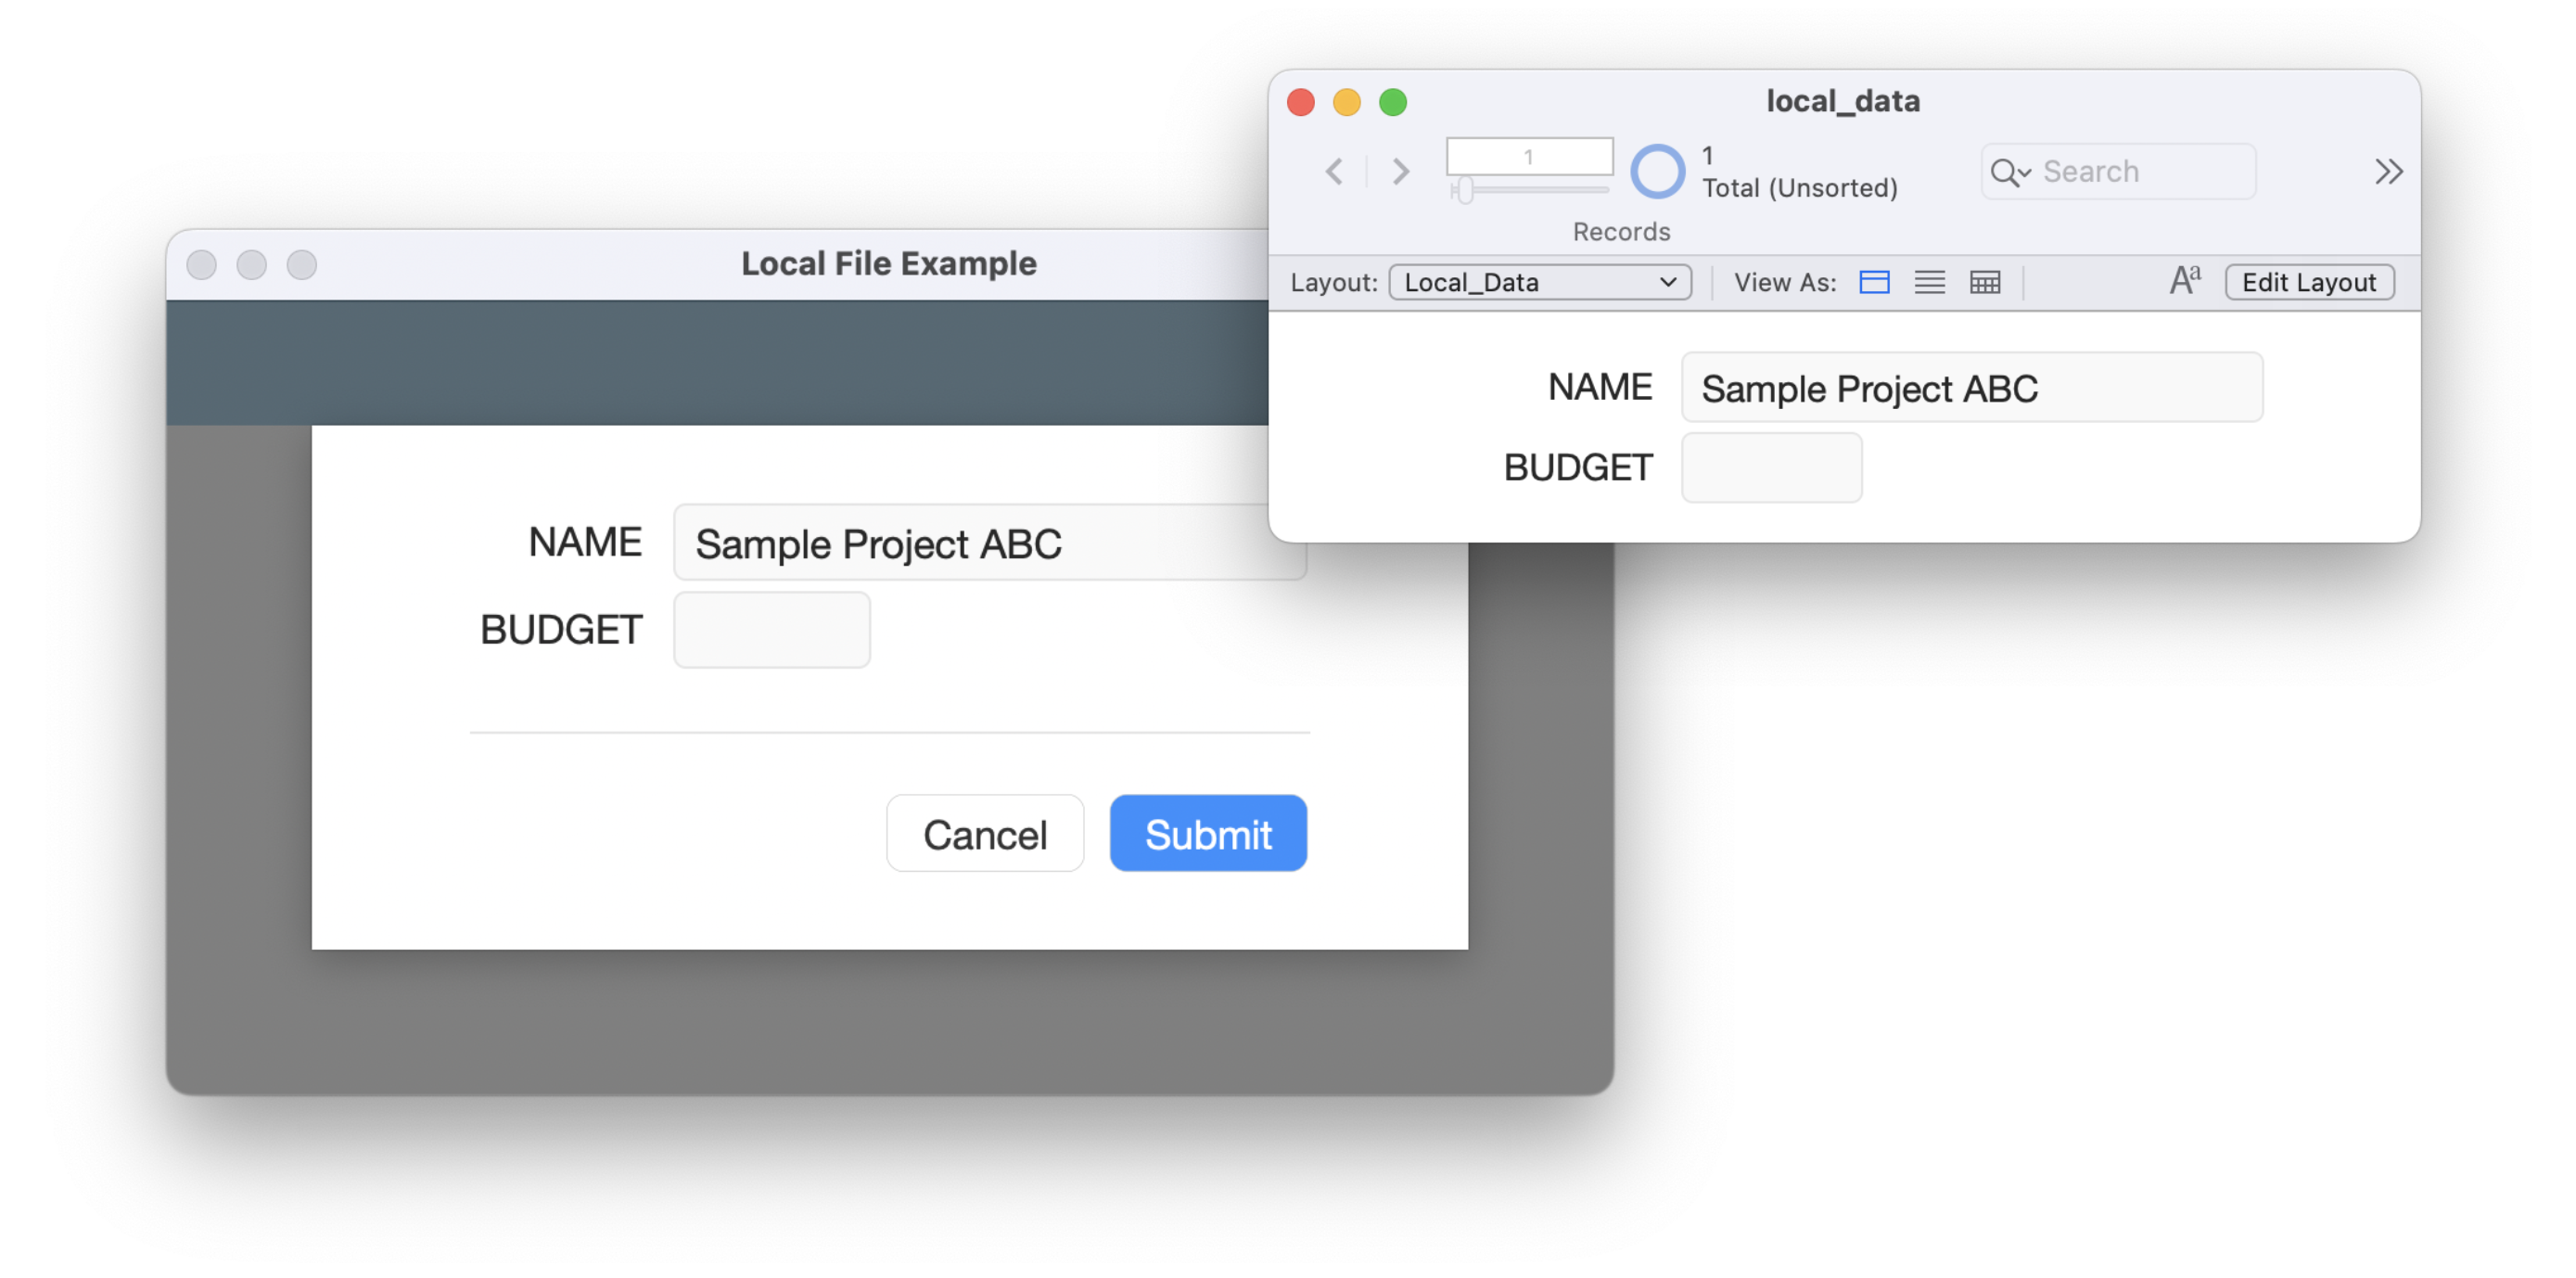
The Local File Editing technique
At Beezwax, we often use what we call Local File Editing. The “local” file is a FileMaker file that starts as embedded into a container in the hosted solution. Then it is exported on open and a variable file reference is defined. There is only schema in there that is needed for creating and editing data.
The basic idea is that the local file is hidden, but because there are table occurrences in the hosted file from it those table occurrences are expressed as cards in the hosted file. So when the user is creating or editing data they are doing it all locally. Only when they are done will it package up the data and send it to the server to have it be transacted upon.
By combining Script Transactions, Local File Editing and PSoS and you gain some really powerful ways to not only improve solution performance, but also improve the developer experience.
To learn more about Local File Editing, you can watch these presentations:
DIGFM: The Value and Benefits of Transactions, Part 1 (2/11/2021)
DIGFM: The Benefits and Value of Transactions, Part 2 (6/10/2021)
DIGFM: Native Script Transactions in Claris FileMaker!, Part 3 (12/8/2022)
Debugging
To test all of these things I mostly used the ReleaseDebugOn flags. To learn more about release debug flags, etc., I’d recommend these two great talks by Karl Jreijiri:
Part 1: Visualizing Network Communication Between FMP/FMGo and FMS
Part 2: Visualizing Network Communication Between FMP/FMGo and FMS
Recap
I am super excited that script transactions are finally here in Claris FileMaker. I think they will have a huge impact on how we architect our solutions. The two main benefits I see are simplified code that is easier to maintain and faster to load, and the possibility of building solutions that allow you to move away from unstored calculations.
And Remember:
Running transactions on FileMaker Server is going to be faster almost always, but especially compared to transactions over the WAN.
FileMaker aggregate functions do not work on uncommitted data.
3 thoughts on “The New Horizon: Script Transactions in Claris® FileMaker®”