Ever wonder how you might be able to create a mobile app with data you already have in your FileMaker solution? I have, too! As it turns out, it’s not too outlandish of an idea thanks to the FileMaker Custom Web Publishing with XML API.
You might wonder, why build a native app? Depending on your data, or your use case, your users may benefit from the native functionality built into both iOS and Android which can provide advanced interfaces and features not readily available in FileMaker Go.
In this blog I will demonstrate how you can leverage the XML API to treat your FileMaker as a back-end and RESTful service. This technique allows for bidirectional communication from both a native iOS app in Swift, and a native Android app in Java. As a bonus, I will show you a workaround to upload container data to your database (according to FileMaker Inc. this is a limitation of the CWP XML API)!
Some pre-requisites:
- Installation of FileMaker Server
- FileMaker Intermediate to Advanced skills
- FileMaker file with fmxml Extended Privilege set enabled
- Permissions on the server to read and write
- Ability to update the php.ini post_max_size and upload_max_filesize to allow large enough files
- Installations of Xcode and/or Android Studio
- Knowledge of Swift and/or Java programming languages, iOS and/or Android SDK’s
That sounds like a lot of prerequisites, doesn’t it? Well, this article doesn’t require you to know both iOS and Android development. You can be familiar with only one or the other, and still be able to follow along.
1. Setup your FileMaker database and Mobile app projects
Let’s begin by creating a simple Person table in a FileMaker database and add the following fields:

Take a moment to host the file and don’t forget to enable the fmxml Extended Privilege Set.
Go ahead and create a new Xcode Project – iOS Application – Single View Application
Also create a new Android Project – Blank Activity – Main Activity.
Now that we’ve got that out-of-the-way, let’s dive into some code!
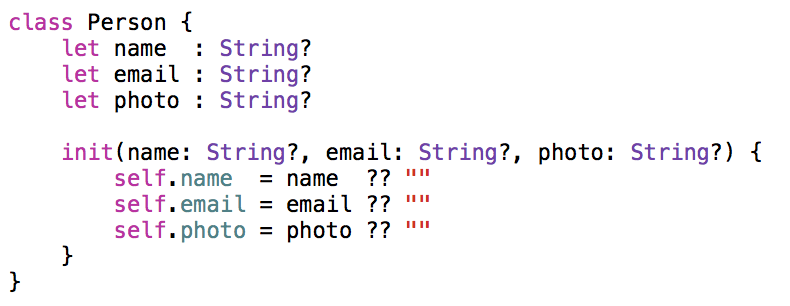
2. Create a class representation of your model
We need a model in our apps to represent the data that we will receive from FileMaker. So, let’s create that Person class now.
Swift
Java

We’re now ready to store our records as an array of Person; we’ll call this array ‘people’.
3. Set up your views
In each project create a TableView (in iOS) and a ListView (in Android). Unfortunately, details on this are out of the scope of this blog, so please refer to Apple and Google’s docs if you aren’t sure how to do this.
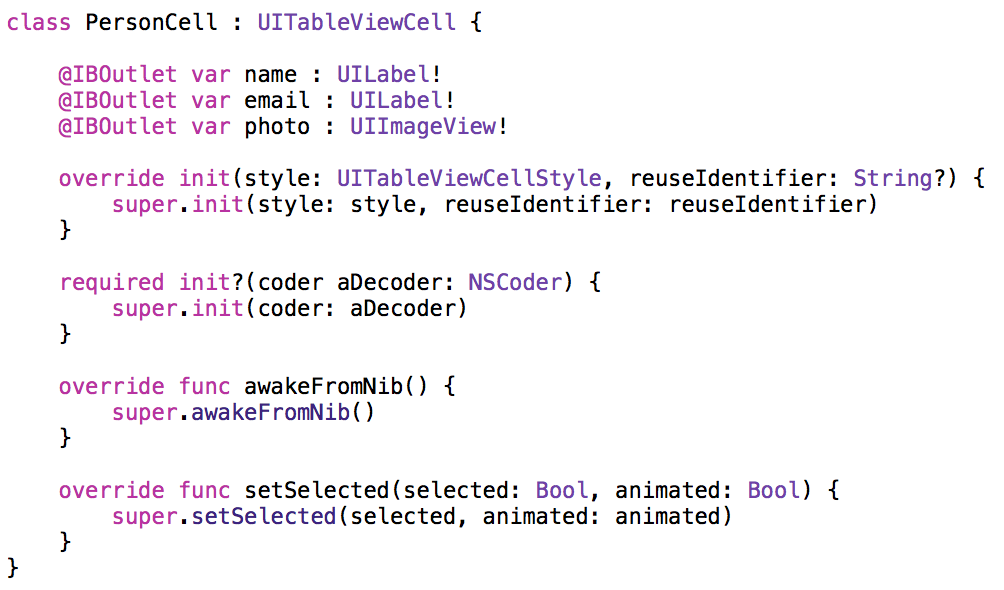
iOS – I suggest you subclass UITableViewCell so that you can create your custom cell with a person’s photo as a UIImage, and UILabels for the name and email. I’ve called mine, “PersonCell” and the cells I use in my tableView are of type PersonCell.

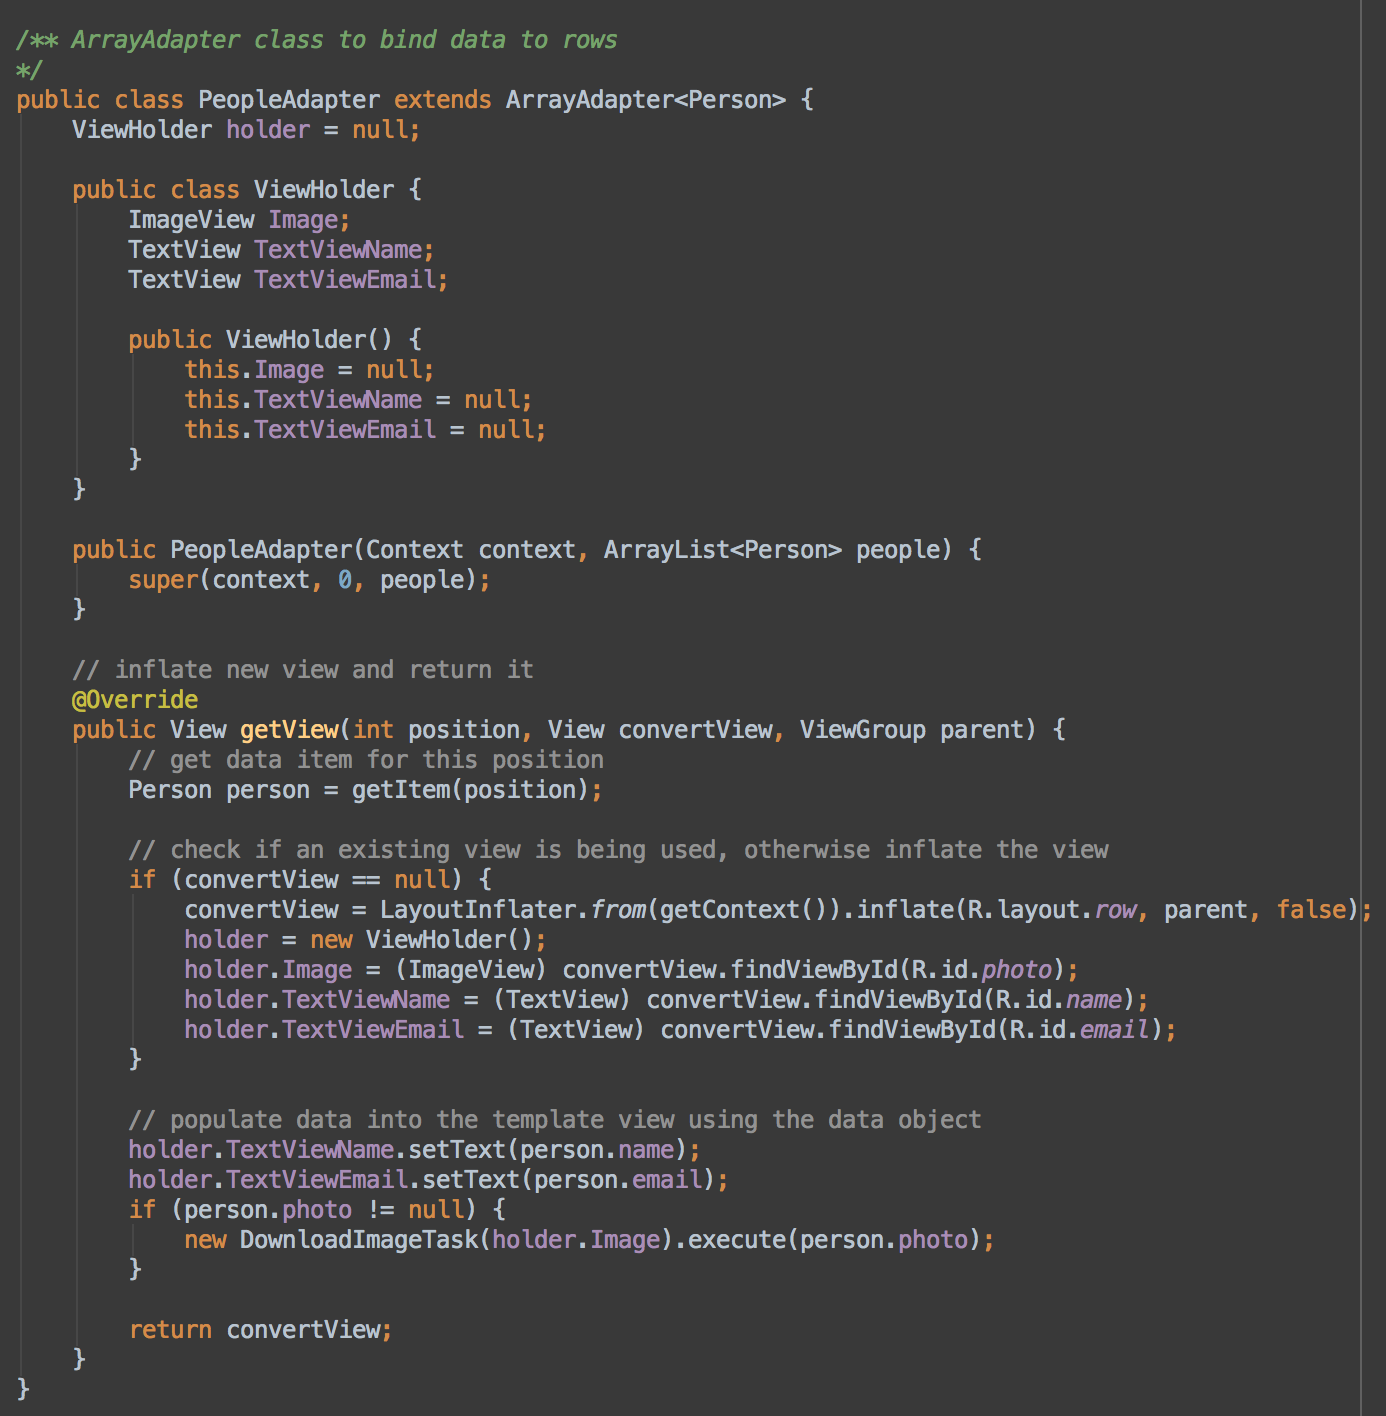
Android – Here you’ll want to create a PeopleAdapter that extends ArrayAdapter such that it’s ViewHolder also contains an Image, and TextViews for name and email. For now, disregard the call to DownloadImageTask as I have not covered this yet.
4. Understand how to query your FileMaker database
Now we’re ready to request some data from our FileMaker database. Before we proceed let’s decipher the syntax for XML data and container objects.
According to the documentation (FileMakerServer 12 Custom Web Publishing with XML on page 22), this is the syntax:

In addition, if you have credentials for the FileMaker database you can authenticate like so:
https://username:password@myhost.net/fmi/xml/fmresultset.xml?-db=myDatabaseFileName
Be sure to reference FileMaker’s documentation if you are unclear about which xml_grammar to use; I will be using fmresultset.xml
If you’ve never used FileMaker’s XML API, then let me explain this: the API requires that you “point” the query parameters to a specific layout. The layout you choose must have the fields present that you wish to get data from. So, if your table has 20 fields but you only need data from 5 of those, then just drop those 5 fields on the layout and you’re ready to go.
My query request to get all of the records in the database looks like this:
https://username:password@myhost.net/fmi/xml/fmresultset.xml?-db=swiftfm&-lay=person&-findall
Notice I am including the authentication credentials, my database filename ‘swiftfm’, the layout ‘person’, and lastly the keyword ‘findall’ to get all of the records in that table.
5. Let’s get some data!
Before we digest the data, I would like to discuss the biggest caveat I have found with this technique — any time the database table is modified (e.g. fields added or deleted) the index of the field in the XML response changes. This results in a very fragile system! Just some cautionary words in case you run into this as I did.
Here is what my FileMaker table currently stores – I like classic scary movies.

And this is the response I get from the API query

You can ignore the first few tags within fmresultset. We are only concerned with the data inside of the resultset tag.
For every record in your data set, there will be one record tag. Within this record tag you will see the field tag with a name attribute – this is where you get the field name. Nested inside of the field tag is the data tag — this is of course, the data stored in that field.
You may notice that the data for my photo field contains a path — this is the relative path to where the image can be found on the server. When we digest this data you’ll see that I create a string concatenation of my serverIP address and the data path in this field.
where, serverIP = “https://myhost.net” and data = “/fmi/xml/cnt/Untitled.jpg?-db=swiftfm&-lay=Person&-recid=20&-field=photo(1)”
e.g. https://myhost.net/fmi/xml/cnt/Untitled.jpg?-db=swiftfm&-lay=Person&-recid=20&-field=photo(1)
)
Once you have the string above you can create an NSURL and URL, in iOS and Android respectively, and use these to load the image data.
Let’s display this in our mobile apps now.
Swift – We’re in luck here because Alamofire makes HTTP network calls a breeze. Coupled with SWXMLHash, parsing the XML data is super easy.

Android – Before I show you the code, this is not for the faint of heart. There are two classes that I heavily relied on to:
- Parse the XML (this is certainly NOT a trivial task in Android)
- Download the Images on a background thread
The FMParseTask runs in a background thread and is responsible for querying the XML API. The onPostExecute runs when the background task is complete and attaches our PeopleAdapter to the listView.

Towards the end of the try block we call the method, parse(myparser). Here is the implementation of that and the “readers”. These readers are the methods which parse the XML.

These next few methods are helpers that iterate through each tag in the XML.
First, we read each record in the XML. Remember, there is one record tag for each record in the data set.

If the above method encounters any of the fields we are looking for (name, email, photo), then we call the following to read the record.
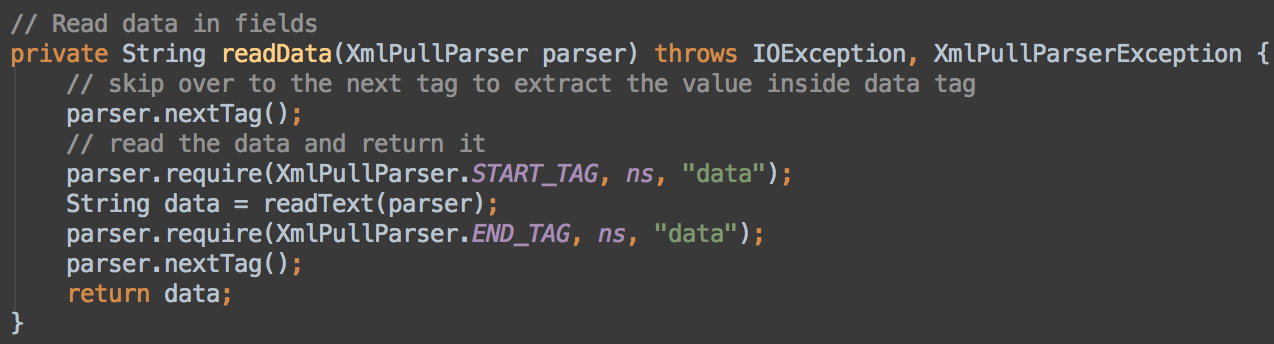
Once we’ve found the data we use this method to extract the strings.

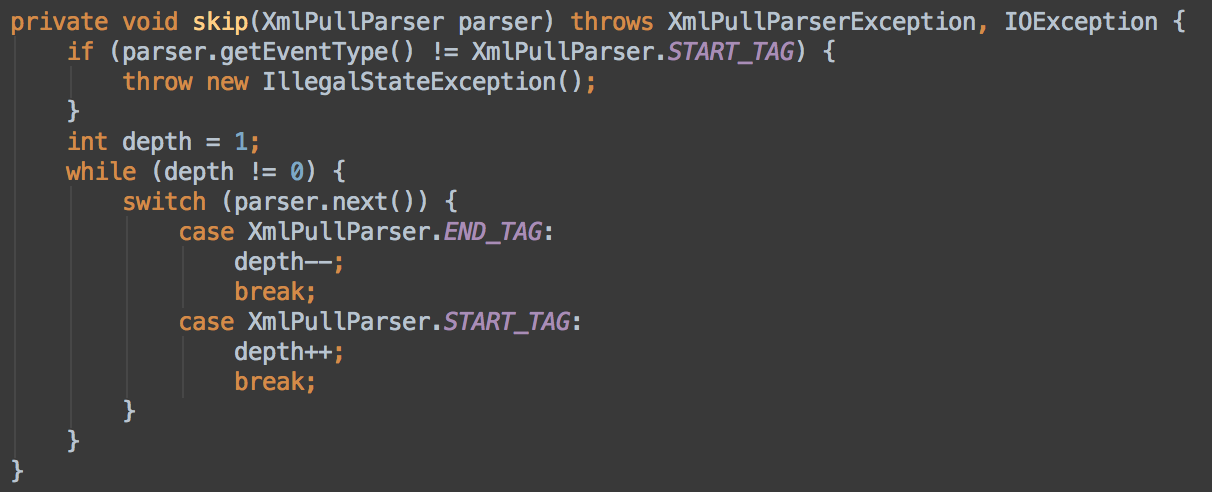
When we get to tags we don’t care about we call the skip method below.
That covers the data portion, to handle the images we call the DownloadImageTask method on another background thread.

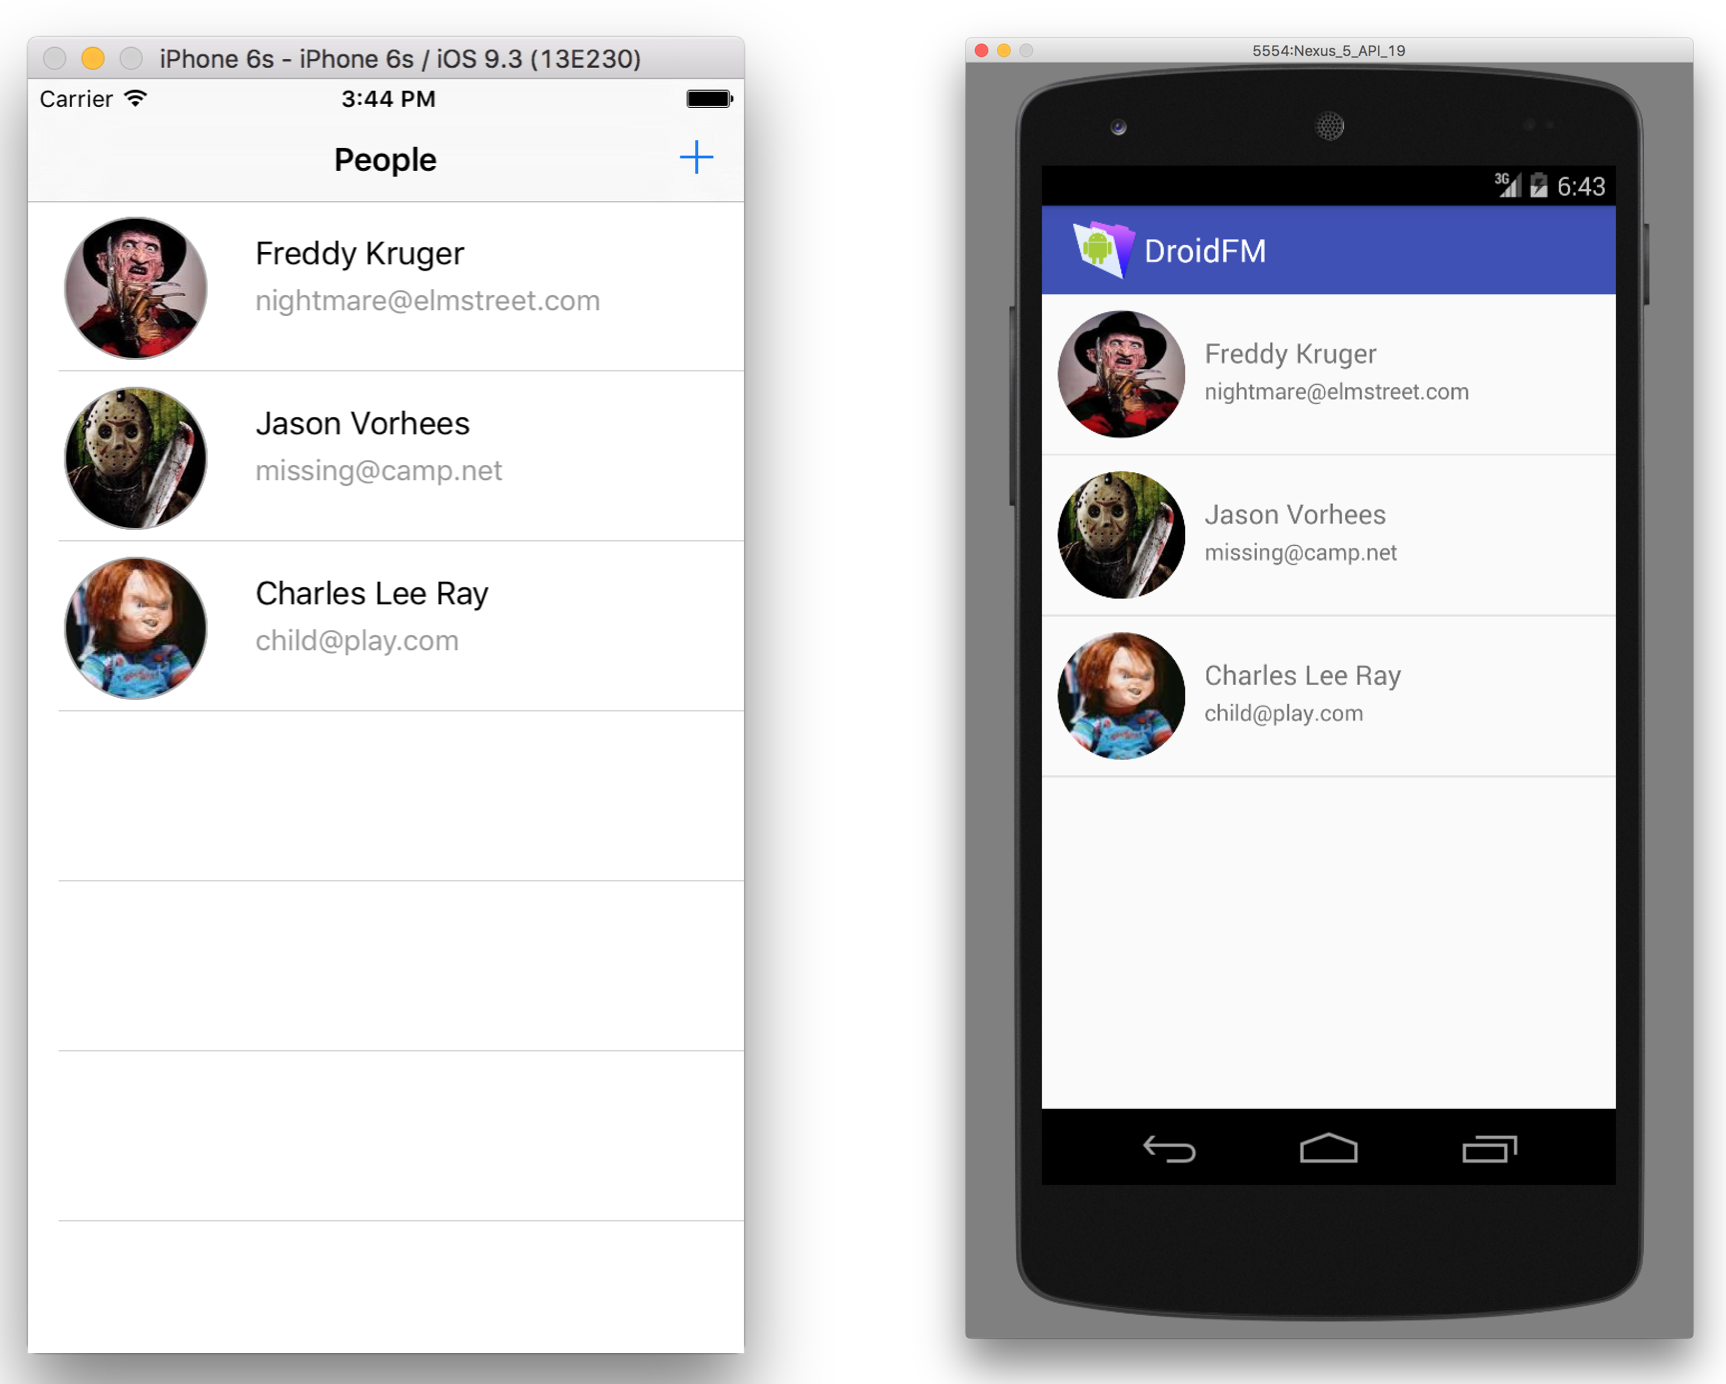
If you run your apps now, you might get some version of this…
6. Let’s upload some data!
So far, I’ve showed you some ways to download the data and present it in native UI’s. The next challenge is to upload data, including images! I skipped the Android implementation due to Java’s verbosity and the fact that this is really a proof of concept. Given that it’s functional in Swift, let’s assume it’s functional in Android.
Some things to get out-of-the-way first.
- Upload the PHP script below to your server.
- Update the php.ini file to allow large enough files for uploading images: post_max_size and upload_max_filesize
- Restart the Apache server after you’ve modified the php.ini
- Create the FileMaker script to help us upload the image file into the container
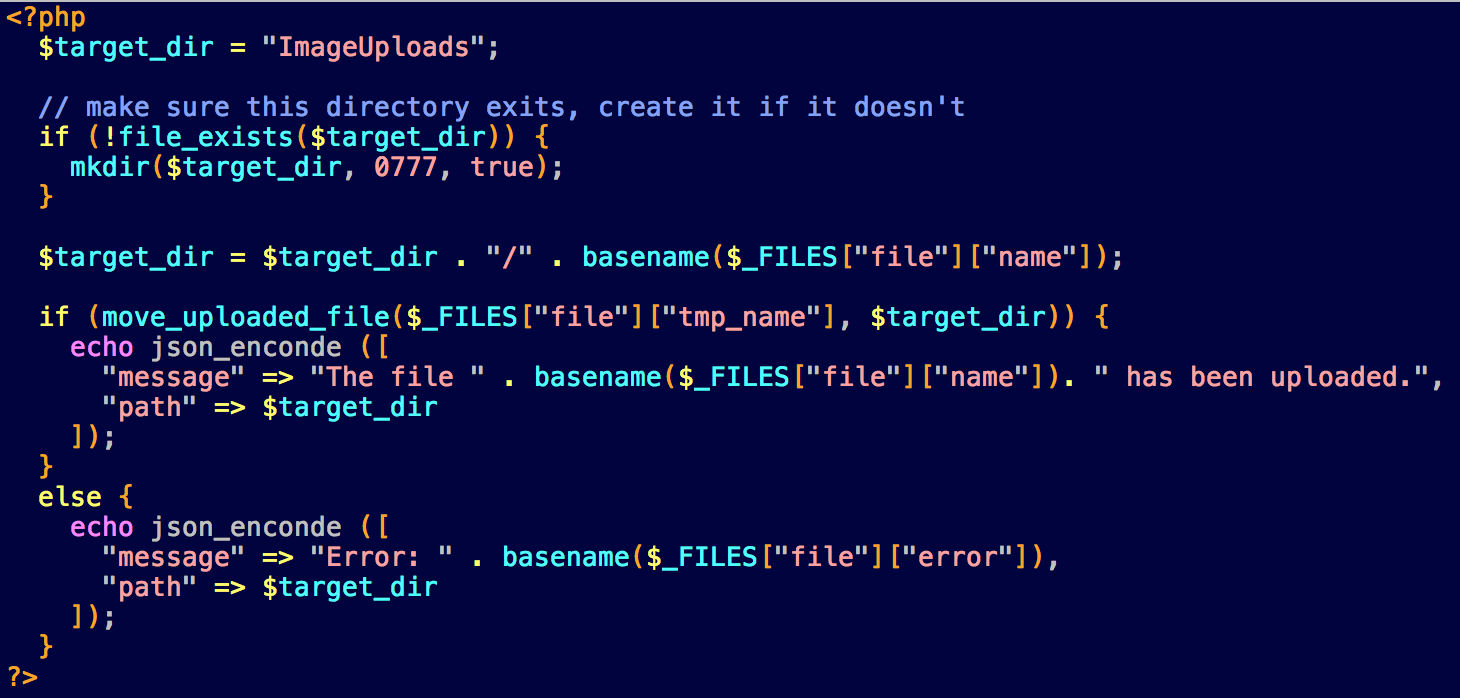
This is the PHP script. It receives the filename and it returns JSON data with the path where the image has been stored.
This is the FileMaker script.

The logic of this script is pretty straightforward. It receives the new person’s data as parameters, and the $photo variable contains the path that the PHP script returns (assuming all went well). We set the variable $serverPath with a prefix that contains the server’s scheme and IP address.
We can then create a New Record in the Person table, insert the image with our $serverPath, and lastly set the data fields.
In the iOS application I have set up the UI to allow the creation of a new Person.

And this is where the magic happens…

We first grab the instance of the Person we just created to use inside our block. Then we send off the upload with the image data and upon completion we receive the imagePath where our PHP script uploaded the file to.
Here is the method implementation of uploadImageFile. Once uploaded we parse the JSON to extract the location of the image on the server.

This is the implementation of the createImageTimestamp() that I used to create unique filenames for each upload.

And this is the implementation of urlRequestWithComponents which takes two parameters: serverPhpPath (where this is https://myHost.net/uploadImage.php and parameters which contains the image data. This is used to add the proper headers to our request.

Once the server has finished uploading the image then we can fire off another request with the XML API to create a new record in our Person table. We call our method, createRecord.

This time our query URL looks like this:
https://username:password@myHost.net/fmi/xml/fmresultset.xml?-db=swiftfm&-lay=person&-script=createRecordWithImage&-script.param= + escapedParams! + &-findall
The escapedParams is a variable that stores the parameters after they have been sanitized.
We append “&-script=createRecordWithImage” in order to request the XML API to call the script we created earlier. We also give it the “&-script.param=“ to provide the necessary parameters. Recall that our FileMaker script receives 3 parameters: name, email, and imagePath.
Here’s the result!

A quick recap of all the technologies used here:
- FileMaker Pro Advanced and Server
- Swift and the iOS SDK, plus some open source helpers:
- Alamofire – for HTTP network calls
- SwiftyJSON – to parse JSON data
- SWXMLHash – to parse XML data
- NetData – to encode our images
- Haneke – to download image data
- Java and the Android SDK
- XML and JSON parsing
- HTTP get and post
- PHP
Using FileMaker’s Custom Web Publishing engine we were able to bi-directionally communicate with FileMaker data. Getting the data is simply a matter of parsing the XML response. In Swift, it’s a sweet breeze! In Android, it’s considerably more work. It’s a technique that I am really excited about and can’t wait to use it on more projects where a native mobile app can provide the best user experience with FileMaker data.
Uploading data was a fun challenge, in particular, finding a workaround to upload data in a native FileMaker container. Again, the XML API gave us access by letting a script create the record once we had our PHP return the path of the image on the server.
If you have any questions, comments, concerns, or just want to brainstorm on how to make this technique better then leave me a comment!
For the complete download, checkout the GitHub repo.
Happy Mobile Development 🙂