One of the most exciting aspects of the newly-released FileMaker 12 product line upgrade is a major redesign to the product’s UI. A new Design Surface modernizes FileMaker Pro layouts and updates every built-in control, giving developers and designers powerful new tools for designing better interfaces.
But as great as Design Surface is, why just stay on the surface?
Here’s how to take advantage of a hidden key in FileMaker Pro 12 to go far beyond the limits of the default set of layout controls. This article will demonstrate how to incorporate virtually any UI control you see on the web directly into your FileMaker 12 Pro — and FileMaker Go — layouts.
Web 2.0 controls and widgets can now be full citizens of FileMaker solutions. They can display FileMaker data as it updates in real time. They can make real-time changes to FileMaker data — natively, without plugins. In short, with FileMaker 12, you can integrate Web 2.0 controls deeply and transparently into your solutions.
HTML5, jQuery, MooTools, ExtJS and more
This new capability opens a door wide to creative possibility. Developers and designers can now expand the palette of available layout controls. If you can find a JavaScript control or an HTML5 design pattern on the web that meets your needs, you can potentially implement it in FileMaker. For example, check out the JavaScript widgets, toolbars and effects available via jQuery, MooTools, or ExtJS. These typically work perfectly in modern browsers. And this technique leverages industry-standard HTML5, JavaScript, and CSS3 – so now you can involve those web designers who might otherwise feel left out of the FileMaker 12 development party.
A Sneak Preview
So, what does a FileMaker 12 layout look like with native Web controls? Here’s an example of the end result:
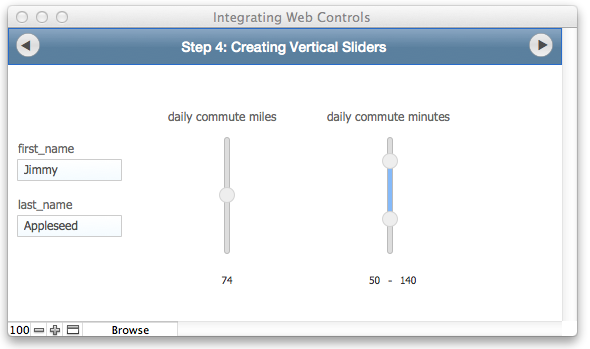
Two native web controls (a single and a dual range slider), plus several standard FileMaker edit box controls (first and last name fields, as well as live text values,) work together to create a simple interactive layout.
A quick note: See the end of this blog post for the demo file. And for now, this technique only works with a solution hosted on FileMaker Server 12, which I’ll explain shortly…
Web Viewers that Talk Back
Our ability to fully integrate live web controls into layouts uses FileMaker 12’s new “fmp://” protocol. I’ll cover the details later in the article. For now, here’s the bit we care about: Objects within a Web Viewer can use this new protocol to send messages directly to our FileMaker 12 databases. They can directly call FileMaker scripts and pass parameters to them in real time.
This means that a Web Viewer in our solution can make a round trip cycle and communicate any changes about its state to our solution, just like built-in layout controls always have done. In effect, this turns Web Viewers from display-only portals into full citizens of our FileMaker world. Anything we could see in FileMaker 11’s Web Viewer can now potentially talk directly to our FileMaker 12 solutions.
This technique works well in both FM Pro 12 and FM Go 12, with one quirk. As of this writing, this technique using the fmp:// protocol doesn’t work with standalone FileMaker Pro databases, although it works fine with standalone FileMaker Go databases. (So, you may want to make sure you have a FileMaker Server or an iPad handy). Hopefully, this limitation will be addressed with a future release of FileMaker Pro.
Setting Up a Demo Project
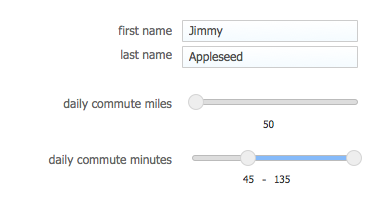
Let’s start with a simple FileMaker solution. We’ll track some very basic information about employees and their commutes: daily commute miles, and the minimum & maximum number of minutes their commute can take (say, depending on traffic conditions). Here’s our FileMaker Pro 12 layout using standard native controls:

There’s certainly nothing wrong with this, especially given the FM 12 Design Surface’s new abilities to provide CSS styling and web-like object hover and focus styling. Still, let’s imagine that we want to provide range sliders on our layouts, just like users would see on the web. We want a simple slider for daily commute miles, and a dual/range slider for the daily commute fields.
Choosing from a Vast Menu
When the whole web is our UI oyster, we face a smorgasbord of options. So, let’s go pick some Web 2.0 slider controls. For now, we’ll limit our world to native HTML5 or JavaScript controls. Also note that Web Viewer in FileMaker 12 for Windows does not support most HTML5 objects (this is expected to change when Internet Explorer 10 is released). Therefore, we’ll further limit our search to widgets from widely-used JavaScript libraries we mentioned earlier. One suggestion: If you find a web control you’d like to use in your FileMaker Pro 12 solution, test it in both in Safari (Mac) and IE (Windows) to make sure it works as expected in both browsers.
Setting Up the Basics
Whenever we want to bring a web widget into a FileMaker solution, our first task will be to extract the HTML, CSS and JavaScript required for this control to work. In our case, we’ll start by downloading the code for some range sliders via the excellent jQuery demo site. We’ll extract the code, and we’ll change any relative paths to be made absolute. We may want to place JavaScript, stylesheets, and other assets into local objects within our solution or onto servers we control and update references to match. Then, we’ll package our widget up into a Custom Function which will enable us to easily deploy it in any solution we’d like.
The starting version of our jQuery slider Custom Function is shown below. The code is really quite simple: we invoke some standard jQuery script libraries, add a standard jQuery stylesheet and a bit of inline CSS, and create the jQuery scripting needed to configure a slider for the slider function and a skeletal body structure:
"data:text/html,
<!DOCTYPE HTML>
<html>
<head>
<link rel='stylesheet' href='http://ajax.googleapis.com/ajax/libs/jqueryui/1.8.16/themes/base/jquery-ui.css' type='text/css' media='all'>
<style type='text/css'>html, body {height:100%;width:100%;border:0;padding:0;overflow:hidden;}#slider-range {position:absolute;width:80%;left:10%;}</style>
<script src='http://ajax.googleapis.com/ajax/libs/jquery/1.6.2/jquery.min.js' type='text/javascript'></script>
<script src='http://ajax.googleapis.com/ajax/libs/jqueryui/1.8.16/jquery-ui.min.js' type='text/javascript'></script>
<script src='http://jquery-ui.googlecode.com/svn/tags/latest/external/jquery.bgiframe-2.1.2.js' type='text/javascript'></script>
<script src='http://ajax.googleapis.com/ajax/libs/jqueryui/1.8.16/i18n/jquery-ui-i18n.min.js' type='text/javascript'></script>
<script type='text/javascript'>
$(function() {
$( '#slider-range' ).slider({
min:0,
max:100,
step:1,
value:5  });
});
</script>
</head>
<body><div id='slider-range'></div></body>
</html>"
This is Ground Control to Major Tom…
On our layout, we’ll add a Web Viewer set to get its data URL from our Custom Function. This is an important first step where we confirm that our web control acts like it should – in this case, sliding back and forth like a slider. But we haven’t yet told our widget how to communicate with our FileMaker solution, so we won’t expect any interactivity yet.
Our next step will be to wire up our widget to consume live FileMaker data. We’ll begin by adding some script parameters to our Custom Function to give us conduits for passing bits of data to our widget. Then we’ll modify our static Web Viewer code so that the data passed through our script parameters will be dynamically injected directly into the widget itself. The new additions to our custom function look like this:
$(function() {
$('#slider-range').slider({
min:" & vmin & ",
max:" & vmax & ",
step:" & step & ",
value:" & value & ",
}
});
…This is Major Tom to Ground Control
At this point, our Web Viewer will be able to see FileMaker data and will immediately respond as we change the linked field data. Now let’s teach our Web Viewer to talk to our solution. To do this, we’ll add two more script parameters to our Custom Function: These will let us pass the name of the FileMaker script we’d like our web control to call when it’s been modified, and the name of the field we’re binding the control to.
Within our JavaScript code, we’ll also make a few changes. First, we’ll attach an anonymous function to our jQuery slider’s “stop” event, which efficiently fires only when we release our slider. When this event fires, we’ll do something unexpected: We’ll set the location of the Web Viewer itself to a special URL that’s nested in that nifty FileMaker 12 fmp:// protocol. This combination of invoking the fmp:// protocol and placing it in the web viewer’s location hash is FileMaker 12’s secret sauce that will let our web viewers talk directly to FileMaker. This is the most important bit – and perhaps the trickiest as well – so let’s break this down a bit:
Within our jQuery code’s stop event, we set the Web Viewer’s self.location property. The value we use is assembled from a combination of static text and dynamic FileMaker-calculated data. You may wonder where the advertised “fmp://” protocol is. In this case, it’s wrapped in a simple Custom Function, whose job is to dynamically create a valid set of arguments regardless of the file’s location or platform. We create a Custom Function, “url.fm”. It accepts 2 script parameters, “script” (the name of the FileMaker script our web viewer will talk to) and “parameters” (any hard-coded parameters we want to pass to that script):
Let ( [ path = Get ( FilePath ) ; path_pro = Right ( path ; Length ( path ) - 7 ) ; start_go = Position ( path ; "/" ; 1 ; 2 ) + 1 ; path_go = "$/" & Middle ( path ; start_go ; 9999 ) ; path = If ( isGo ; path_go ; path_pro ) ] ;"fmp://" & path & "?script=" & script & "¶m=" & parameters)
This Custom Function does a few tasks for us. Most importantly, it determines our platform and the location of the file we’re using, and constructs the matching fmp:// URL for us. So in FileMaker 12 Pro, our fmp:// URL will look something like this :
fmp://10.1.10.100/Integrating_Web_Controls.fmp12?script=my_script¶m=my_parameters
While in FileMaker 12 Go, our URL will look like this:
fmp://$/Integrating_Web_Controls.fmp12?script=my_script¶m=my_parameters
Returning to our slider Custom Function, we can now reference url.fm as we’re setting the Web Viewer’s location property. After invoking url.fm, we’ll concatenate code that will append the current value of our slider at the moment the event is fired:
$( '#slider-range' ).slider({
min:" & vmin & ",
max:" & vmax & ",
step:" & step & ",
value:" & value & ",
stop: function( event, ui ) {
$( self.location = " &
sQuote ( url.fm ( script ; target_field & "|" ) ) & "
+ $( '#slider-range' ).slider( 'values', 0 )
);
}
});
With this in place, our web widget will now look for the FileMaker script we direct it to via our script parameter, and if it’s able to connect, it will pass the live parameters we’ve set up. We’re almost there.
The last thing we need to do is set up the FileMaker handler script our web widget will be looking for. The handler script’s task is to take the parameters our web widget hands it and perform whatever action we want. in our case, the action is to update the targeted FileMaker field. Let’s set up a script to do this, remembering that our Web Viewer will be returning the name of the field it wants to update as well as the value (and that our upcoming dual slider widget will return pairs of each). Here’s how our script looks:
Set Variable [ $_params; Value:Substitute ( Get ( ScriptParameter ) ; "|" ; "¶") ]
Set Variable [ $_fields_passed; Value:Case ( ValueCount ( $_params ) = 2 ; 1 ; ValueCount ( $_params ) = 4 ; 2 ; 0 ) ]
If [ $_fields_passed = 1 ]
Set Variable [ $_target_field; Value:GetValue ( $_params ; 1 ) ]
Set Variable [ $_value; Value:GetValue ( $_params ; 2 ) ]
Else If [ $_fields_passed = 2 ]
Set Variable [ $_target_field; Value:GetValue ( $_params ; 1 ) ]
Set Variable [ $_target_field_2; Value:GetValue ( $_params ; 2 ) ]
Set Variable [ $_value; Value:GetValue ( $_params ; 3 ) ]
Set Variable [ $_value_2; Value:GetValue ( $_params ; 4 ) ]
End If
Set Field By Name [ $_target_field; $_value ]
If [ $_fields_passed = 2 ]
Set Field By Name [ $_target_field_2; $_value_2 ]
End If
Houston, We Have Contact!
OK. We’ve done all the hard work! But, really, this wasn’t too hard, right? And remember, this is a one-time setup; once we have the pieces in place, things get nice and easy. Now let’s take our web widget out for a spin. Back in our layout, we’ll add a Web Viewer and configure it with a data URL that points to our Custom Function like this:
rangeJQ (
DemoValues::miles ;
GetFieldName ( DemoValues::miles ) ;
DemoValues::miles_min ;
DemoValues::miles_max ;
1 ;
"webHandler"
)
And, just like that, we have a live jQuery slider on our layout! It’s attached to our miles field as desired. If we update the FileMaker field data, the slider will update instantly to reflect the change. If we move our slider, our underlying FileMaker field data will immediately update as well. Both objects understand and enforce the same data constraints (minimum, maximum, and even step values). From a user’s perspective, there’s little if any noticeable difference between stock FileMaker layout controls and our new jQuery slider. Everything “just works”…Sweet!

Giving our Web Slider some Style
There is still one complaint from the audience. (Tough crowd!) Our newborn web control is, well, kind of boxy – maybe even, dare we say, ugly. The great news is that just like native FileMaker 12 Design Surface elements, we can simply style our new web widget with a bit of standard CSS, which we’ll add in our Custom Function:
<style type="text/css">
html, body {height:100%;width:100%;border:0;padding:0;overflow:hidden;}
#slider-range {position:absolute;width:80%;left:10px;}
.ui-slider .ui-slider-handle {font-size:.1em; width:1.2em; height:1.2em;-webkit-border-radius:20px;border-radius:20px;background:#eee;}
.ui-slider .ui-slider-range {font-size:.1em;background:#85BAFA;}
.ui-slider-horizontal {height:4px;background:#ddd;border-color:#bbb;}
.ui-slider-horizontal .ui-slider-handle {height:14px;width:14px;font-size:.5em;top:-.7em;}
.ui-slider-vertical {width:4px;background:#ddd;border-color:#bbb;}
.ui-slider-vertical .ui-slider-handle {height:14px;width:14px;font-size:.5em;left:-.7em;}
</style>
Now our web control looks much nicer:

Completing the Picture
With that under our belt, let’s tackle the second part of this job, and add a multi-range slider. This will go quickly now that we understand the basic steps.
First, duplicate and rename the slider Custom Function, and give it a new name (like “dual slider”). In our dual slider Custom Function, we’ll add a couple of new parameters to our existing slider code, so we can pass in and later return two data values and field names instead of just one. We’ll also lightly modify the jQuery code, so our code will accept and return these 2 added parameters. We won’t need to modify our CSS or HTML – they’ll work just fine. Back in our layout, we’ll add a second Web Viewer and point it to our dual slider Custom Function. Here’s how things now look:
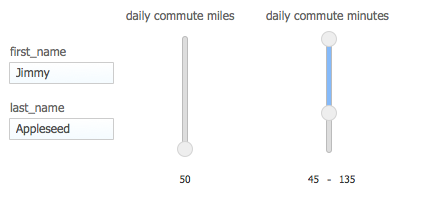
Everything’s working great, and our imaginary users are thrilled! But now they’d like the sliders to be vertical, and they’d like to see live, editable FileMaker native controls interact with our jQuery sliders. No problem! We just lightly modify the JavaScript in our Custom Functions, and fine tune the inline CSS a bit. Easy peezy. Back in our layout, we just resize our Web Viewers for vertical orientation, do a bit of layout adjustment, and we’re done:
Where to Go from Here
Once the initial path is paved, Web 2.0 controls and widgets are simple, expressive, and fun to use in FileMaker 12. You’ll certainly want to do some prep and planning when you’re selecting and setting up a new web control. But once you’ve configured a control as a custom function, you’ll be able to simply drop this web control directly into any Filemaker 12 solution.
This technique opens a doorway to a world of possibilities previously unavailable to the FileMaker development and design communities. For those of us who’ve long been limited to a handful of possible Ui controls, the ability to simply locate, adapt, and integrate virtually any control we can find on Web 2.0 world can be quite a revelation. We suddenly have the ability to implement sophisticated controls and rich design patterns that have until now been beyond our reach. Exciting stuff!
Please check out this demo file: Integrating_Web_Controls.fmp12. Remember that at this time, this technique requires a hosted or shared solution for FileMaker Pro users; the round trip functionality will NOT work if you open locally in FileMaker Pro. It will work with a standalone or hosted file in FileMaker Go (and if you made it this far, you deserve to buy yourself a brand new iPad!)
If you have any feedback, questions, or ideas, I look forward to hearing from you.
Update
April 23 – Thanks to Bruce Robertson for some very helpful Go-specific feedback. I’ve updated the demo file with an additional example of an html5 slider that’s been visually and functionally optimized for Go implementations. Go adds several interesting challenges to implementing this technique gracefully, and I look forward to further feedback and ideas on this front.
- Brian
2 thoughts on “Native Web 2.0 Controls in FileMaker 12 Layouts”