Fun with Button Bars, Part 2: Expert Panel
Have you ever had a FileMaker design conundrum for which you wished you could convene an Expert Panel to help guide you? If you’re thinking “panel of experts,” I can’t help you, but if you’re looking for a more flexible and visually engaging alternative to FileMaker Tab Panels, this combination of a slide-panel control and a button bar just might be your “Expert Panel.”
Here’s the Expert Panel.fmp12 example file. Use this to explore Expert Panel examples, scripts, and functions described below.
Tab Panel Limits | Expert Panel Benefits
Tab Panels, once the cat’s whiskers, have seen little love in the FileMaker themes & styles era. Most of their styling options remain unexposed in the Inspector, and tabs have not been invited to the icon party. Lastly, the active panel is not remembered when you navigate between layouts. Tab panels, in short, are stuck in yesteryear.
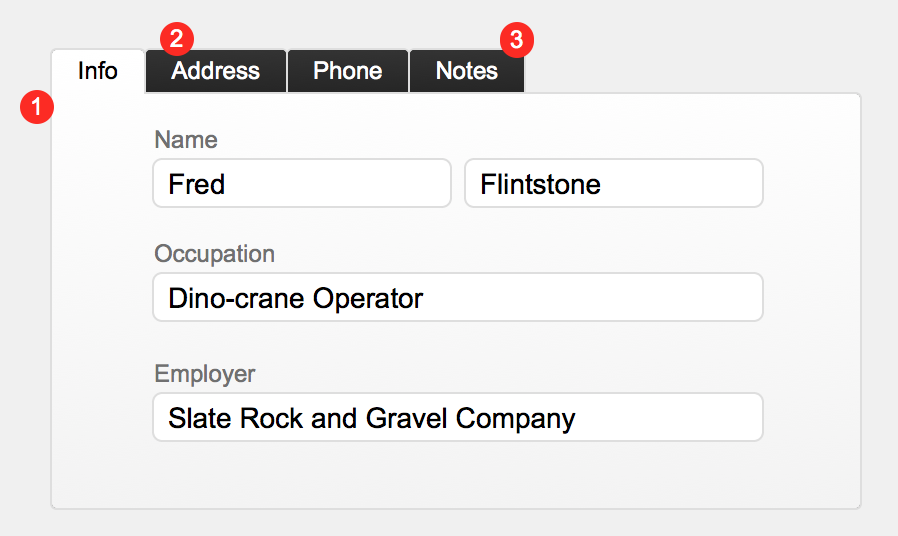
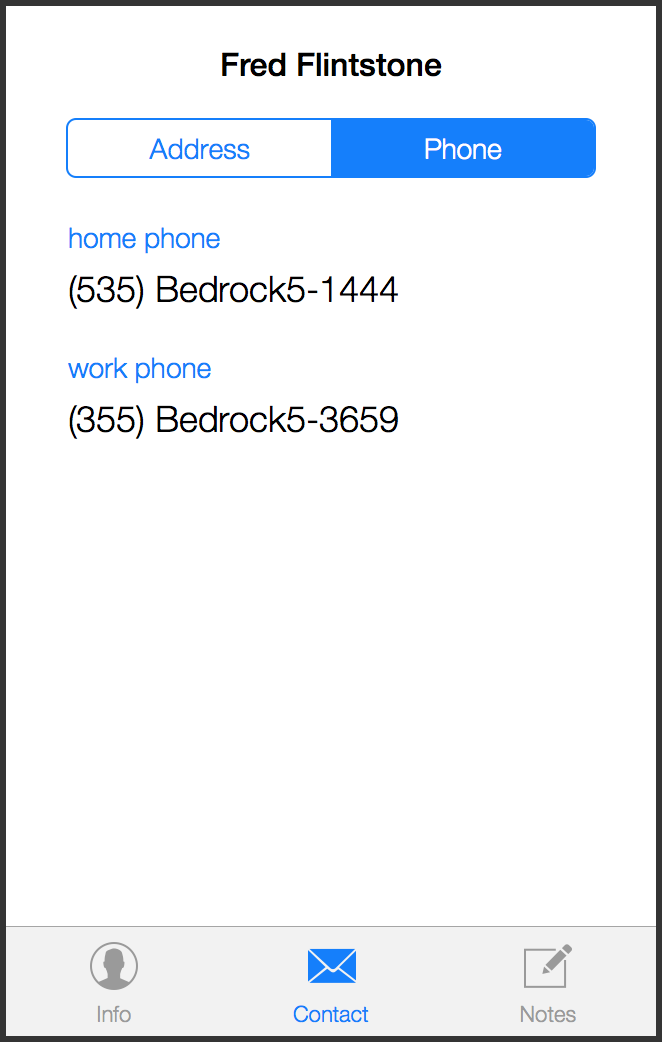
Expert Panel brings us into the 21st Century, providing a visually engaging alternative that remembers active panels when you navigate away from and back to a layout. It accomplishes this through a combination of a slide-panel control for your content, a highly styleable button bar providing navigation among the panels, a custom function to set the active segment, and 3 short scripts. You could probably do away with the Go To Panel script and just set each segment to directly perform the Go to Object step, but the script includes a bit of error handling to help catch setup errors. The other two scripts keep a global variable updated with a file-wide list of currently active panels, and ensure that all of a layout’s active panels are restored when switching layouts.

Benefits of the Expert Panel technique include:
- Unlike tab panels, for which much formatting remains unexposed (as of FileMaker 15), all of the formatting options of button bars are at your disposal. This includes using text and/or icon labels, icon styling responsive to state and amenable to conditional formatting, calculated text labels, and complete control over button borders, segment dividers, etc.
- You can use horizontal or vertical button bars, positioned on any side of the slide panel control.
- Active panels on a layout are saved and restored when navigating between layouts.
- Any number of panel objects in a file, within or across layouts, can be managed by the single set of 3 scripts.
- Panels can be nested; the Restore Active Panels script restores the correct state for nested panels on layout load.
- Multiple windows are supported.
- A user’s active panel list can be saved on file exit and restored on next log in, preserving their state between sessions.
- Individual panels (and associated buttons) can be hidden from groups of users (for example, panels for admins only, see Caveats).
How It Works
Object Naming
The navigation scripts and custom function rely on a naming convention for the button bar, its button segments, and the associated panels in the slide-panel control, although could be adopted to different object naming conventions with a little work (I leave that up to you). Object names are prefixed with object type (“buttonBar.“, “button.“, or “panel.“). Using this scheme minimizes the amount of parameter passing required when setting up the scripts for individual instances of Expert Panel. For buttons and panels, the last part of the fully namespaced object name must be identical between a button and its corresponding panel, but beyond that has no rules. Lastly, while FileMaker allows duplicate object names as long as they’re not on the same layout, Expert Panel does not. Therefore, between the object-type prefix and individual panel designation, all objects in a single Expert Panel unit share a “<panelGroup>” name uniquely identifying it within the file.
Taking an example where the <panelGroup> name is “invoice”, the object names might be:
buttonBar.invoice
button.invoice.lineItems
button.invoice.notices
button.invoice.payments
panel.invoice.lineItems
panel.invoice.notices
panel.invoice.payments
The Scripts
button | Go To Panel ( panelName )
This is the script for the individual button-bar segments, and simply navigates to the panel whose complete object name (e.g., “panel.customerInfo.phone”) is passed in as a parameter. (Note that we use the Six Fried Rice Dictionary functions for passing parameters [# ( ), #P ( ), #Decode ( ), #Encode ( ), #NthValue ( ), and #Value ( )].)
on panel switch | Update Active Panel List
This is set up as an OnPanelSwitch trigger on the slide-panel control. It keeps a single global variable, $$UI.PANELS.ACTIVE, updated with the most recently active panels on every layout, removing the “TriggerCurrentPanel” and adding the “TriggerTargetPanel” on each panel switch. It also refreshes the button bar to force reevaluation of the Active Segment calculation—note that it’s the button bar, not the segments, that gets refreshed here—and exits with a result of “True” to allow the panel switch event to proceed. It is not necessary to pass the button-bar name into the script, as that can be parsed out of the panel object names, thanks to the naming convention employed here.
on layout enter | Restore Active Panels
This is set up as on OnLayoutEnter and OnModeEnter (to handle Layout to Browse mode changes) trigger on the layout. It iterates through the values in $$UI.PANELS.ACTIVE, checks each to see if it’s on the current layout (using the oft-forgotten LayoutObjectNames ( ) function), and, if so, navigates to the panel and refreshes the relevant button bar to force reevaluation of the Active Segment calculation. Active panel names saved in $$UI.PANELS.ACTIVE are prepended with the window name (bracketed with the “‰” character), so that the same Expert Panel unit in different windows can have different active panels. No script result is returned for these post-event script triggers.
Custom Function
PanelNavActiveSegment ( buttonBarName )
On loading a layout or refreshing the button bar, this calculation evaluates to determine the active segment. As there is no immediately apparent way to dynamically pull the button-bar name into the calculation—the Self ( ) function is not allowed here—either the button bar name (e.g., “buttonBar.customerInfo”) or just the <panelGroup> name (“customerInfo”) must be passed in as a parameter. If a match for that <panelGroup> is found in $$UI.PANELS.ACTIVE, then that is returned (prefixed with “button”.) as the active segment name, otherwise, the first match is pulled out of LayoutObjectNames ( ).
Putting It All Together
On initially opening a file, you might choose to load a saved active-layout list, from the user’s last session, into the $$UI.PANELS.ACTIVE variable, but this is optional. Assuming you’re not saving state between sessions, this variable will be undefined on loading the first layout. As you navigate to each layout for the first time, the Restore Active Panels script is triggered, but none of the listed panels (if any) will match objects on the current layout, so no panel navigation will actually take place. In this case, FileMaker’s native behavior is to display the first (left-most) panel in each slide-panel object; this is also the first panel listed by the LayoutObjectNames ( ) function, so its name is correctly returned by the PanelNavActiveSegment ( ) function.
Clicking a button segment will navigate to its associated panel, triggering Update Active Panel List which updates the list in $$UI.PANELS.ACTIVE and refreshes the button bar’s Active segment.
Returning to a layout with one or more panel controls triggers the Restore Active Panels script again, but this time some or all of those might have panels listed in the $$UI.PANELS.ACTIVE variable; if so, those will be made active and their button bars refreshed.
Handling of nested panels relies on the top-to-bottom iterating through the listing in $$UI.PANELS.ACTIVE. When a sub-panel’s button is clicked, its name is added lower in the list than the parent panel’s name. If, however, the user then navigates away from the parent panel, the different parent panel’s name will now appear lower in the list and be evaluated in a later loop iteration. When the layout is subsequently reloaded, the Restore Active Panels script will first navigate to the sub-panel (and thus “display” its parent panel), but the window is frozen so we don’t see this. A subsequent iteration then restores the correct parent panel.
How to Implement
(See the accompanying Expert Panel.fmp12 file for examples, scripts, and functions.)
- Import the custom function PanelNavActiveSegment ( buttonBarName ). Also make sure you have the Six Fried Rice functions in place for passing parameters (1). (If you use the FileMakerStandards (2) functions instead, modify the Go To Panel script accordingly.)
- Import the three scripts.
- For each slide-panel control placed on your layout, add a button bar with an equivalent number of segments. The sky’s the limit when choosing styling for you button bar. Check Please covered some of the considerations in choosing an icon style. Name the button bar, its segments, and the panels as outlined above.
- Set the Active Segment calculation to PanelNavActiveSegment ( buttonBarName ). Set each segment to perform the script button | Go To Panel ( panelName ).
- Set up an OnPanelSwitch trigger on the slide-panel control, pointing to the on panel switch | Update Active Panel List script. Set up OnLayoutEnter and OnModeEnter triggers on the layout, pointing to the on layout enter | Restore Active Panels script.
Caveats
In order to make a panel hidden, say for certain user groups, you actually place the appropriate visibility calculation on the button-bar segment rather than the individual panel. This works fine for any panel that is not the first (left-most) panel in a control. In order to conditionally hide the first panel’s button, you’ll need to make sure that another, visible panel’s name is added to the $$UI.PANELS.ACTIVE variable on startup, to serve as the default panel for that control, for users or conditions that dictate the first panel be hidden. Do the same for nested panels.
Hiding of panels interactively (e.g., visibility that changes as a result of other state changes, field value changes, etc.) introduces more complicated logic to the navigation flow and is not currently supported, although some cases may work. Be sure to test thoroughly, of course.
Lastly, while this technique works smoothly in our testing with a relatively small number of panel controls in a file, there is a possibility that things could slow down a bit with a larger number of panel controls in a file. The Update Active Panels script iterates through the entire listing in $$UI.PANELS.ACTIVE. Until a match is found, the screen is sitting on the default panel. Because the layout loads before the script is triggered, Freeze Window cannot be used to prevent initial display of the layout’s default panels, which could possibly lead to flickering once the variable list grows long, although we have not seen that in our testing. If you encounter this in a file, the solution might be to maintain 2 or more separate global variables for different sets of layouts.
About The Series
When I first saw the FileMaker Button Bar demoed, I was a bit underwhelmed. It’s not that it didn’t look potentially useful to have a new layout object type that keeps a group of buttons permanently joined at the hip, but that’s about all I thought it did. Once I got my hands on button bars, however, I discovered the nuances that make them far more than just a permanent grouping of individual buttons.
The “Fun with Button Bars” series explores some uses I’ve been putting them to. In Part 1, “Check Please,” we used a button bar to provide a modern, highly styleable alternative to native, FileMaker checkbox controls for Boolean (yes/no) fields. This time around, we turned to button bars to do the same for dowdy, native FileMaker tab panels. There are a lot more tricks that button bars have up their sleeves, so stay tuned.
Acknowledgements
Thanks to Vince Menanno, Jay Gonzales, and Brian Schick for their many suggestions that helped improve this post and demo file, particularly Brian’s suggestion that the technique should be made multiple window-safe, and to Lon Cook for compositing the “before and after” image.
Endnotes
(1) The core set of functions is included in the accompanying file. For reference, see “FileMaker – Passing Multiple Script Parameters,” “Passing Multiple Parameters to Scripts – Advanced,” and “FileMaker Dictionary Functions.”
Hello,
Hope all is well. I need help in implementing the technique.
I think I copied all the custom functions and scripts but when I tried to click my buttons it showing me an error 116, the panel is missing.
Please help me point out to what Im missing.
Thanks in advance.
thong
Hi Thong,
Hard to diagnose without more detail, but here are a couple thoughts: First, make sure you follow the naming convention for panels, button bars, and button-bar segments carefully, especially the part about matching button-bar segments to panels 1-for-1. Second, while you mentioned that you copied all the custom functions into your file (including the parameter-handling functions, I presume?), did you copy those in before copying in the scripts? If you copy the scripts first, some critical steps will get commented out and will need to be fixed manually after the functions are in place. Lastly, I’d suggest walking through with the script debugger on; that will likely show you just where things went astray.
Hope this helps!
Best,
Mark
P.S. One additional thought: Make sure that the panel name is passed into the Go To Panel script correctly, using the # ( ) function. If not familiar with the Six Fried Rice parameter-handling technique, you can check their original blog posts linked in the Endnotes, and then look at the Expert Panel demo file to see the exact implementation used here.
Hi Mark,
I couldn’t find any link to the demo file. What am I missing?
Regards,
John
Hi John,
Download link is in the second paragraph of post. Hope you enjoy it.
Hi Shawn,
Thanks for the kind comments.
You’ve hit on a caveat that should have been mentioned in the post. Since we capture just window name, the windows do have to be named distinctly.
-Mark
Mark,
Thanks for the clarification. I wish there were some kind of unique internal window name/ID that could be referenced, like there is with layouts. That would solve so many things.
Thanks again!
-Shawn
Awesome demo, guys!
Loving the possibilities, and how modular you made it.
One thing I am wondering about with the multiple window support: FileMaker allows 2 windows to be named the same thing. If you just open a new window, it will append a ” – 2″ after the name, but you can have a scripted process that opens a new window and gives a new window the same name as an existing window. Does Expert Panels multi-window support still work, or will it get confused in that situation? If it just uses the window name bracketed with the “‰” character, how does it tell the 2 windows apart?
Thanks, and keep up the great work!
-Shawn