Although setting up your AWS account and creating a new FileMaker Cloud instance is a fairly easy process, it does have dozens of steps, and a few places where you could easily take a wrong turn. On this post we’ll go through each step in the configuration of your Amazon AWS account and requesting your first server.
Before we can start with the actual deployment, a few things need to be either verified or created, depending on the state of your Amazon account and its AWS status.
Amazon Account Creation
You’ll of course need an Amazon account with AWS access enabled. If you already have an Amazon account, and you don’t mind mixing store and AWS access, you may skip this section.
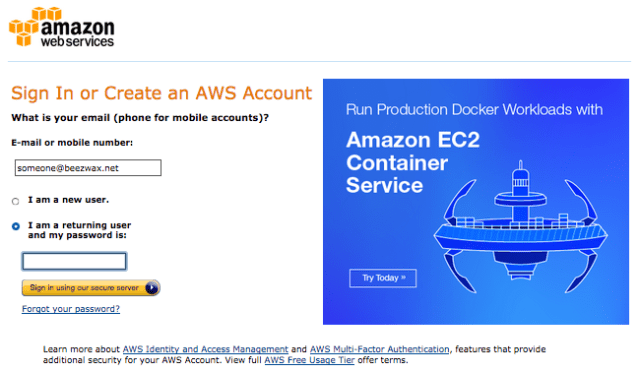
You can start the process of creating an Amazon account with AWS access by going to https://aws.amazon.com/free. Click any of the three different Sign In to the Console buttons.
You’ll probably want to use an email that is not already associated with the Amazon online store. If that’s the case, select I am a new user and enter a valid email address and a strong password. Click Sign in using our secure server.
A downside to creating a new account for AWS access is that you’ll have to go through the full sign-up procedure, which requires entering company information, credit card information, and entering a PIN over the phone. It may take several hours for your AWS access to complete.
You’ll be asked for more information about your account.
Securely save your credentials, as any servers or data you store will be vulnerable if these are disclosed. Also, you may want to consider enabling two-factor authentication later.
We enter some further contact information, and accept the AWS Customer Agreement.
We enter a credit card that can be used for AWS usage. But there are no charges until we actually start using the service.
To complete the verification process you’ll need to enter a phone number you can be reached at.
You should soon receive a call. Enter the PIN number displayed on your screen into your phone.
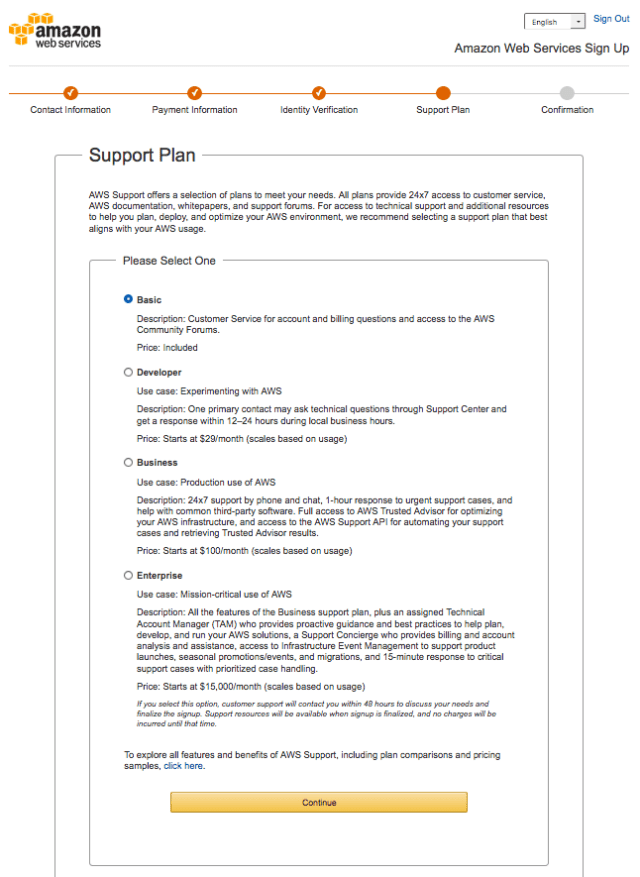
Verification process is now done. Click the Continue to select your Support Plan button.
Choose your support level. Using Basic should be fine for now.
After clicking Continue above you should next see the AWS welcome screen. Click Sign in to the Console or Complete Sign Up to actually log in.
It may still take several hours for your full AWS access to be approved. However, some accounts get approved quickly.
Configuring AWS
Log back in to AWS or make sure you are at the top-level of the dashboard if already logged in.
After entering your credentials you should be at the top level of the dashboard.
Setting Your AWS Region
There are two regions you can currently deploy FileMaker Cloud servers: US West (Oregon) and US East (N. Viriginia). Generally, you’ll be picking the location closest to your users. To verify the following information, we need to first verify that we have the needed region selected.
Older AWS accounts may see a different version of the dashboard, but the Region pulldown will still be on the top-right. Here, the US West (Oregon) region was previously selected.
Create Your Key Pair
You’ll need at least one EC2 key pair for the servers you create in a region. To create a new key pair, first navigate to the EC2 section.
In the left navigation pane, under Network and Security, choose Key Pairs. Click the Create Key Pair button at top. Enter a name for reference. This key can be used for a single server, but you might possibly also be using this for an entire group of servers, so name accordingly.
A text file should download with the key. Save in a safe place. Although you won’t need this key pair typically with FileMaker Cloud servers, it would be unsafe for others to gain access to this, and in some cases, such as using SSH access to your server, you may want need this later.
Verify You Have a VPC
For each region you use, you’ll need a default VPC. For newer accounts this typically won’t be an issue, but older accounts may of not been provisioned with this.
To verify this, you’ll need to first locate the VPC Dashboard. Probably the easiest way to get to this is to search for its link in the Search services field. Click on the displayed VPC link.
Now click on the blue VPC link near middle of page.
You should now see a list of any VPCs defined for this region.
If none of the VPCs listed have Yes under the Default VPC you’ll need to contact Amazon support to create a default VPC for this zone in your account. This may take a day or so if using the free AWS support.
Request A New Server
With all of that out of the way, we can now start an actual request for a FileMaker Cloud server.
In another browser window, log in to the AWS Marketplace at https://aws.amazon.com/marketplace/.
Get a listing of the FileMaker Cloud options available. For simplicity’s sake, we’ll be choosing the FileMaker Cloud (5 users) option here.
Review the information, toggle between the two regions and the Annual or Hourly software pricing to see how this may affect your costs. All of the changes you make here are purely informational.
Since this is probably the first time you’ve done this, you’ll need to first accept the licensing terms, so click the Accept Software Terms button on top-right.
We have not started your instance yet. However, your 15 day free trial for the software does commence now. Click the Return to Product Page button to go back to our original request page.
We’ve come back to nearly the same page, except for the now missing Accept Software Terms button. Verify whether that hourly or annual software licensing is still set as you wanted, and that you are using the desired region. Other settings, such as the instance size will be set later.
We can now start the actual request.
There’s one particularly misleading aspect to this screen however: do not use the Launch with EC2 Console buttons. Instead, click the Usage Instructions button to proceed.
Down at the bottom are the two points of interest — click one of the two links at the bottom for the region you want to deploy your server at. We’ll be asked later what size of instance, etc.
This screen you’ll normally leave as is. Simply click the Next button.
Here we can set some optional key value pairs, but unlikely to be useful for those with a small number of instances. We’ll also be leaving the IAM Role and Advanced settings at their defaults. Click Next.
Here is a summary of the instance request. Verify that you have an email and key name set, and check the acknowledgement of this creating IAM resources. Click Create when ready.
You’ll next land on a progress page of sorts. Most of these messages are a bit cryptic, but you’ll get a general idea of the instance’s creation status.
If we click on it to get more detail, a completed instance shows something like this:
At this point, the AWS portion of the deployment is complete, and you should receive an email a subject of Welcome to FileMaker Cloud.
In your email, click on the link on the line Enter this information here.
You may be wondering about that first field — where do I find my Amazon account number? If you go back to the AWS dashboard, click on the drop-down on the top-right for your account, and then select My Account. It will be the first thing listed under Account Settings.
The hostname must be unique. If someone has already used the same one you are out of luck. This is also the name that will be used on the SSL certificate, and the server name that will show up when users connect.
While the deployment completes, which will take several minutes, we’ll see this progress screen.
When it completes, we’ll land on the Admin Console log in page.
And finally, we’ve now logged in to our system.


One thought on “Step-by-step for FileMaker Cloud”